Overview
NoteAWC-SC is supported with TQ5403, TQ5403e, and TQm5403 firmware version 6.0.1-1.x or later.
AWC-SC (AWC-Smart Connect)
AWC-SC (AWC-Smart Connect) is our original solution that streamlines the introduction and expansion of wireless networks through autonomous wireless connection between APs.In a wireless network using AWC-SC (a Smart Connect network), APs are connected wirelessly like in a WDS (wireless distribution system). This means there is no need to connect to a wired LAN, except for the root AP at the top level.
In WDS, when connecting a satellite AP by wireless, it is necessary to preconfigure the AP in advance. However, with AWC-SC, if you have a DHCP server that can communicate with the subnet where the satellite AP will be connected, and the MAC address of the satellite AP is registered in the AWC plug-in, a factory default AP can join the Smart Connect network by simply unboxing, installing, and powering on the AP.
In a Smart Connect network, the wireless connection path between APs changes dynamically according to the surrounding conditions. This means communication is performed on the optimal path, while also providing a redundant communication path.
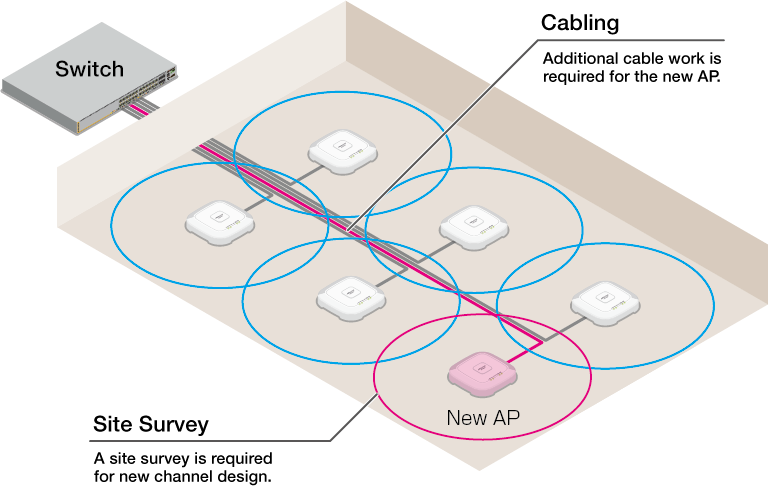
◼ Conventional Wireless Network
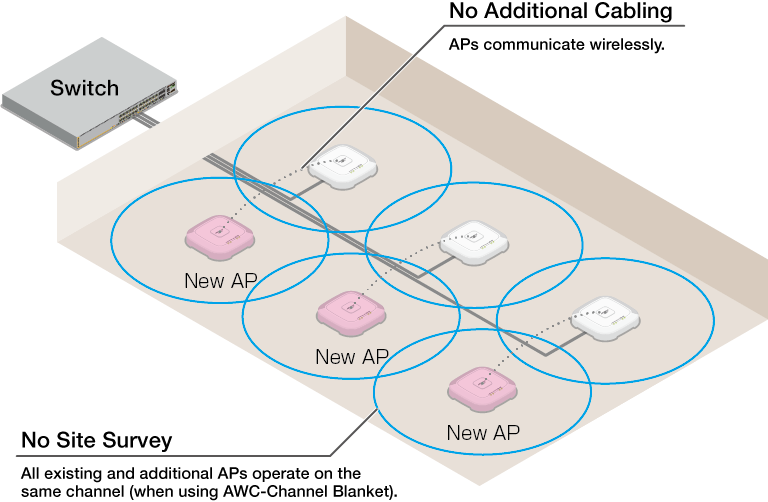
◼ Smart Connect Network
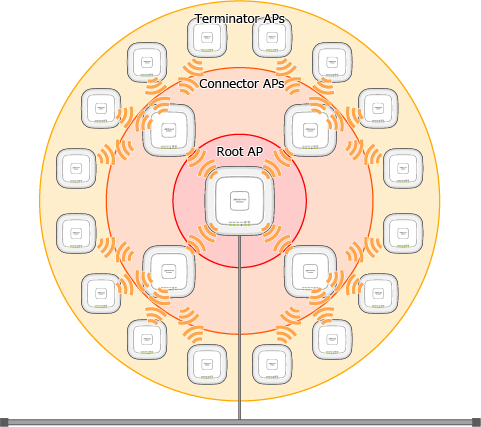
Roles of Wireless APs
In AWC-SC, the roles of wireless APs are broadly classified as follows:- Root AP
A wireless AP located at the most upstream position of a Smart Connect network.
It has a connection to the wired network, and bridges packets between the wirelessly-connected Satellite APs and the wired network.
It has the same role as the Root AP in WDS, but in AWC-SC there can be multiple Root APs as well as Satellite APs (Connector APs and Terminator APs).
- Satellite AP
A downstream wireless AP that is only connected wirelessly to other APs in a Smart Connect network.
The wireless connection paths between APs are automatically constructed and changed according to the surrounding conditions.
- Connector AP
A wireless AP located in the middle of the AWC-SC's multi-tier wireless connection.
It bridges packets from the Root AP to the Terminator AP and clients, and from the Terminator AP and clients to the Root AP.
Bridging by Connector AP is supported only once (2 hops from Root AP-Connector AP-Terminator AP.)
- Terminator AP
A wireless AP located on the edge of the AWC's multi-tier wireless connection.
It bridges packets between wireless clients and the upstream devices (Root APs and Connector APs).
- Connector AP
This means that at most, up to 4 Connector APs and 16 Terminator APs can be connected to a single Root AP.
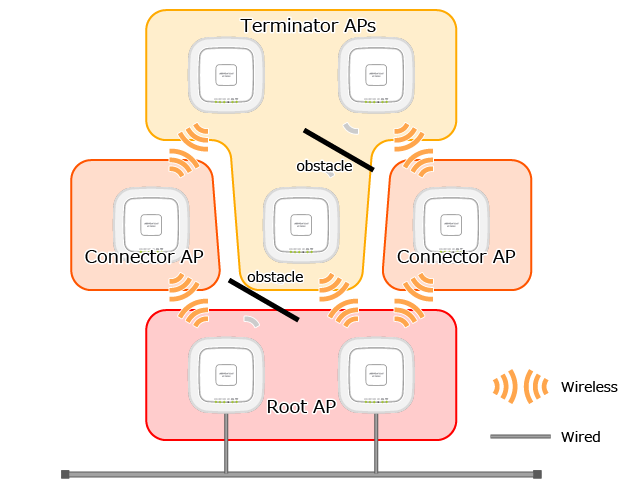
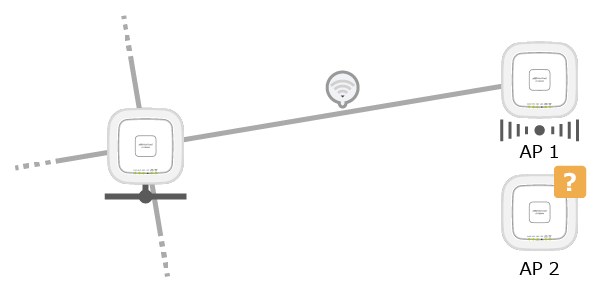
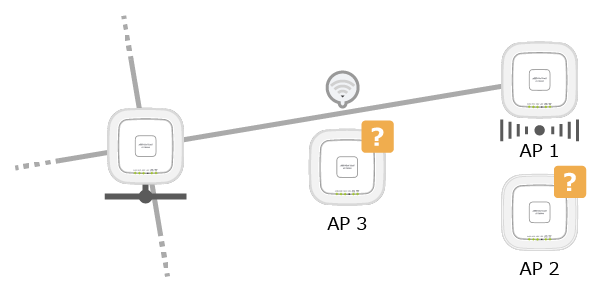
If there are not enough Root APs, the path may not be optimal depending on the order in which the satellite APs are installed.
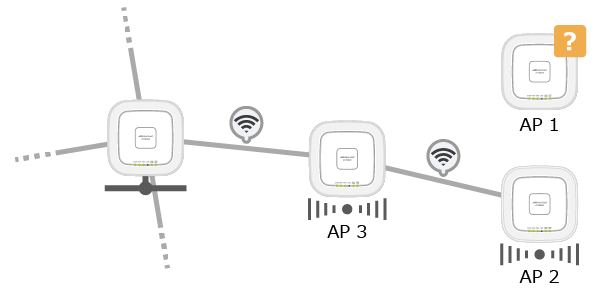
For example, if the communication state between the Root AP and the Satellite AP (AP1) is stable, but the radio wave is very weak, AP1 is unable to be a Connector AP and accept a Smart Connect connection request from another wireless AP (AP2).
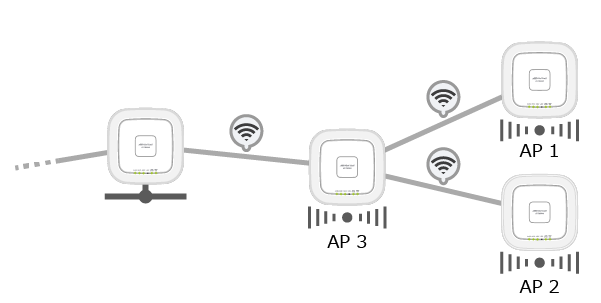
Assuming the Root AP has the capacity to accept Satellites, the Root AP and AP3 will establish a Smart Connect link with a strong radio wave. Next, by optimizing the connection route, AP3 will bridge between AP1 and AP2 to the Root AP, acting as a Connector AP.
NoteWhen installing Satellite APs, pay attention to the number and distance of adjacent wireless APs.
If a large number of Satellite APs are arranged so that the distance between wireless APs becomes too short, the throughput of the entire Smart Connect network may be significantly reduced.
Configured VAPs
AWC-SC uses two VAPs as an alternative to wired networks between wireless APs.- SC Management VAP
This is a VAP used to communicate between wireless APs in a wireless network established with AWC-SC.
It operates by overwriting VAP1 of the AP Profile in the radio band selected as "Frequency" in the SC Profile.
The SSID can be set arbitrarily, but will not be broadcast.
The encryption method is fixed to "WPA2 Personal", and the security key (WPA2-PSK) can be set arbitrarily.
- SC Provisioning VAP
This is a VAP that allows factory default APs to find a Root AP and join to the Smart Connect network.
It operates by overwriting VAP2 of the AP Profile in the radio band selected as "Frequency" in the SC Profile.
The SSID is fixed to "sc-initial-provisioning" and will not be broadcast.
The encryption method is fixed to "WPA2 Personal". The Security Key (WPA2-PSK) is hidden and can not be changed.
NoteIn the radio band used by AWC-SC, the other VAPs will be disabled automatically.
Required Licenses
The following licenses are required to use AWC-SC functions on AWC Plug-in.- Vista Manager EX License
- Wireless LAN Controller License (10 APs)
- Wireless Smart Connect License (10 APs)
In addition, when using AWC-CB together with AWC-SC, you may need both Wireless Smart Connect licenses and Wireless Channel Blanket licenses that satisfy the number of the APs that are operated in both AWC-SC and AWC-CB.
| Non-SC (Conventional) | Smart Connect | Total | Numbers of Licenses | |||
|---|---|---|---|---|---|---|
| Multi-channel | AWC-CB | Multi-channel | AWC-CB | |||
| Number of APs | 16 | 16 | 16 | 16 | 64 | |
| Vista Manager EX License | 1 | 1 | 1 | |||
| Wireless LAN Controller License (10 APs) | 16 | 16 | 16 | 16 | 64 | 7 units (Max 70 APs) |
| Wireless Channel Blanket License (10 APs) | 16 | 16 | 32 | 4 units (Max 40 APs) | ||
| Wireless Smart Connect License (10 APs) | 16 | 16 | 32 | 4 units (Max 40 APs) | ||
NoteFor Wireless Smart Connect licenses, please prepare the number of licenses that meet the total number of Root and Satellite APs.
Supported Wireless APs
The following AP models support AWC-SC.- TQ Series:
TQ5403, TQ5403e, TQm5403
Firmware Version 6.0.1-1.1
NoteTQm5403 is supported as a Terminator AP only.
Support Limits
The number of Smart Connect APs per Root AP are as follows:- Smart Connect APs per Root/Connector AP: Max 4 APs
- Smart Connect hops: Max 2 hops
- Number of Satellite APs per Root AP: Max 20 APs
- Connector APs: Max 4 APs
- Terminator APs: Max 16 APs (4 per Connector AP)
- Connector APs: Max 4 APs
Smart Connect Configuration Process
To build a hybrid wireless system, follow the steps below.Configuring Smart Connect on Wired AP
To register the wireless AP to the AWC Plug-in, the MAC and IP Addresses of the AP are needed.For satellite APs that connect only by wireless communication, please prepare an AC adapter separately, as the UTP cable is unplugged after the setup is complete.
- Configure an IP address via the AP's web interface.
Connect the wireless AP to the PC with a cable directly, or via a switch, and set a fixed IP address for the AP from the AP's web interface.
Note
The Root AP can also obtain a static registered IP address from the DHCP server.
- Access the management web interface of the AWC Plug-in.
- Register the AP on the AP Settings screen.
Specify the corresponding Management Group, MAC Address, and IP Address of the AP.
- Next, create the AP Profiles.
On the AP Profile screen, create an AP Profile that will be used for communication between wireless APs managed by AWC-SC and wireless clients.
For communication between APs managed by AWC-SC, the SC Profile created in the later steps will be used. In this SC Profile, two dedicated VAPs will be created on the wireless band that AWC-SC uses.
Different radio bands are used for normal client service communications.
- Create CB Profile as required.
Create a channel blanket to apply the CB Profile to, and select the wireless APs that belong to it.
Refer to Create/Edit/Delete CB Profile and Create Channel Blanket for more details.
When creating a CB VAP, specify a VAP number for the CB VAP that is different from the wireless band used for Smart Connect, avoiding the VAP number of the VAP used as a multichannel wireless network created in Step 4.
- Create an SC Profile.
On the SC Profile screen, create an SC Profile for communication between the APs under the control of AWC-SC.
Only one SC Profile can be created for each Management Group. If you create multiple Smart Connect networks, Management Groups must be separated for each network.
Specify the management group to which the SC Profile applies, and the SC management SSID for communication between wireless APs. You can also set the wireless band and channel to use here.
Refer to Configure SC Profile for more details.
- Select the wireless APs to be managed on the Smart Connect Network.
In the AP list of the SC Profile, all APs belonging to the same management group specified as the target of the SC Profile are displayed in a list. Select "Enable" or "Disable" for Smart Connect for each AP.
Note
Also, select the wireless AP to be set as the "Root AP" that is the bridge with the wired network.If there are APs that do not support AWC-SC in the same Management Group, set Smart Connect to "Disable". When Smart Connect is set to "Enable" for an AP that does not support AWC-SC, some wireless settings that overlap with the SC Profile, such as the channel used, are ignored.
- Assign the AP Profile to the APs registered in Step 3.
- Connect the wireless APs to a switch within the management range of the Smart Connect network (in the management group) with UTP cables.
- Turn on the APs.
At this point, the wireless AP that you intend to use as a root AP can be powered either by PoE or by a power adapter.
Wireless APs that you intend to operate as satellite APs should be powered using the power adapters, as you will unplug the UTP cables in a later step.
In addition to the AP Profile assigned in Step 8, the SC Profile, and the CB Profile if necessary, will be applied to the APs.
Once the configuration is complete, the Management Status on the AP Settings screen will change to "Managed".
- If the channel setting is set to "Automatic" in the SC Profile, on the AWC Settings screen, check the checkbox for the Management Group to which the wireless APs belong and click the " Calculate and Apply" button at the top right of the screen.
By performing and applying the AWC calculation, the channels used in the radio band for the AP in AWC-SC are automatically set to the identical number.
- Leave the wireless AP that you set as the Root AP in Step 7 connected by UTP cable. Disconnect the UTP cables of the other wireless APs intended to operate as Satellite APs.
The Satellite APs will communicate with the Connector/Root APs in the upper level via the SC management SSID.
Configuring Smart Connect Wirelessly
You can add a factory default AP to your Smart Connect network via wireless communication between the APs.Smart Connect allows you to expand the wireless network without time-intensive processes like cable work.
Since the factory default AP has no IP address assigned, it is necessary to assign an IP address by a DHCP server via the Root AP.
NoteIn order to configure and manage a Satellite AP by using OTA (Over The Air), it is necessary that the AP model supports the Smart Connect feature, runs the firmware version 6.0.1-1-1 or later, and is in factory default status.
Additionally, when using OTA to add the satellite AP right after a firmware upgrade, log on to the AP and perform an initialization before adding it under management.
Refer to the firmware reference manual of the AP for the initialization procedure.
NoteDo not turn on the wireless AP until instructed to do so.
- On the DHCP server on the wired network, specify the IP address of the AWC plug-in and the monitoring port number (65437) as DHCP option 43 (vendor specific information).
This setting is required only once for the DHCP pool.
The format of the AWC server information passed as an optional setting value is as follows:
The following setting shows an example in which the IP address of the AWC Plug-in is set to "192.168.1.250":
As a result, if you are running the DHCP service on an AlliedWare Plus device and you have installed the AWC Plug-in at IP address "192.168.1.250", you will need to add the following settings to the relevant DHCP pool. Here, it is assumed that the DHCP option name to be set is "awcserver" and the DHCP pool name is "pool1".Table 2: DHCP option 43 format
Field name Field length Description Variable / Fixed Setting Example Content Hexadecimal value Header 1 octet Information header to be passed as vendor-specific information. Fixed 207 CF Option 1 type 1 octet Indicates that the following field is the IP address of the AWC Plug-in. Fixed 1 01 Option 1 value 4 octets Specify the IPv4 address of the AWC Plug-in. Variable 192.168.1.250 C0A801FA Option 2 type 1 octet Indicates that the following field is the monitoring port number of the AWC Plug-in. Fixed 2 02 Option 2 value 2 octets Specify the monitoring port number of the AWC Plug-in. Fixed 65437 FF9D
awplus#configure terminal
 awplus(config)#ip dhcp option 43 name awcserver hex
 awplus(config)#ip dhcp pool pool1
 awplus(dhcp-config)#option awcserver cf01c0a801fa02ff9d
- On the DHCP server, set a static IP address for the MAC address of the Root AP.
- Register the AP on the AP Settings screen.
Specify the Management Group and MAC address of the corresponding wireless AP.
Select "DHCP" for IP Address.
- Create an AP Profile as required.
- If necessary, select or create a channel blanket to which the CB Profile is applied, and add the registered AP to it.
Refer to Create/Edit/Delete CB Profile and Create Channel Blanket for more details.
- Check that the new wireless APs are displayed correctly on the SC Profile screen.
In the AP list of the SC Profile, all APs belonging to the same management group specified as the target of the SC Profile are displayed in a list.
For newly registered APs, Smart Connect is automatically set to "Enable".
Since the wireless AP is not connected with a UTP cable, it cannot operate as a Root AP that is a bridge to a wired network, so keep the "Root" checkbox unchecked.
- Assign the AP Profile to the APs registered in Step 3.
On AP Settings screen, assign the AP Profile. When the AP Profile is assigned, the Management Status of the AP will change to "Searching".
- Referring to Configuring Smart Connect on Wired AP, add the Root AP under management.
- Power on the factory default AP that is used as a Satellite AP, using the AC adapter.
The factory default AP automatically starts the process of joining under AWC-SC management once it has completed booting.
- The new wireless AP scans each channel sequentially, searches for the SC initial setting VAP beacon sent by surrounding wireless APs, and tries to connect.
At this time, on the wireless AP, the WIRELESS LAN LED (2.4GHz, 5GHz 1, and 5GHz 2) corresponding to the wireless band used for the scanning beacon flashes slowly (once per second).
Note
The AP will send signals also in the channels in the DFS band (5GHz W53/W56), however, these channels can not be used for Smart Connect.
- When a new wireless AP connects to the SC initial setting VAP sent by the wireless AP managed by AWC-SC, the wireless AP managed by AWC-SC assigns a temporary IP address to the new wireless AP.
At the same time, the MAC address of the new wireless AP is checked against the MAC address list of the candidate wireless APs to be managed. When the AWC Plug-in permits joining, the information of the SC management VAP defined in the SC Profile is sent to the new wireless AP via the APs managed by the AWC-SC, and allows it to connect to the Smart Connect network. After the connection by AWC-SC is established, the new AP obtains the IP address and DHCP option 43 (vendor specific information) from the actual DHCP server, and refers to the DHCP option information to send a request to join the AWC server.
When a new wireless AP joins, the AWC plug-in associates the registered MAC address with the IP address and transfers the assigned AP, CB, and SC Profiles to the new wireless AP.
During this time, the WIRELESS LAN LED (2.4GHz, 5GHz 1, or 5GHz 2) corresponding to the wireless band used for communication with the Root AP / Connector AP managed by AWC-SC blinks rapidly (about 4 times per second).
- When the transfer of the Profiles is completed, the AP disconnects the wireless connection and applies the settings.
When the configuration is completed, the management status on the AP Settings screen changes to "Managed".
- The new wireless AP scans each channel sequentially, searches for the SC initial setting VAP beacon sent by surrounding wireless APs, and tries to connect.
Notes
Please note the following points when you use AWC-Smart Connect.- Radio 1 (2.4GHz band) and Radio 2 (5GHz band W52) can be used for AWC-SC connection. Radio 2 (5GHz band W53) and Radio 3 (5GHz band W56), which are DFS detection target channels, cannot be used.
- In the wireless band that is used by Smart Connect, the VAP for SC communication occupies VAP1.
- When Auto Discovery is enabled, the SSID "sc-initial-provisioning" for connecting the factory default wireless AP to the Smart Connect network occupies VAP2 in the same wireless band. When Auto Discovery is disabled, "sc-initial-provisioning" will not be set for VAP2. In this case, VAP2 will be disabled.
- If the Selection Type of channel is set to "Auto" in the SC Profile, the wireless channel used by the SC management SSID of the wireless APs belonging to the Smart Connect network must be set to the identical channel by performing and applying the AWC calculation.
When a wireless AP to which the relevant SC Profile is to be applied to is added to the management for the first time via a wired connection (or when applying the settings), please calculate and apply the AWC function after adding it to the management.
- When using AWC-SC Auto Discovery, it cannot be used in a network configuration where the wireless AP receives packets with the network address 172.31.0.0/24.
This address range is used only for wireless communication when Auto Discovery is enabled.
When using AMF on the AlliedWare Plus switch, packets using this network address will not be sent to the AP, so this restriction does not apply.
- On the wireless band that is used by AWC-SC, VAPs other than VAP1 and VAP2 described above are all disabled. Creating a VAP for client service on the wireless band that is used by AWC-SC is not supported.
- Assigning the VLAN ID that is not assigned for client service on the Root AP to a Satellite's client service is not supported.
- The combination of the Smart Connect feature and dynamic VLAN is not supported. Dynamic VLAN will be automatically disabled, even if enabled.
- The combination of the Smart Connect feature and WDS is not supported.
- The combination of the Smart Connect feature and the AMF Guest Device feature is not supported.
- When you use the Smart Connect feature, DHCP Snooping on the switch port that connects the AP is not supported.
- The combination of the Smart Connect feature and Link Aggregation is not supported.
- In AWC-SC, a Satellite AP will automatically select a destination AP to connect to. The connection destination will be changed according to the signal conditions. You cannot set a static connection destination.
- The maximum number of hops for AWC-SC is up to 2. Depending on the radio condition, a Satellite AP may not be able to connect another hop further from Root AP.
- The combination of the Smart Connect feature and the Management VLAN Tag on APs is not supported. Do not set Management VLAN Tag to "Enable".
02 Nov 2021 16:59