Overview
In this section, we will show you basic steps to configure an AWC-SC (AWC-Smart Connect) wireless network in a quick tour style.
NoteAWC-SC is supported by AT-TQ5403/5403e, AT-TQm5403 firmware version 6.0.1-1.x or later, and AT-TQ6602 firmware version 7.0.2-0.1 or later.
Note that in this version, the AT-TQ6602 cannot coexist with the AT-TQ5403/5403e or AT-TQm5403 on the same Smart Connect network.
For simplicity, we assume that we are going to create the following network.
- The AT-TQ5403 wireless APs are used this time.
- There is one floor (3F).
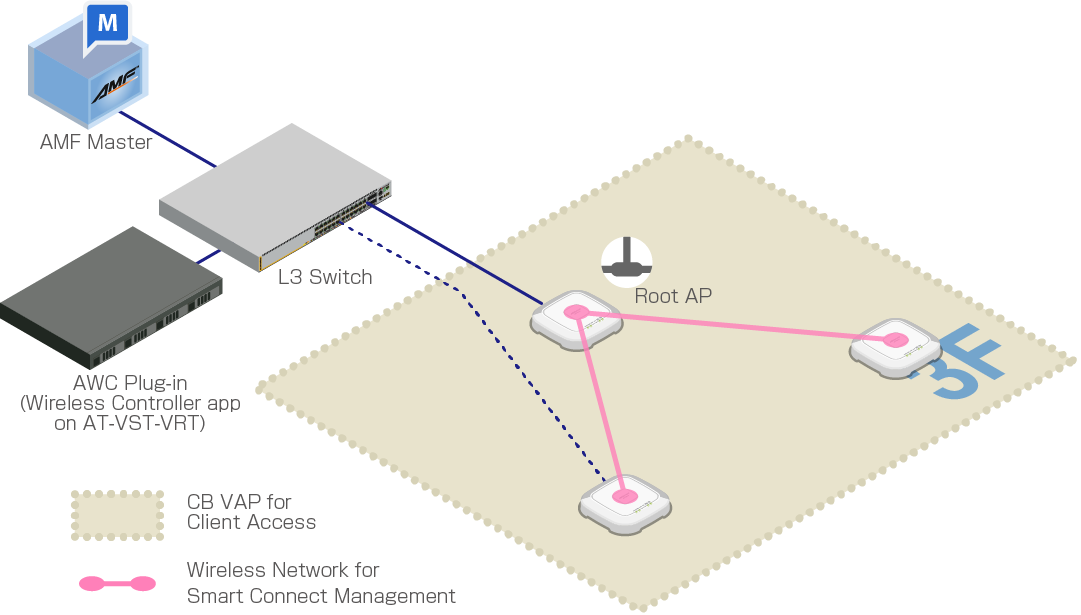
- We will construct an AWC-SC network with 5 APs, 1 Root AP, and 4 Satellite APs.
Satellite APs will connect to the single Root AP and act as Terminator APs, which do not bridge the connection between the Root AP and others.
- A multi-channel VAP will be used for usual client service communication.
Channel Blanket Network will not be provided.
| Device Name | Device Name | IP Address | MAC Address | Role |
|---|---|---|---|---|
| Wireless Controller application container | 192.168.1.250 | AWC Plug-in | ||
| AlliedWare Plus Layer 3 Switch | 192.168.1.1 | PoE+ power sourcing, DHCP/NTP server | ||
| TQ5403 |
TQ5403-SC-1 |
192.168.1.230 |
00:00:5E:00:53:00 |
Root AP (wired) Powered by PoE+ |
| TQ5403-SC-2 |
192.168.1.231 |
00:00:5E:00:53:20 |
Satellite AP (wired) Powered by an AC Adapter |
|
| TQ5403-SC-3 |
192.168.1.232 |
00:00:5E:00:53:40 |
Satellite AP (wireless) Powered by AC Adapters |
|
| TQ5403-SC-4 | 192.168.1.233 | 00:00:5E:00:53:60 | ||
| TQ5403-SC-5 | 192.168.1.234 | 00:00:5E:00:53:80 | ||
Based on this, the following wireless network will be created.
| Radio | VAP | AP Profile | SC Profile | Overview |
|---|---|---|---|---|
| VAP1 | Wireless network for empolyees | |||
| VAP1 | Default-1 (default) |
For SC Management | ||
| VAP2 | (default) |
For bootstrapping factory default APs (Automatic setting) | ||
| VAP1 | Default-1 (default) |
Disabled |
When applying the AP Profile and SC Profile, if there are specific configuration items for either AP or SC Profiles, those items will be applied to the AP as they are. If there are conflicting configuration items between the Profiles, the settings of the SC Profile take precedence over the AP Profile.
Therefore, VAP "Default-1" set by default on Radio 2 in the AP Profile is not used, "SC-Default-cVVGG" set in the SC Profile overrides the VAP.
In addition, for the VAP2 of the radio band declared to be used in the SC Profile, the SSID "sc-initial-provisioning" set by deafult for the factory default AP connection is used.
This is the same SSID defined for each radio band of the factory default AP, and is used for listening to the beacon of the factory default AP.
NoteIn the radio band used by AWC-SC, the other VAPs will be disabled automatically.
Configure External IP Address for AWC Plug-in
When using the AWC Plug-in on VST-VRT to manage wireless APs, please first register the IP address of the Wireless Controller application (AWC Plug-in) on the VST-VRT as an external IP address in the System Setting screen of the AWC Plug-in.If you have already configured the external IP address of the AWC plug-in correctly, this step is not necessary.
- Click on System Setting from the AWC Plug-in menu.
The "System Setting" screen appears.
- In the "External IP Address for AWC plug-in" under "IP Address Settings", select the IP address of the Wireless Controller application (i.e., AWC Plug-in) on the VST-VRT from the dropdown list.
For this configuration example, select "192.168.1.250".
- Click on the "Save" button to the right side of "IP Address Settings".
21 Oct 2022 11:59