Create AP Profile
Let's create an AP Profile for the cellular wireless network.
When you configure a channel blanket, the AP profile defines the overall configuration of the APs while the CB profile configures a specific channel blanket. To manage APs for channel blanket, you always have to apply an AP profile to the APs.
When both an AP profile and a CB profile are applied to an AP, the CB profile has precedence over the AP profile and overwrites the AP configuration with its content.
We are going to use a single AP Profile for all APs because a multi-channel network will cover both 1F and 2F as you can see in the following table (see cells filled with red).
| Radio | TQ5403-xF-1 | TQ5403-xF-2 | TQ5403-xF-3 | Overview | |
|---|---|---|---|---|---|
| 2F | Radio 2 | Multi-channel VAP for employees' PCs | |||
| Radio 1 | AWC-CB VAP for employees' mobile devices | ||||
| 1F | Radio 2 | Multi-channel VAP for employees' PCs | |||
| Radio 1 | AWC-CB VAP for employees' mobile devices | ||||
| AWC-CB VAP for guests | |||||
AP Profile for TQ5403
Let's create an AP Profile for all TQ5403 APs.- Select "Wireless Configuration" > "AP Profile" from the AWC Plug-in menu.
The AP Profile list screen will appear.
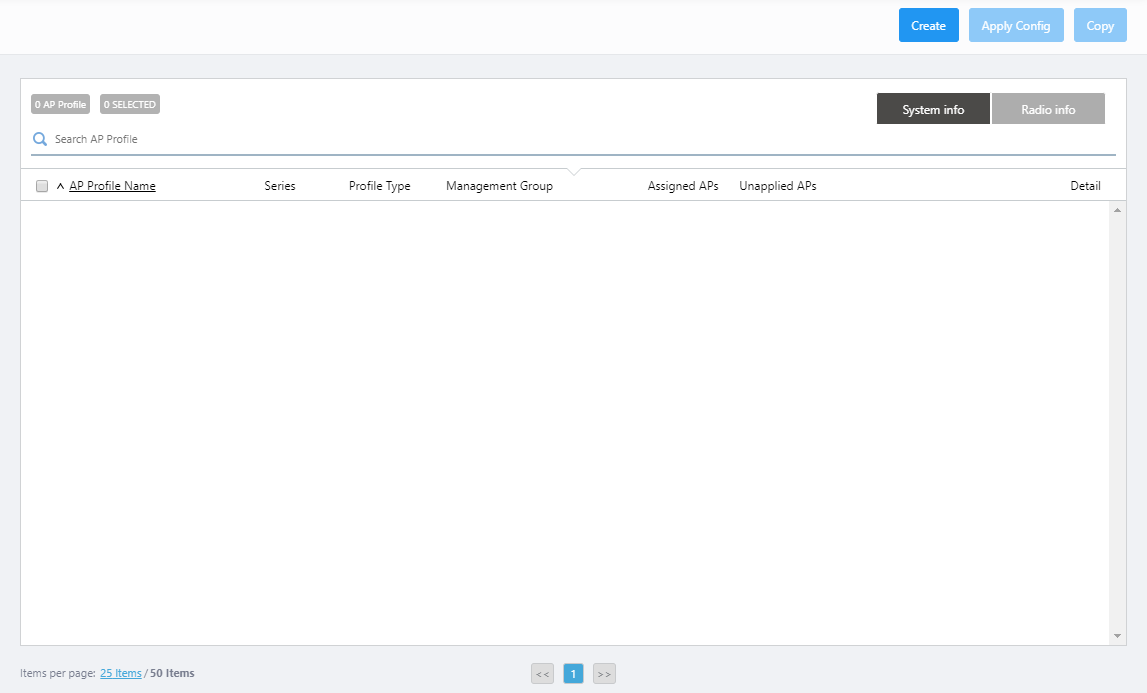
- Click "Create" at the top right of the screen.
The "Select Country, AP Series and Profile Type" dialog box will appear.
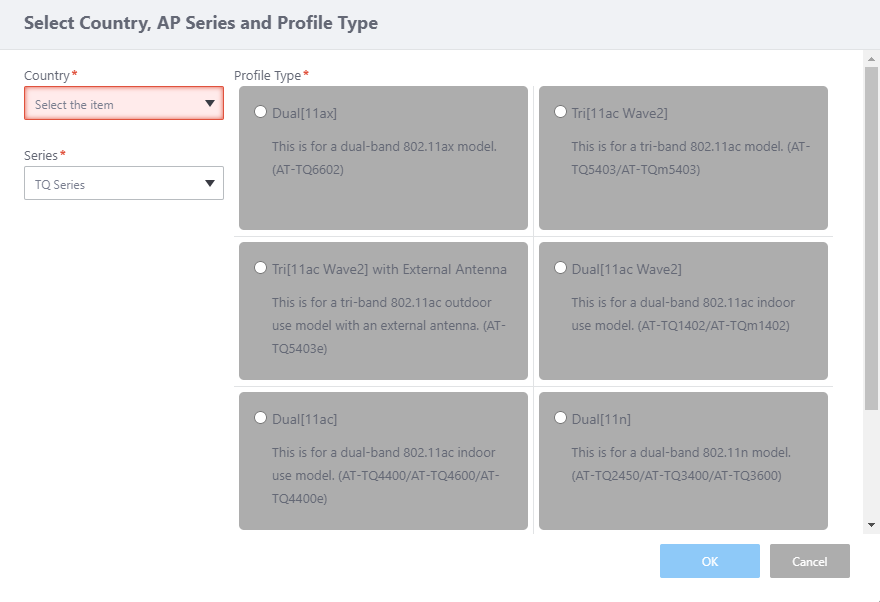
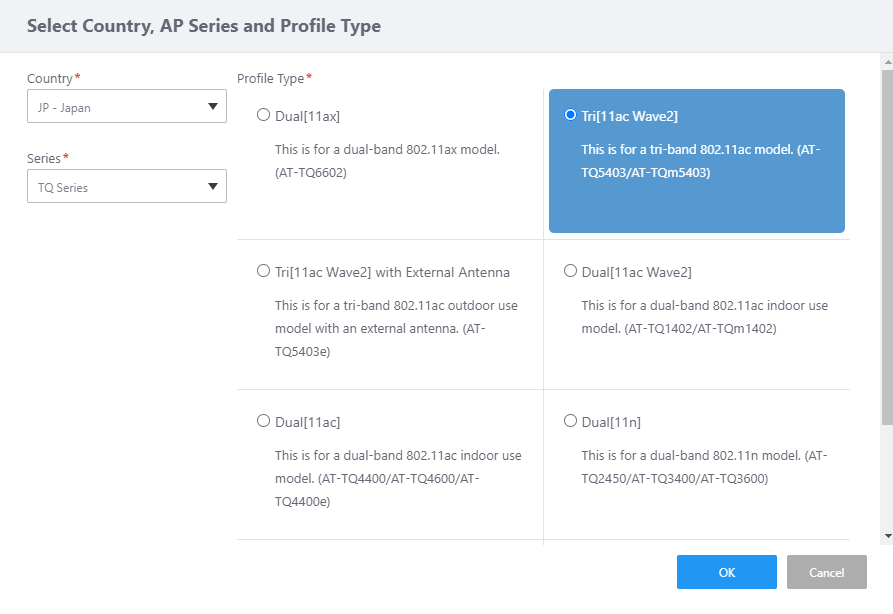
- Select a Country.
If the default country code for the currently logged in user is configured, it is selected by default.
- Select "TQ Series" from "Series".
- Select "Profile Type".
There are several options for this item, depending on the supported feature set of the AP model.
Select "Tri[11ac Wave2]" suitable for TQ5403.
- Click "OK".
The AP Profile configuration screen will appear.
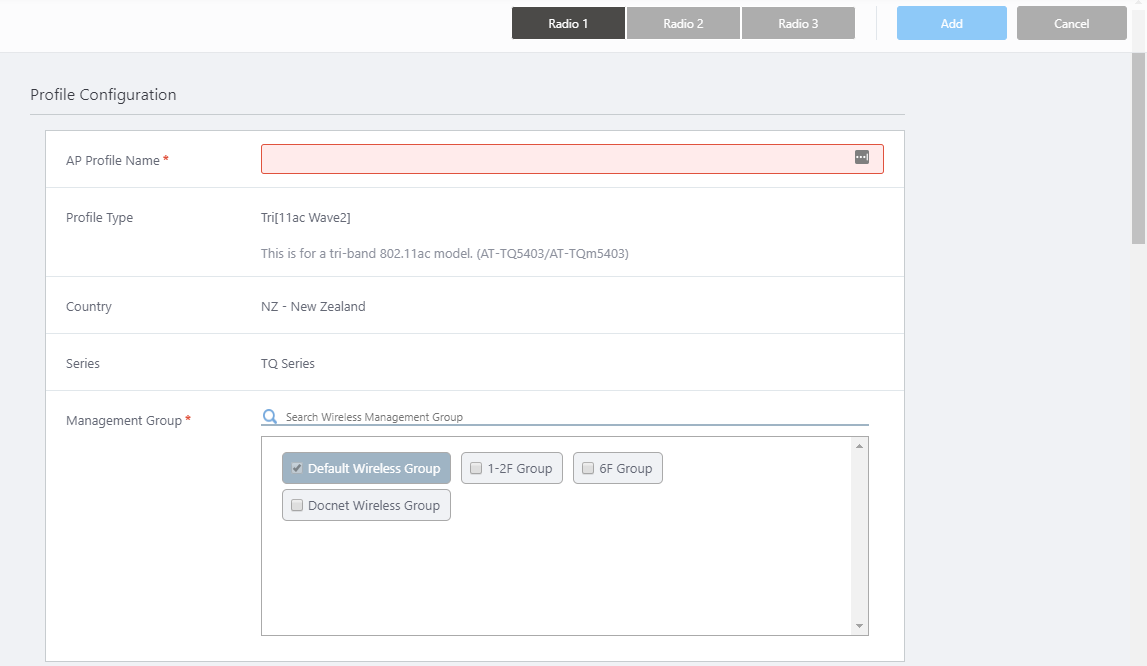
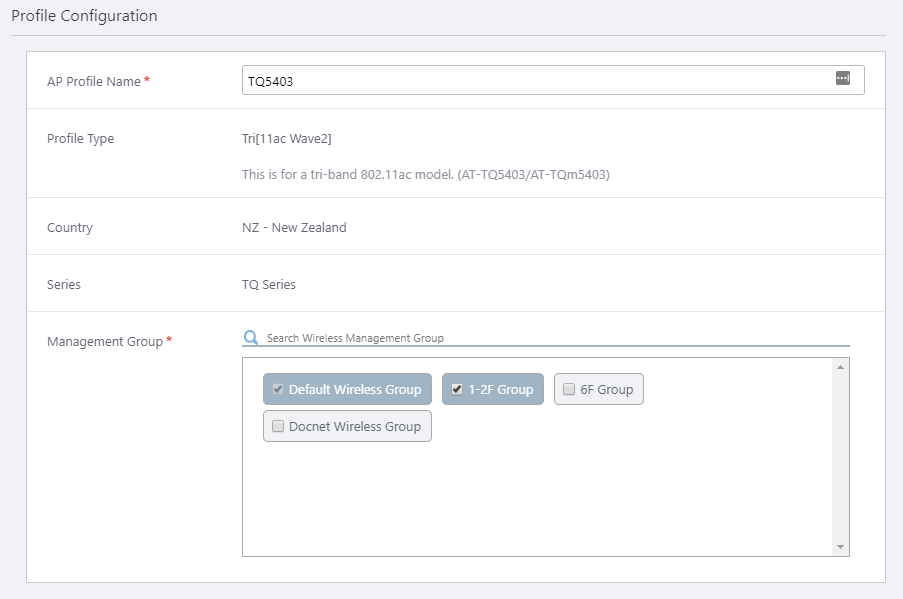
- Configure general parameters in the "Profile Configuration" section.
- Enter "TQ5403" in "AP Profile Name".
- The "Profile Type", "Country" and "Series" fields show the options selected in the earlier "Select Country, AP Series and Profile Type" dialog box.
- Select the Management Groups that you want this AP Profile to belong to.
An AP Profile can be used in multiple Management Groups by selecting those groups in this dialog box.
Here we check the "1-2F Group" which we created earlier.
Note that you cannot uncheck the "Default Wireless Group".
- Enter "TQ5403" in "AP Profile Name".
- You can specify the AP's system settings in the "Basic Configuration" section.
If the Profile Type is "Dual[11ax]", "Tri[11ac Wave2]", "Tri[11ac Wave2] with External Antenna", or "Dual[11ac Wave2]", by configuring the User Settings in AP Profile, you can set a username and password to the APs in a batch.
But even when the APs are under the AWC Plug-in's control, each AP's web interface is still accessible.
Now we are going to change the administrator account (username and password) of the AP's web interface in order to prevent someone from accessing the APs.
Note
You can also change the administrator account of an AP before adding it to the AWC Plug-in.
Note
If you configure the usernames and passwords in both the AP Profile and the AP-specific configuration on the same AP, the username and password in the AP-specific configuration will take effect.
Note
If you specify a username and password for the AP's guest-class on a parent AMF node, ensure that the AP's login username and password are the same as the ones configured for the guest-class.
If you want to manage an AP which was detected as a guestnode under the AWC Plug-in, specify the same username and password that is configured for the AP's guest-class and AP's web interface.
If you want to use a different username and password for each AP, create a separate guest-class for each AP on the parent AMF nodes.
In the "Basic Configuration" section, set "User Settings" to "Enable". Enter a new username and password (twice).
The allowed characters vary depending on the AP model.
- Username
1 to 12 characters in length, with letters and digits. Must begin with a letter.
- Password
0 to 32 characters in length, with letters, digits and symbols (except SPACE " $ : < > ' & *).
If you check "Disable" on the "AP's User Settings" you can restrict username and password setting in the AP-specific configuration, but leave it unchecked to allow the per-AP account control this time.
- Username
- In the "Timezone" section, select a timezone to apply to the APs.
Here, we set the time display to JST (Japan Standard Time). Select "(UTC+09:00) Asia/Tokyo" from the drop-down list.
You can also narrow down the choices displayed in the drop-down list by entering a part of the above timezone character string in the search field above the drop-down list, such as "tokyo" in this case.
- The "NTP Client" field is used to enable/disable the NTP client on the APs.
To use the AWC (Autonomous Wave Control) feature, which we will describe later, you have to enable the NTP client.
Here we enable the NTP client.
When you enable the NTP client, an additional "NTP Server IP Address/Hostname" field will appear. Enter the IP address of the switch (192.168.1.1) that is configured as an NTP server.
- The "Syslog Client" field lets you enable or disable the syslog client feature on the APs.
If you want the APs to send log messages to the syslog server, enable this item.
Here we set the syslog client to disabled.
- You can enable or disable the SNMP agent on the APs in the "SNMP Agent" section.
If you want to monitor and configure the APs with SNMP manager, enable this item.
Here we enable the SNMP Agent because we are going to monitor the APs with the SNMP Plug-in.
When you enable the SNMP Agent, the following fields will appear. Here we enter the following data:
Table 2: TQ5403 SNMP Agent Configuration
Item Name Value Description Version v1/v2c Select the SNMP version(s) to use. Read Only Community Name public Enter the read-only SNMP community name, using 1 to 256 ASCII characters including letters, digits, and symbols (except " ' \ & < >). Port Number 161 Enter the UDP port that the SNMP agent listens on. Restrict the source of SNMP requests Disable Enable this to accept SNMP requests only from specific source addresses. Only allow from the designated hosts or subnets - Enter the IP address or hostname (FQDN) of the SNMP manager.
This is only displayed when "Restrict the source of SNMP requests" is enabled.Community name for traps public Specify the trap SNMP community name, using 1 to 256 ASCII characters including letters, digits and symbols (except " ' \ & < >). Trap types Cold Start
Link Up/Down
AuthenticationSelect the SNMP Trap types to generate. Trap Host IP Address/Hostname 192.168.1.249 Specify IP addresses or hostnames (FQDNs) to which SNMP traps will be sent.
A maximum of 3 trap hosts can be configured.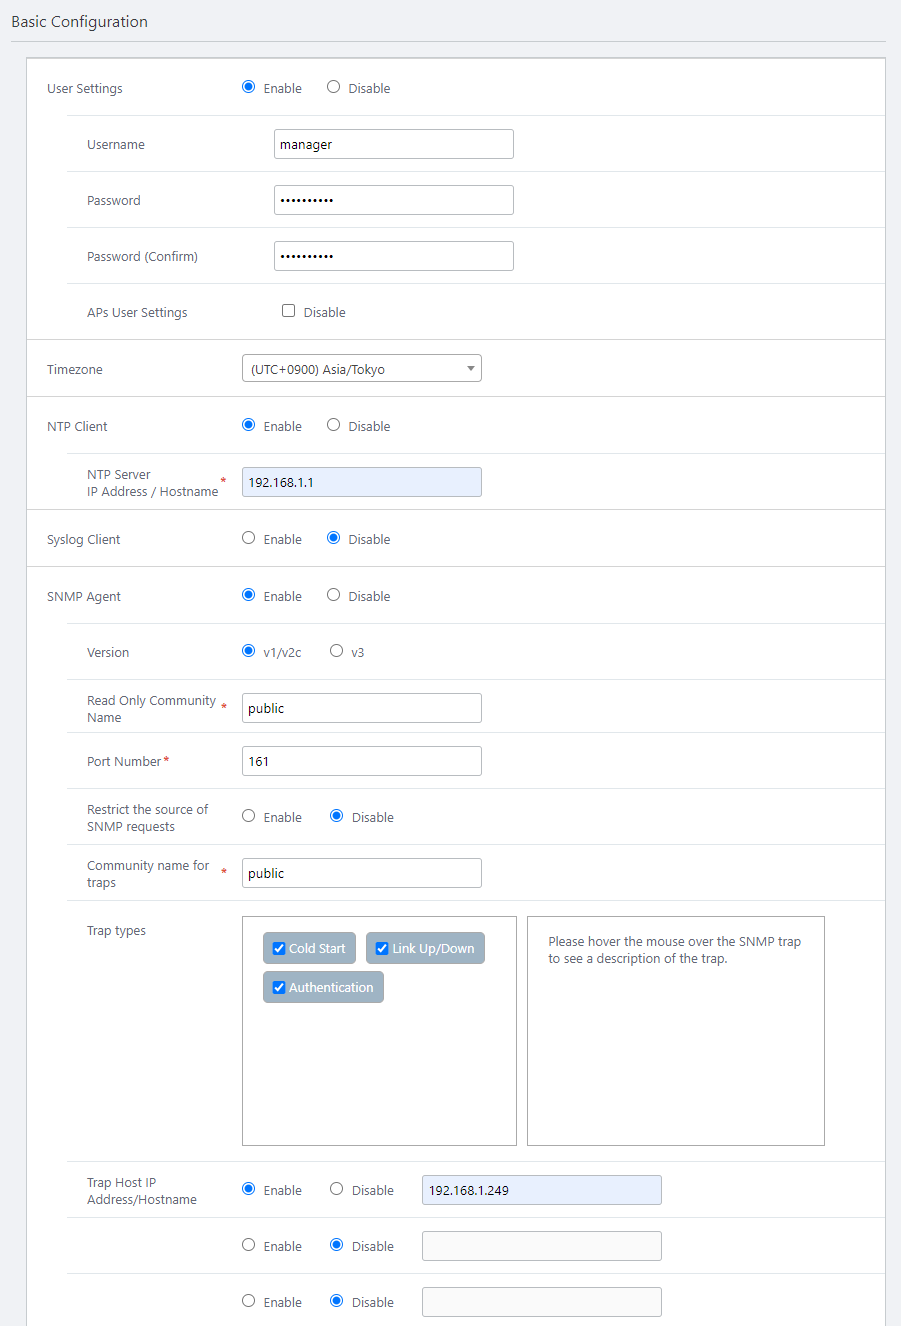
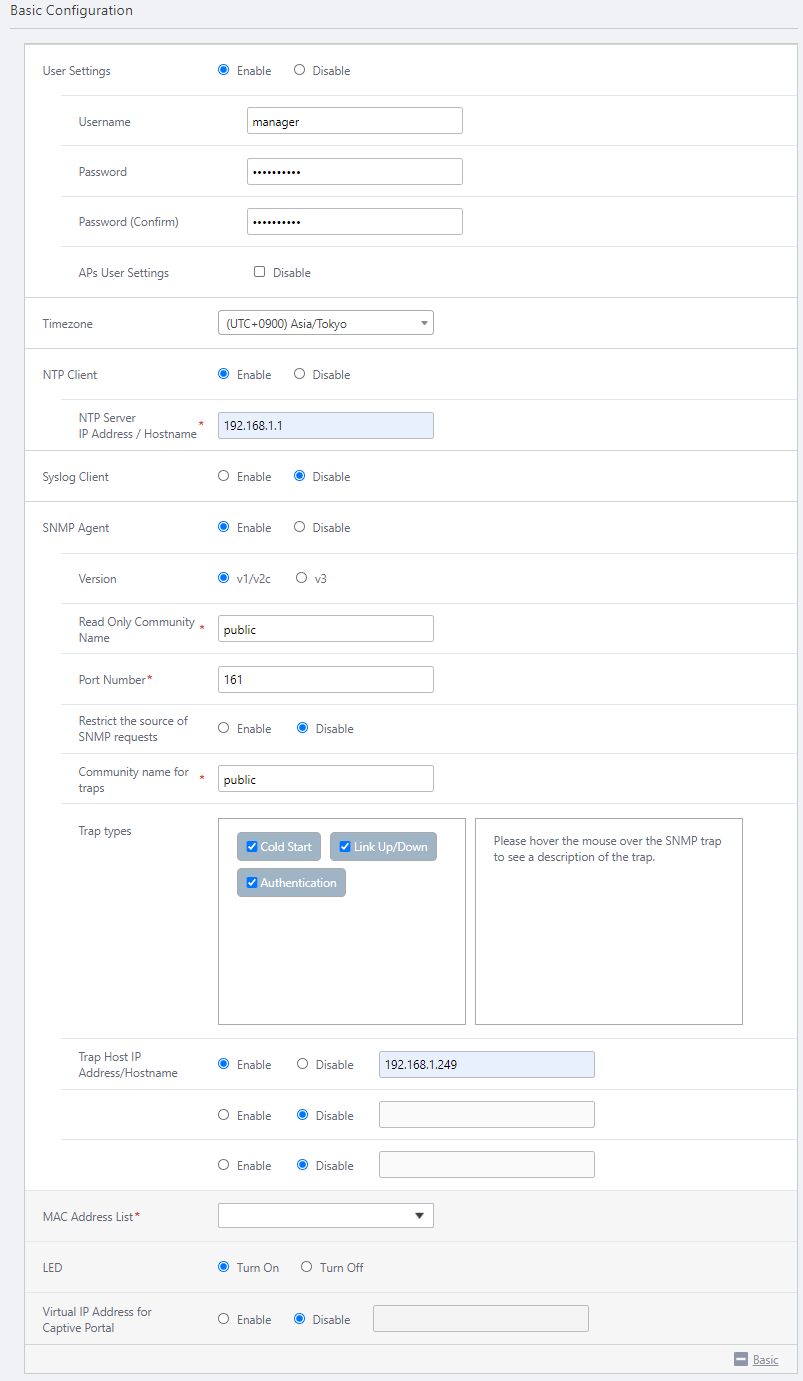
- Clicking "+ Detail" will show "MAC Address List", "LED", and "Virtual IP Address for Captive Portal".
- "MAC Address List" lets you specify MAC address lists (blacklist or whitelist) used by MAC Access Control features with a MAC Address List on the APs.
An AP can use only a single MAC address list but the MAC Address List feature can be enabled or disabled per VAP (SSID).
Here we haven't created a MAC address list. Leave "MAC Address List" empty in order to accept all wireless clients that have a valid SSID and key.
- The "LED" field lets you select the operational mode of the AP's LEDs.
Here we choose "Turn On" for "LED".
- The "Virtual IP Address for Captive Portal" is a security feature that hides the management IP address from attackers by displaying a temporary IP address as the IP address of the web server that provides Captive Portal.
Here, leave "Virtual IP Address for Captive Portal" disabled as we do not use Captive Portal.
- "MAC Address List" lets you specify MAC address lists (blacklist or whitelist) used by MAC Access Control features with a MAC Address List on the APs.
- "LAN Configuration" lets you configure ethernet links on the AP.
The TQ5403 has two LAN ports and can use a wider uplink with link aggregation (LAG), provided that both ends of the LAG (a parent switch and the AP) are correctly configured.
In this example, we will not be using link aggregation or cascading features. Please make sure that Disable is selected.Table 3: TQ5403 Wired Network
Item Name Value Description LAN 2 Port
Disable
Specifies TQ5403 and TQm5403's LAN1/PoE and LAN2 ports behavior, such as link aggregation or cascading.
- Static LAG:
Enables link aggregation. A static LAG should also be configured on the switch ports to which the AP connects.
- Cascade:
Enables cascading function, the LAN2 port will work as a cascade port.
- Disable:
Neither link aggregation nor cascading function will be enabled. The LAN2 port is also disabled. The AP can only use the LAN1/PoE port.

- Static LAG:
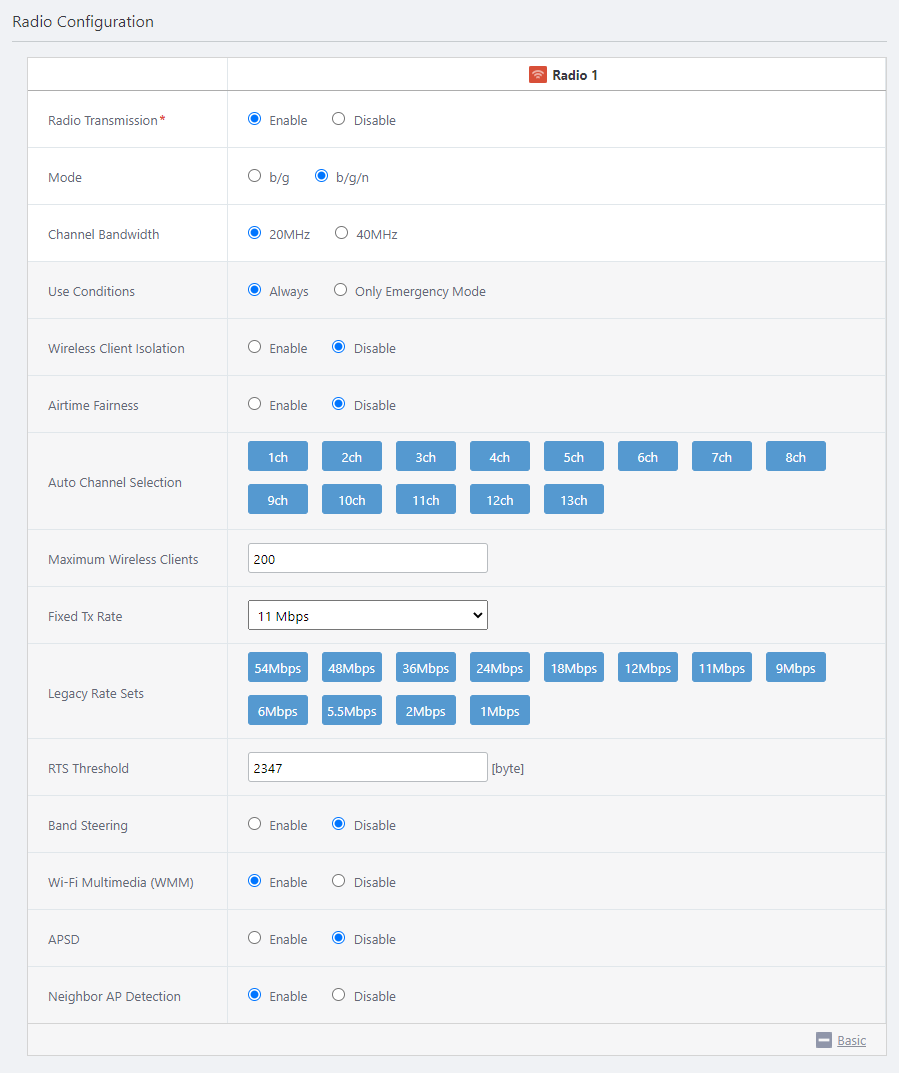
- You can specify configuration parameters for radio waves in the "Radio Configuration" section.
Depending on the selected "Profile Type", configure "Radio 1 (2.4GHz)", "Radio 2 (5GHz W52/W53)" and "Radio 3 (5GHz W56)" appropriately. You can switch the radio by clicking the "Radio 1", "Radio 2" and "Radio 3" buttons at the top of the screen.
This section is used for CB VAPs too.
Here we configure it as follows because we are going to operate CB VAPs for guests' and employees' mobile devices on Radio 1 and a multi-channel VAP for employees' PCs on Radio 2.
- Disable "Radio Transmission" for Radio 3 because we are not going to use Radio 3.
- Disable "Emergency Mode" on Radio 1 because it cannot be used with channel blanket.
Radio 2 can use emergency mode because it is used for multi-channel VAP. You can create emergency VAP on Radio 2 if needed.
Or you can also enable Radio 3 to operate emergency only network on the radio.
- We are going to use Radio 1 for two blanket wireless networks, one for guests' and the other for employees' mobile devices.
Although we should block traffic between clients on the guest network, we will leave "Wireless Client Isolation" Disabled because it can be configured in the CB Profile
- Disable "Airtime Fairness" because it cannot be used with channel blanket.
- Leave the "RTS Threshold" default value of 2347 because changing the value is not supported with channel blanket.
- Disable "Band Steering" because it cannot be used with channel blanket.
Note
When applying the same CB profile to wireless APs configured with different AP profiles, the following radio settings for each AP profile must be the same settings for the radio band where the channel blanket is to be created.
- Mode
- Bandwidth
- Maximum Wireless Clients
- Fixed Tx Rate
- Neighbor AP Detection
Table 4: Wireless Configuration
Item Name Value Description Radio 1 Radio 2 Radio 3 Radio Transmission Enable Enable Disable Specify whether to transmit and receive radio waves in the selected frequency band. Mode b/g/n a/n/ac Specify the wireless modes (protocols) to use. Bandwidth 20MHz 20MHz Specify the bandwidth to use. IEEE 802.11ac and IEEE 802.11n can aggregate two or four adjacent channels to make a large 40MHz or 80MHz channel. Use Conditions Always Always Select "Always" to always use the wireless feature. Select "Only Emergency Mode" to use the radio band only in emergency mode.
Refer to Enable Emergency Mode for more details.Wireless Client Isolation Disable Disable Specify whether to block communication between wireless clients connected to the same VAP. Airtime Fairness Disable Disable Specify whether to give each client an equal amount of airtime regardless of its speed. Auto Channel Selection All All Specify the channels to use. All channels are selected by default. Maximum Wireless Clients 200 200 Specify the maximum number of clients that can connect to the APs. Fixed Tx Rate 11 Mbps 6 Mbps Specify the fixed Transmission Rate for IEEE 802.3 Multicast/Broadcast. Legacy Rate Sets All All Specify valid rates to use when IEEE 802.11b/g or IEEE 802.11a is being used. RTS Threshold 2347 (Disable) 2347 (Disable) To transmit RTS packets in IEEE 802.11b/g/a mode, select Enable and specify the minimum size of Tx packets. Specifying "2347" disables RTS transmission. Band Steering
Disable
Disable
Specify whether to use the Band Steering feature, which encourages clients supporting both 2.4GHz and 5GHz to prefer 5GHz in order to reduce congestion in 2.4GHz.
Note
Band Steering cannot be used with channel blanket.
Wi-Fi Multimedia
(WMM)
Enable
Enable
Specify whether to use Wi-Fi Multimedia (WMM).
When enabled, WMM information is included in the AP beacon. This shortens the frame transmission interval for video/audio streaming and VoIP traffic and therefore keeps communication quality high.
APSD
Disable
Disable
Specify whether to use APSD (Automatic Power Save Delivery).
Enabling APSD can lower power consumption of mobile devices (VoIP) and therefore increase the battery life. The mobile device should also support APSD (U-APSD).
Neighbor AP Detection
Enable
Enable
Specify whether to detect rogue APs in the radio band.
When enabled, APs detect the radio waves of wireless APs managed/unmanaged by the AWC Plug-in that use the same wireless band nearby, and reflects them in Wireless IDS/IPS and AWC calculations.
If you disable this, these functions may not work properly.
◼ Radio 1
◼ Radio 2

◼ Radio 3
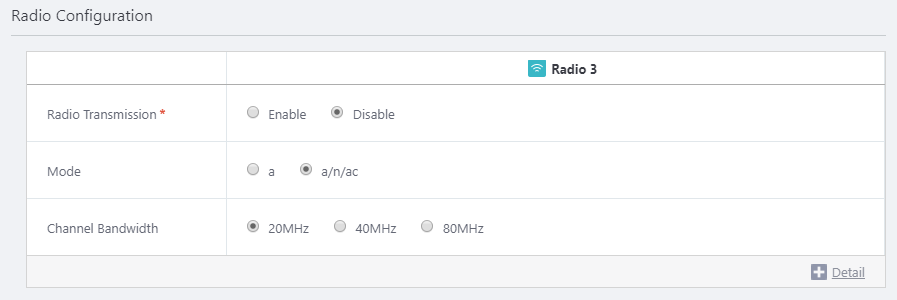
- Disable "Radio Transmission" for Radio 3 because we are not going to use Radio 3.
- Configure VAPs in the "VAP (Multiple SSID) Configuration" section.
In this example, we use multi-channel network on Radio 2 only. Therefore, we are not going to use regular VAPs on Radio 1 and 3.
Although WPA Enterprise is not used in this example, please note that pre-authentication and dynamic VLAN cannot be used with channel blanket.
Table 5: TQ5403 VAP Configuration
Item Name Radio 2 VAP 1 Description VAP Status Enable Specify one of "Enable", "Disable" and "Emergency". The VAP Status of VAP1 is always "Enable" when "Use Condition" in the "Radio Configuration" section is set to "Always". VLAN ID
100
Specify a VLAN ID used for communication between the VAP and associated clients.
Note
Specify a VLAN ID that is different from the AP's management VLAN. When the AP is detected as a guest node, a parent AMF node is configured to collect the guest node information automatically ("dynamic discovery"), and wireless clients get their IP addresses via DHCP.
SSID ForStaff-PC Specify an SSID (network name) to use on the VAP. Broadcast SSID Enable Specify whether to broadcast the SSID on the VAP. Security WPA Personal Specify a security method for the VAP. Security Key (WPA-PSK) 5+@f/=0N1y Specify an encryption key for the VAP. WPA Versions WPA2 Specify a WPA version to use on the VAP. Encryption Protocol CCMP Specify an encryption protocol to use on the VAP. Management Frame Protection Capable Specify whether to protect Management Frames. Broadcast Key Refresh Rate 0 Specify an interval at which to refresh the broadcast key that is sent to clients on the VAP. Specifying "0" stops the key from refreshing. Captive Portal Disable Specify whether to use the Captive Portal feature on the VAP. MAC Access Control Disable Specify whether to use MAC Access Control on the VAP. Area Authentication Disable Specify whether to use the Area Authentication function. Fast Roaming Disable Specify whether to use Fast Roaming of wireless clients. Inactivity Timer 300 Specify the delay before disconnecting a client that disappears without notifying the APs. Duplicate AUTH received Disconnect Select how to process connection requests from clients that have maintained a connection. Association Advertisement Enable Specify whether to use Association Advertisement. DTIM Period 1 Specify how frequently to insert a DTIM (Delivery Traffic Indication Map) in the AP's beacons (every 1 to 255 beacons). Proxy ARP
Disable
Note
This item is not supported. Do not enable it.
Hotspot 2.0 Disable Specify whether to use Passpoint (Hotspot 2.0).
Because VAP1 cannot be disabled on an AP profile, if you apply this AP profile to APs as usual, the default SSID "Default-1" will be activated without any security.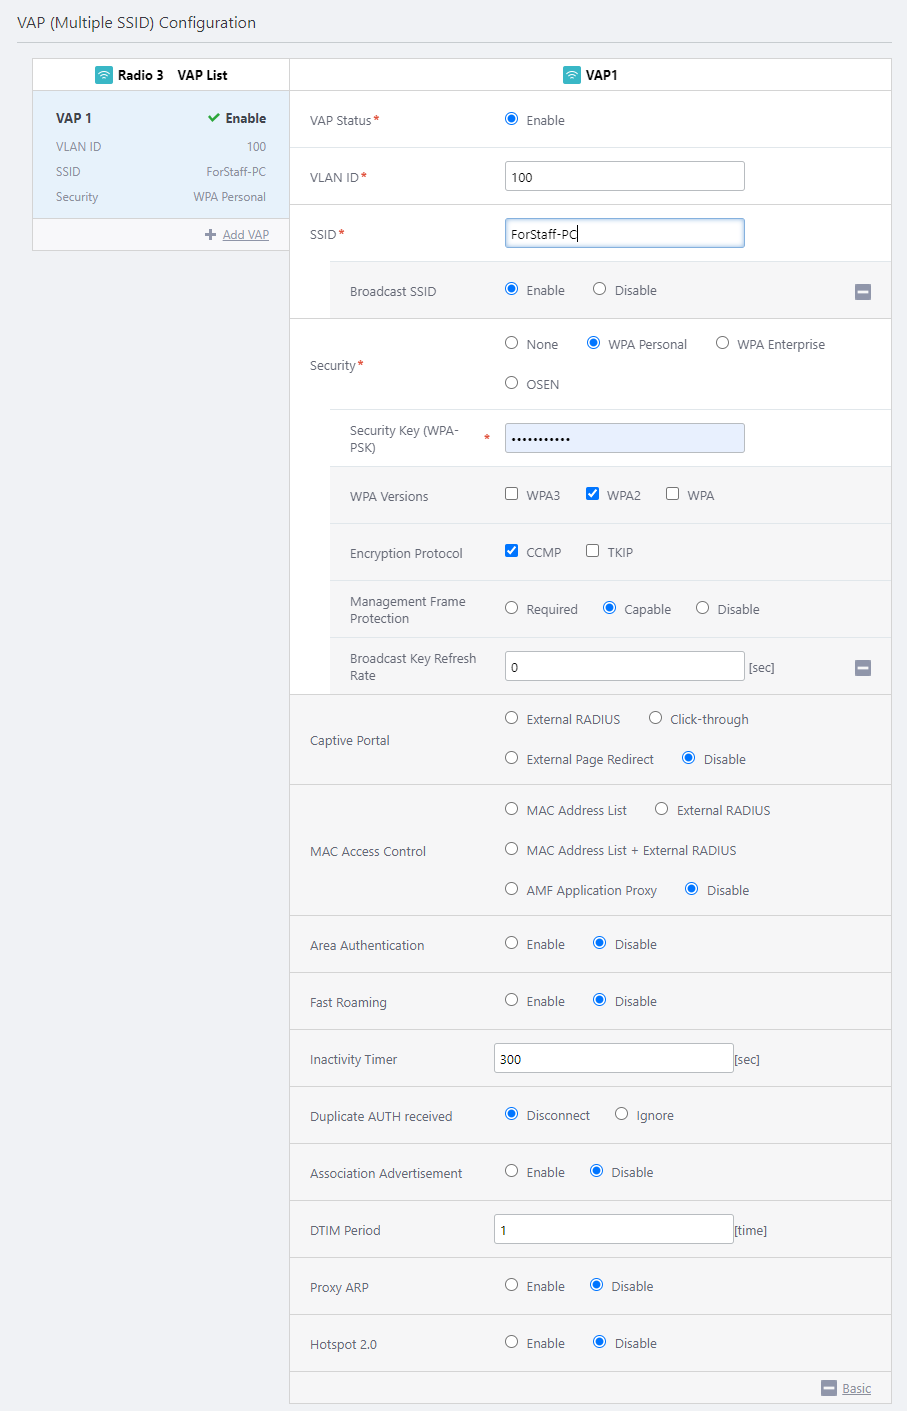
When both an AP profile and a CB profile are applied to an AP, the CB profile has precedence over the AP profile and overwrites the AP configuration with its content.
Therefore, VAP1's configuration will be overriden by a CB Profile that we are going to create next.
You don't have to change VAP1 settings for Radio 3 because Radio 3's "Radio Transmission" has been disabled.
Note
In this quick tour, we will apply the AP Profile to APs after creating channel blankets. This is because applying the AP Profile before the CB Profile can enable multi-channel (conventional) VAPs on the AP Profile, which are not intended for use. If you want to apply the AP Profile before CB Profile, we recommend that you configure dummy VAPs for radios intended only for channel blanket networks.
- Click "Add" at the top right of the screen.
Now you can see the newly created AP Profile "TQ5403".
22 Apr 2021 15:29