Floor Map Detail [Edit Wall]
You can draw walls with polylines to simulate radio attenuation by walls, partitions, and pillars on the floor map.
Section 1
| Item Name | Description |
|---|---|
| Management Group / Floor Map Group | The floor map name and the management group of the selected floor map will be displayed. |
| Radio dropdown menu | Lets you select a radio band to show on the map, from Radio 1, 2 or 3. |
| View Selection dropdown menu | Lets you change what information is displayed on the Floor Map Details screen.
|
| "Back to list" button | Click to return to the Floor Map List screen. |
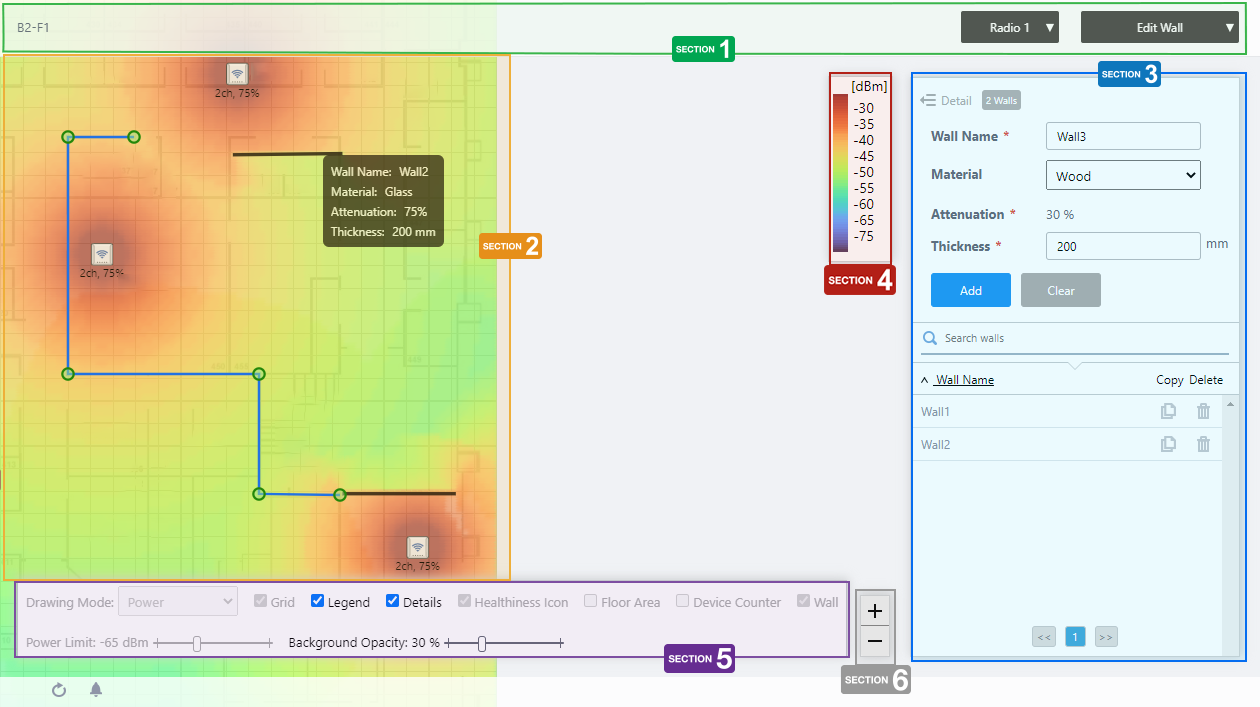
Section 2
You can view and draw walls.
- Type in the "Wall Name" field to turn on wall edit mode. A crosshair mouse pointer will appear.
- Click on the corner of a wall with the crosshair mouse pointer to start drawing the wall as a polyline.
- To finish drawing a wall, double-click on the end point of the wall.
- You can reshape it by using the drag-and-drop on each corner point.
Note
You can not add or delete corner points.
- Click on the corner of a wall with the crosshair mouse pointer to start drawing the wall as a polyline.
- When you hover over an existing wall, a popup balloon shows the wall information.
- Wall Name:
Shows the wall name configured.
- Material:
Shows the material name specified.
- Attenuation:
Shows the attenuation rate according to the wall material, or specified manually (unit: %).
- Thickness:
Shows the wall thickness (unit: mm).
- Wall Name:
Section 3
Shows the Wall list.
| Item Name | Description |
|---|---|
| X Walls | Shows the number of walls defined on the floor map. |
| Wall Name | Shows the wall name. |
| Material | Select a wall material from the drop-down list. The attenuation factor varies according to the wall material. The preset materials and attenuation factor are as follows:
|
| Attenuation | Shows the attenuation factor according to the selected material. If "User Specified" is selected for the material, enter a value between 1 and 99 (unit: %), depending on the attenuation by the actual wall. |
| Thickness | Specify the thickness of the wall with a value from 1 to 32767 (unit: mm). |
| "Add" / "Save" button | Saves a newly created wall or edited existing wall. You can add a wall by typing the wall name, then drawing a polyline on the floor map. Should be 1 to 64 characters in length, with alphabets, numbers and symbols (including spaces). |
| "Clear" / "Cancel" button | Cancels changes before clicking the "Add" / "Save" button. |
| Search walls | You can search for particular walls on the floor map. The Search field lets you enter a partial string to match. The screen displays entries with that string in the "Wall Name" field. To remove the filter, delete the string from the search field and press enter. NoteThe search is case-sensitive. |
| Wall Name | Shows the wall name defined for display. |
| "Copy" button | Duplicates the selected wall. The wall name of the duplicated wall will be the original wall name plus "_copy". If this name is already in use, a sequential number with brackets follows the suffix, such as "_copy(1)". If this name is already in use, a sequential number with brackets follows the suffix, such as "_copy(1)". |
| "Delete" button | Deletes the selected wall. |
Section 4
Shows the legend of the Wireless Status View.
Section 5

On the Edit Wall screen, "Drawing Mode", "Healthiness Icon", "Floor Area", "Device Counter", and "Power Limit" are irrelevant and disabled.
| Item Name | Description |
|---|---|
| Grid | Lets you enable or disable grid lines on the floor map. |
| Legend | Lets you enable or disable the legend. Check to display. |
| Details | Toggles the visibility of Area List. Check to display. |
| Wall | Lets you choose whether to display the walls if walls have been created on the floor map (using the Edit Wall page). |
| Opacity | Specify the opacity of the floor map background image. |
Section 6
Zoom In/Out buttons.
You can zoom in (+) or zoom out (-) of the floor map display. You can also use the mouse wheel scroll to zoom in or out.

12 Jul 2024 09:32