Manage AP Registration
This section describes how to register, edit, and delete managed APs.
Register AP
There are three ways to register APs in the AWC Plug-in's management database: registering them manually, importing their data from a CSV file, and registering them from a guest device list.AP properties such as Device Name, IP Address, MAC Address, Management Group, and Tags can be edited after the AP is registered to the database.
If the AMF network is properly configured, you can easily register a guest device AP by specifying a guest port on the parent AMF device, instead of specifying the AP's address. This is called Zero Touch Configuration.
In this case, the AWC Plug-in can identify the AP even if the AP's IP or MAC address changes.
This is useful when you want to provision management information on the AWC Plug-in before connecting the AP to the network, or if you want to replace the failed AP with the same model and have the AWC Plug-in automatically apply the same configuration to the new AP.
To perform Zero Touch Configuration, the following requirements must be met:
- AMF Network
- The Management VLAN of the AP (TQ Series) is untagged.
- The AP is detected as a guest device, and a parent AMF device is configured to collect the guest device information automatically (dynamic discovery).
- On the parent AMF device, DHCP Snooping is enabled for the AP's management VLAN.
Note
On the AMF device, make sure that you enable DHCP Snooping on the AP management VLAN only.
- The Management VLAN of the AP (TQ Series) is untagged.
- Vista Manager EX
- The AMF Network is registered in the management database.
- The AMF Network is registered in the management database.
- AP
- TQ series firmware version 7.0.x, 6.0.x, 5.3.x - 5.4.x, 4.2.x - 4.3.x Bxx or 4.1.x Sxx is installed.
- The DHCP Client is enabled on the AP (default), and the AP acquired its IP address from a DHCP server.
Note
If you specify a username and password for the AP's guest-class on a parent AMF device, ensure that the AP's login username and password are the same as the ones configured for the guest-class.
- TQ series firmware version 7.0.x, 6.0.x, 5.3.x - 5.4.x, 4.2.x - 4.3.x Bxx or 4.1.x Sxx is installed.
NoteThe maximum number of APs that can be assigned to a single management group is 350.
NoteFor TQ series, configuring APs, LLDP, Ethernet, and HTTP/HTTPS is only possible from the AP's own management web interface. Please follow the steps described in Configure AP through Its Own Web Interface to perform that configuration.
For detailed explanation on configuring APs, refer to the "TQ series Reference Manual" on our website.
NoteIf you manage guest device APs with the AWC Plug-in, AMF backup and manual recovery of the guest device is not supported.
Register AP Manually
- Select "Wireless Configuration" > "AP Settings" from the AWC Plug-in menu.
- Click the "Gear" icon at the top right of the Content section.
- Click "Manual Registration" from the menu.
- The "Wireless AP Registration" dialog box will appear.
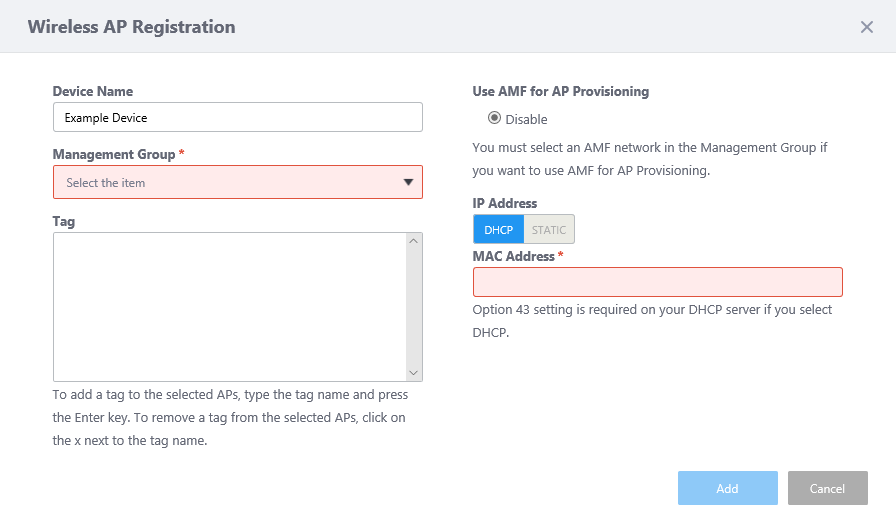
Table 1: "Wireless AP Registration" dialog box (manual)
Item Name Description Device Name
Enter a name for the AP. Max 100 characters. If you leave this field empty, the name of the AP will be automatically filled in. The name depends on the "Use AMF for AP Provisioning" setting:
- When "Use AMF for AP Provisioning" is disabled:
The name will be set to the AP's MAC address.
- When "Use AMF for AP Provisioning" is enabled:
The name will be set to "(Parent Device Name)-(Port Number)" (e.g. "x230_1-port1.0.1").
Management Group Specify a management group to which you want the AP to belong (mandatory) Tag
Enter a tag of your choice and press the Enter key.
A tag can contain up to 100 characters, but cannot contain successive spaces.
To delete a tag, click "x" to the right of the tag.
Note
If you paste a tag string from the clipboard, not all text may be visible. In that case, press Enter to make a tag from the entire pasted string.
Note
Pasting a tag containing a newline is not supported.
Note
Tag names may be truncated in the tag filter list on the Devices Map, Floor Map Details and Device Search pages. To avoid this, use shorter names for the tags.
Use AMF for AP Provisioning
Select whether the AWC Plug-in uses the AMF guest device information to identify the AP.
- If you select "Disable", the AWC Plug-in identifies the AP by its IP and MAC addresses. This requires that the AP's IP address is preconfigured.
- If you select "Enable", the AWC Plug-in identifies the AP by using AMF guest device information for the AP (AMF network, area, parent device, and the port to which the AP is connected).
"Enable" will not be available unless AMF areas are configured in the management group.
The default is "Disable".
Depending on this setting, you have to supply different information to add an AP:
- When "Use AMF for AP Provisioning" is disabled:
- IP Address:
Specify an IP address for the AP List (mandatory)
- To set the IP address from a DHCP server, select "DHCP".
Note
When using DHCP, DHCP option 43 (vendor specific information) must be set on the DHCP server in advance.
Refer to Prerequisites For Using DHCP for more details - If you have set a static IP address in advance, select "STATIC" and enter the IP address assigned to the AP.
- To set the IP address from a DHCP server, select "DHCP".
- MAC Address:
Specify the MAC address of the AP (mandatory)
Specify the MAC address for the AP in "xx:xx:xx:xx:xx:xx" format.
For TQ5403, specify the MAC address of LAN1 port regardless of the connected port.
Note
You have to supply a MAC address to manage an AP.
- IP Address:
- When "Use AMF for AP Provisioning" is enabled:
- Network Name:
Select an AMF Network to which the guest device AP belongs (mandatory)
- Area Name:
Select an AMF area to which the guest device AP belongs (mandatory)
- Device Name:
Select an AMF device to which the guest device AP is connected (mandatory)
Note
After registering a wireless AP as a guest device, if the AMF device name to which the guest device belongs to is changed in the AMF network, the information in the AWC plug-in must also reflect the change. See Edit AP about changing registered information.
- Port Number:
Enter a switchport number on the parent AMF device to which the guest device AP is connected (mandatory)
- Network Name:
"Add" button Add the AP to the AWC Plug-in's management database with the specified information. "Cancel" button Cancel registering the APs.
- When "Use AMF for AP Provisioning" is disabled:
- When you have entered all required information for the floor map, click "Add".
- Next, you have to assign an AP Profile to the AP.
For detailed procedures of how to apply an AP Profile to an AP, refer to Change Management Group or AP Profile for AP.
Import AP from CSV File
NoteThe maximum number of APs which can be imported in a single operation is 1000.
- Select "Wireless Configuration" > "AP Settings" from the AWC Plug-in menu.
- Click the "Gear" icon at the top right of the Content section.
- Click "Import from CSV" on the displayed menu.
- The "Registration from CSV File" dialog box will appear.
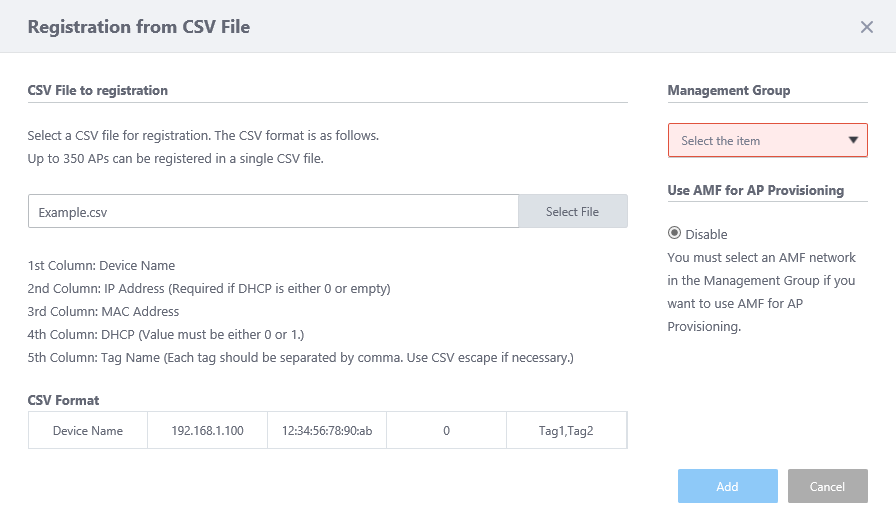
Table 2: "Registration from CSV File" dialog box.
Item Name Description "Select File" button
Opens a file dialog box to specify a CSV file.
The required fields in a CSV file vary depending on the "Use AMF for AP Provisioning" setting:
- When "Use AMF for AP Provisioning" is disabled:
The CSV file must contain the following data:
* Lines starting with "#" are ignored.
- 1st column: Device Name
- 2nd column: IP Address (Required if DHCP in 4th column is 0 or blank)
- 3rd column: MAC Address
- 4th column: Whether to use DHCP (0: not used, 1: used)
Note
When using DHCP, DHCP option 43 (vendor specific information) must be set on the DHCP server in advance.
Refer to Prerequisites For Using DHCP for more details - 5th column: Tag Names (separated by a comma. CSV escape required)
For TQ5403, specify the MAC address of LAN1 port regardless of the connected port.
- 1st column: Device Name
- When "Use AMF for AP Provisioning" is enabled:
The CSV file must contain the following data:
* Lines starting with "#" are ignored.
- 1st column: Device Name
- 2nd column: Network Name (mandatory)
- 3rd column: Area Name (mandatory)
- 4th column: Device Name (mandatory)
- 5th column: Port Number (mandatory)
- 6th column: Tag Names (seperated by a comma. CSV escape required)
- 1st column: Device Name
Note
When an error is found, the AWC Plug-in always reports that there is an error in the 1st column (Device Name), regardless of which columns have errors.
Note
Only CSV format is supported for import.
Management Group Specify a management group to which you want the AP to belong. Use AMF for AP Provisioning
Select whether the AWC Plug-in uses the AMF guest device information to identify the AP.
- If you select "Disable", specify APs by their IP and MAC addresses.
- If you select "Enable", specify APs by their parent device's switch ports. This is useful when the APs get their IP addresses from a DHCP server.
"Enable" will not be available unless AMF areas are configured in the management group.
The default is "Disable".
"Add" button Register APs from the specified CSV file. "Cancel" button Cancel registering the APs. Note
A sample CSV file is found in the following directory:
[Vista Manager EX Installation Directory]\Plugins\AT-AWC\tools\import_wireless_APs_sample.csvNote
When using DHCP, DHCP option 43 (vendor specific information) must be set on the DHCP server in advance.
Refer to Prerequisites For Using DHCP for more details
- When "Use AMF for AP Provisioning" is disabled:
- When you have entered all required information for the floor map, click "Add".
- Next, you have to assign an AP Profile to the AP.
For detailed procedures of how to apply an AP Profile to an AP, refer to Change Management Group or AP Profile for AP.
Register AP From Guest Device AP List
NoteThis page shows candidate guest device APs in the AMF area/network configured in the specified management group.
NoteThis page only shows the guest device APs which are not registered to the management database.
NoteWhen registering the TQ series AP as a guest device, if you do not use zero-touch configuration or auto recovery, connect the wireless client using the DHCP client function to the same VLAN as the management VLAN of the wireless AP. In this case, set the discovery method of the guest device to "static".
Choose "dynamic" method when you use zero-touch configuration and/or auto recovery. Make sure you set a VAP VLAN that is different from the AP's management VLAN. Also make sure that DHCP snooping is only enabled on the AP's management VLAN, and it is disabled on the VAP VLAN if wireless clients use DHCP.
NoteAfter registering a wireless AP as a guest device, if the AMF device name to which the guest device belongs to is changed in the AMF network, the information in the AWC plug-in must also reflect the change. See Edit AP about changing registered information.
- Select "Wireless Configuration" > "AP Settings" from the AWC Plug-in menu.
- Click the "Gear" icon at the top right of the Content section.
- Click "Registration from Guest Device" on the displayed menu.
- The "Registration from Guest Device" dialog box will appear.
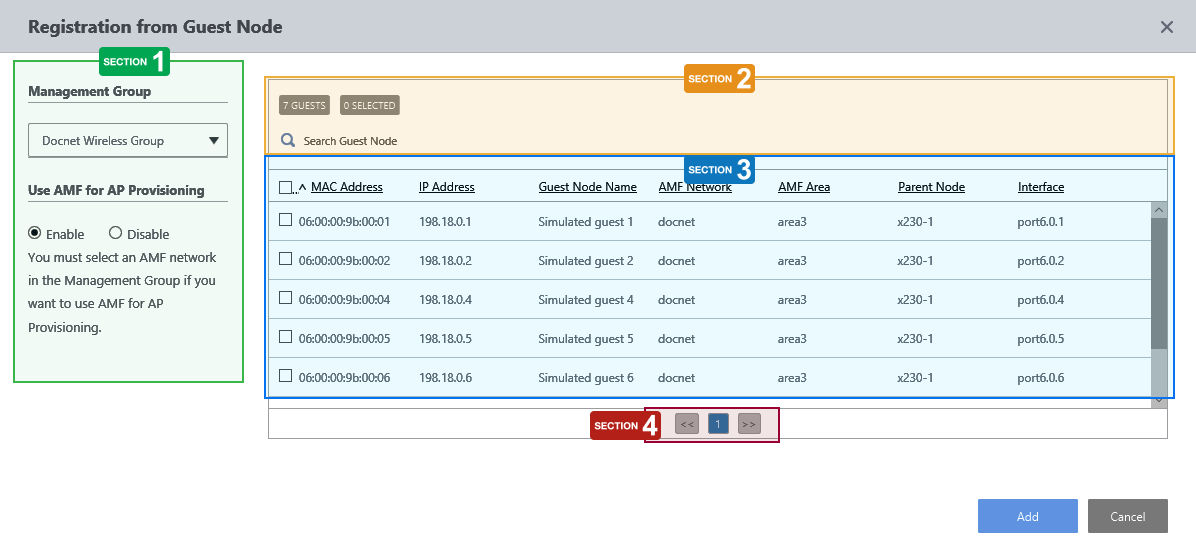
Section 1
Table 3
Item Name Description Management Group Specify a management group to which you want the AP to belong. Use AMF for AP Provisioning
Select whether the AWC Plug-in uses the AMF guest device information to identify the AP.
- If you select "Disable", specify APs by their IP and MAC addresses.
- If you select "Enable", specify APs by their parent device's switch ports. This is useful when the APs get their IP addresses from a DHCP server.
"Enable" will not be available unless AMF areas are configured in the management group.
"Add" button Add the selected APs to the management database. "Cancel" button Cancel registering the APs.
Section 2
Table 4
Item Name Description X GUESTS Shows the number of guest devices. X SELECTED Shows the number of guest devices that are selected (checked). Search Guest Device
Lets you search guest devices. Filter entries in the list by entering a partial string in the search box.
The Search field lets you enter a partial string to match. The screen displays entries with that string in one of the following fields: "MAC Address", "IP Address", "Guest Device Name", "AMF Network", "AMF Area", "Parent Device" or "Interface".
To remove the filter, delete the string from the Search field and press Enter.
Note
The search is case-sensitive.
"All" icon button Shows all guest devices. "AP List" button Shows wireless APs only.
Section 3
Table 5
Item Name Description Checkbox Lets you select guest device APs to register. Checking the box in the heading row selects all guest devices in the list. Unchecking the box in the heading row deselects all entries in the list. MAC Address Shows the device's MAC address. IP Address Shows the management IP address. Guest Device Name Shows the guest device name. AMF Network Shows the AMF network name to which the guest device belongs. AMF Area Shows the AMF area name to which the guest device belongs. Parent Device Shows the parent AMF device name to which the guest device is connected. Interface Shows the interface name on the parent AMF device to which the guest device is connected.
Section 4
Table 6
Item Name Description << Goes to the first page of the list. (Page Number) Shows the current page number in the list. >> Goes to the last page of the list.
- If you select "Disable", specify APs by their IP and MAC addresses.
- When you have entered all required information for the floor map, click "Add".
- Next, you have to assign an AP Profile to the AP.
For detailed procedures of how to apply an AP Profile to an AP, refer to Change Management Group or AP Profile for AP.
Zero Touch Configuration
If the AMF network is properly configured, you can easily add a guest device AP by specifying a guest port on the parent AMF device, instead of specifying the AP's address (Zero Touch Configuration).When using Zero Touch Configuration, you do not have to know the AP's IP or MAC addresses in advance. This is also useful when you want to just replace the failed AP with the same model and make AWC Plug-in to automatically apply the same configuration to the new AP.
For more details and procedures, refer to Operation Reference > Miscellaneous Settings > Zero Touch Configuration and Auto Recovery.
NoteTo perform Zero Touch Configuration, the AMF network must be properly configured.
Edit AP
- Select "Wireless Configuration" > "AP Settings" from the AWC Plug-in menu.
- Click the "Edit" icon in the rightmost column of the AP to edit the AP.
- The "Wireless AP Edit" dialog box will appear.
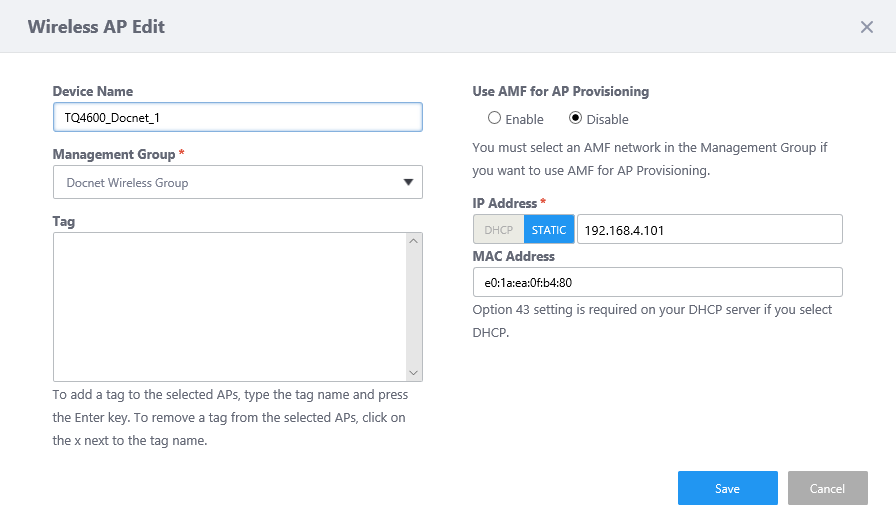
- Click "Save" when finished editing.
Delete AP
NoteEven if you delete all entries on the last page of the list, the page will not be deleted and an empty list page will be displayed. The number of pages will be refreshed after moving to another page or reloading the browser.
- Select "Wireless Configuration" > "AP Settings" from the AWC Plug-in menu.
- Check the APs to delete on the list.
- Click the "Gear" icon at the top right of the Content section.
- Click "Delete" from the menu.
- The "Confirm" dialog box will appear.
- Click "Delete".
Prerequisites For Using DHCP
If the IP address of the wireless AP is not known in Register AP, you can obtain the IP address from the DHCP server and register the AP based only on the MAC address of the AP.When configuring to obtain an IP address from a DHCP server, it is necessary to specify the IP address and monitoring port number (65437) of the AWC Plug-in as DHCP option 43 (vendor specific information) on the DHCP server side.
NoteWhen using DHCP option 43, be careful not to let the DHCP server assign an IP address that conflicts with the IP address of the AP already registered to the AWC Plug-in.
DHCP option 43 is set only once for the DHCP pool.
DHCP option 43 is required only in case the AP requests a DHCP server for a dynamic IP address. If the DHCP server has static entry with each AP's MAC address, and all APs are to be registered to the AWC Plug-in with the IP addresses which are statically assigned from the DHCP server, you do not need to set DHCP option 43.
The format of the AWC server information passed as an optional setting value is as follows:
The following setting shows an example in which the IP address of the AWC Plug-in is set to "192.168.1.250":
| Field name | Field length | Description | Variable / Fixed | Setting Example | |
|---|---|---|---|---|---|
| Content | Hexadecimal value | ||||
| Header | 1 octet | Information header to be passed as vendor-specific information. | Fixed | 207 | CF |
| Option 1 type | 1 octet | Indicates that the following field is the IP address of the AWC Plug-in. | Fixed | 1 | 01 |
| Option 1 value | 4 octets | Specify the IPv4 address of the AWC Plug-in. | Variable | 192.168.1.250 | C0A801FA |
| Option 2 type | 1 octet | Indicates that the following field is the monitoring port number of the AWC Plug-in. | Fixed | 2 | 02 |
| Option 2 value | 2 octets | Specify the monitoring port number of the AWC Plug-in. | Fixed | 65437 | FF9D |
If the AMF device is running the DHCP service and the AWC Plug-in is installed on the IP address "192.168.1.250", the following settings must be added to the corresponding DHCP pool.
Here, it is assumed that the DHCP option name to be set is "awcserver" and the DHCP pool name is "pool1".
awplus#configure terminal
 awplus(config)#ip dhcp option 43 name awcserver hex
 awplus(config)#ip dhcp pool pool1
 awplus(dhcp-config)#option awcserver cf01c0a801fa02ff9d
28 Mar 2022 10:47