Floor Map
This page allows you to create floor maps to manage APs more efficiently.
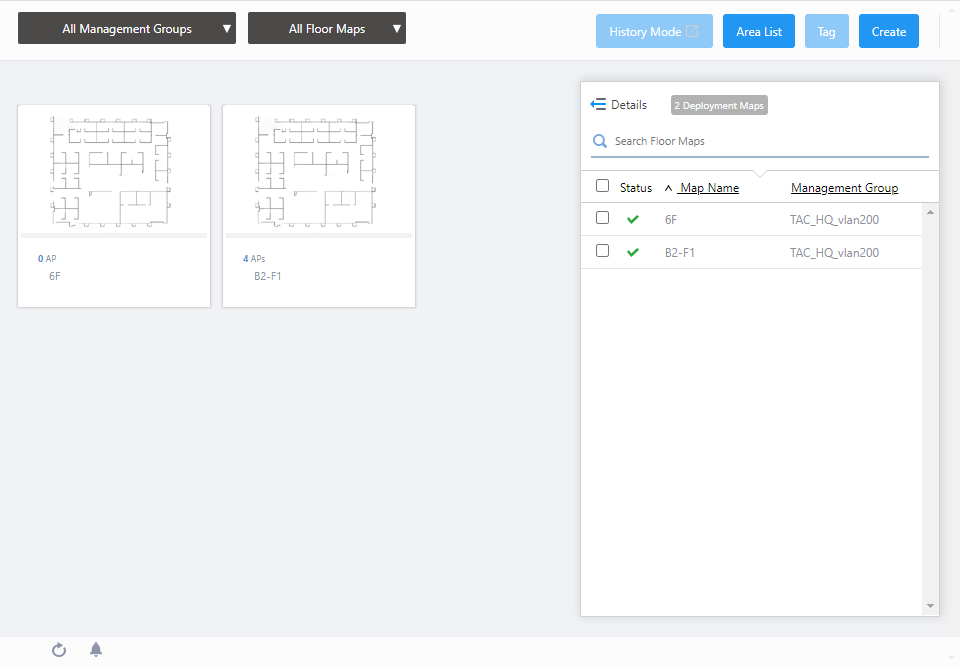
Clicking a floor map panel shows its details.
NoteThe page is periodically refreshed to display the latest information.
NotePlease do not use the automatic scroll feature of your mouse wheel on the page.
NoteLong floor map names may be truncated on the "Floor Map List" in the panel or list view and the "Floor Map Details" page.
To see an entire name, go to the "Floor Map List" > "List View" icon > "Pencil" icon > "Edit Floor Map" page.
NoteIf you sort by IP address, the addresses in an AP list are sorted in lexicographical order.
Floor Map List
Section 1
| Item Name | Description |
|---|---|
| Management group drop-down menu | Narrow down the floor map to be displayed. The default is "All Management Groups". |
| Floor Map drop-down menu | Select the floor map to be configured. The default is "All Floor Maps". When you select one of the floor maps, the display in the center of the contents section will switch from the floor map list view to the floor map detail view. |
| "History Mode" button | Displays "History Mode" screen to recall the status of APs and associated clients in the floor map details for a specified period. To use History Mode, the VST-APL on the same subnet must be registered as Vista Appliance Storage. For more information about the History Mode, please refer to Screen Reference > Wireless Monitor > Floor Map History Mode. |
| "Area List" button | Opens the "All Area List" dialog box.  Lists all the areas created on any floor maps, along with information of Area Authentication VAPs associated with each area.
|
| "Tag" button | NoteThe "Edit Tags" button cannot be used in Panel View. |
| "Create" button | Opens the "Create Floor Map" dialog box. Refer to Operation Reference > Floor Map > Configure Floor Maps for more details. |
Section 2
| Item Name | Description |
|---|---|
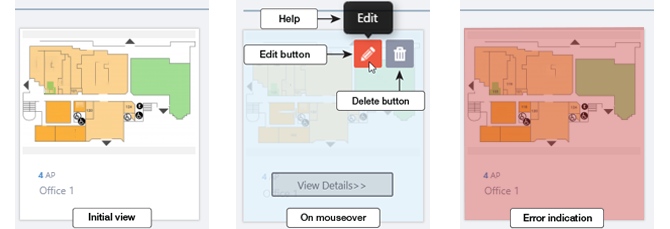
| Floor Map Panels | Each floor map is shown as a panel. The name of the floor map and the number of APs placed on the map are shown below the panel. When an Admin user hovers over a panel, that panel will become half-opaque, and "Edit" (pencil) and "Delete" (trashbin) buttons will appear at the top right of the panel Clicking the panel opens the "Floor Map Details" page for the floor map.
|
Section 3
| Details | You can click to see the information such as the number of Deployed APs, and Tags, in addition to the default items of Status, Floor Map Name, and Management Group Name. Floor Map Panel will not be displayed in the extended state of Floor Map List. Clicking Details again returns you to the default non-detailed view. |
| X Deployment Map | Shows the number of floor maps. |
| Search Floor Map | Filter entries in the list by entering a partial string in the search box. The Search field lets you enter a partial string to match. The screen displays entries with that string in one of the following fields: "Floor Map Name", "Management Group Name" or "Tag". To remove the filter, delete the string from the Search field and press Enter. NoteThe search is case-sensitive. |
| Checkbox | Check this box if you want to select the floor map as the display target. |
| Status Icon | Overall status of the APs on the floor map is indicated by an icon. A green checkmark means everything is normal. A red triangle indicates some APs on the map have an issue. |
| Floor Map Name | Shows the name of the floor map. |
| Management Group | Shows management groups for the floor map. |
| Item Name | Description |
|---|---|
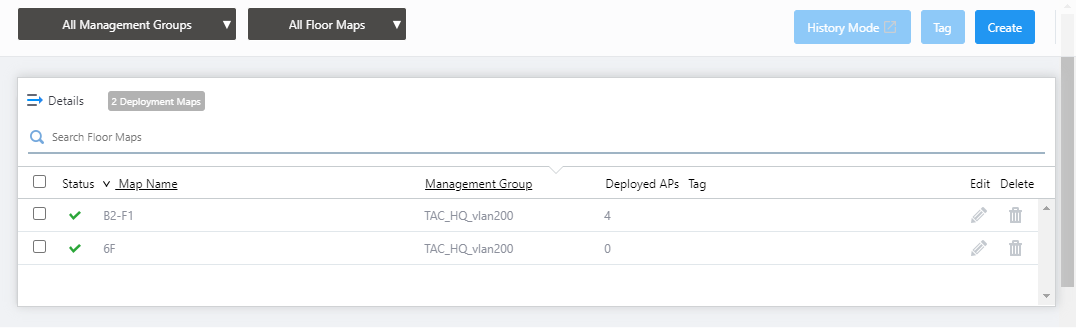
| Details | Click to return to the list display of Status, Floor Map Name, and Management Group Name. The Floor Map Panels will also be displayed on the left side of the Contents section. |
| X Deployment Map | Shows the number of floor maps. |
| Search Floor Map | Filter entries in the list by entering a partial string in the search box. The Search field lets you enter a partial string to match. The screen displays entries with that string in one of the following fields: "Floor Map Name", "Management Group Name" or "Tag". To remove the filter, delete the string from the Search field and press Enter. NoteThe search is case-sensitive. |
| Checkbox | To edit tags for floor maps, use the checkbox to select the maps and click this button. |
| Status Icon | Overall status of the APs on the floor map is indicated by an icon. A green checkmark means everything is normal. A red triangle indicates some APs on the map have an issue. |
| Floor Map Name | Shows the name of the floor map. |
| Management Group | Shows management groups for the floor map. |
| Deployed APs | Shows the number of wireless APs placed on the floor map. |
| Tag | Shows tags added to the floor map. |
| "Edit" (pencil) button: | Lets you edit the floor map. |
| "Delete" (trashbin) button: | Lets you delete the floor map. |
Floor Map Detail Views and 3D Floor Map
You can select the floor map to be displayed from the management group drop-down menu and Floor Map drop-down menu in the header of the Floor Map list.If you select multiple Floor Maps in the same management group, you can view the layered view of the Floor Maps in 3D.
- 3D Floor Map
s "3D Floor Map", a stereoscopically layered view will be displayed in the following case:
- When a specific management group is selected in the management group drop-down menu at the top of the screen, a specific floor map is not selected in the Floor Map drop-down menu, and multiple floor maps are selected in the Floor Map list on the right side of the screen.
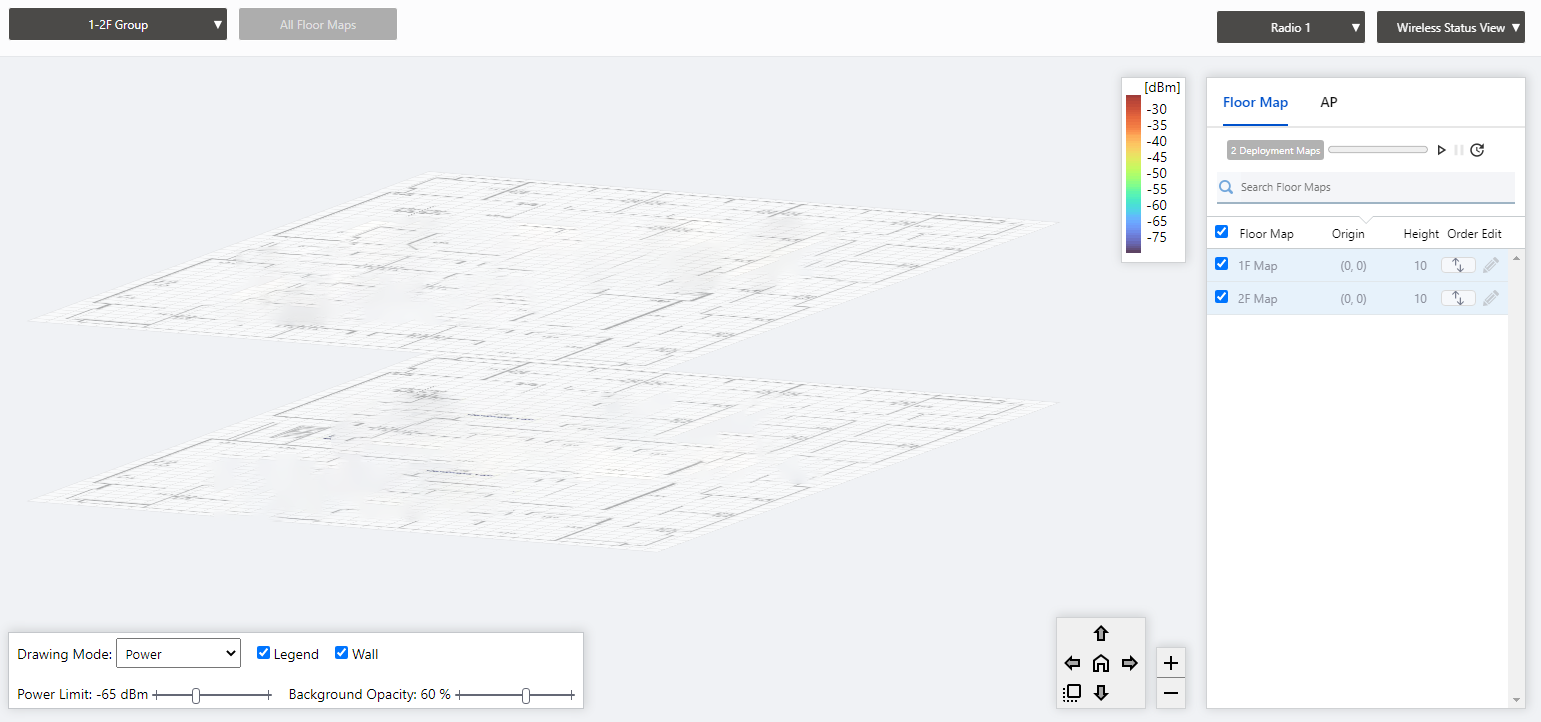
The 3D floor map view allows you to grasp the status of APs, the number of associated clients and their locations and flow lines (when AWC-CB is used and the Client Location Estimation History function is enabled), and the connections of APs in the AWC-SC configuration across the floor maps in the same management group.
- When a specific management group is selected in the management group drop-down menu at the top of the screen, a specific floor map is not selected in the Floor Map drop-down menu, and multiple floor maps are selected in the Floor Map list on the right side of the screen.
- Floor Map Details
The floor map details will be displayed in the following cases:
- When you select a specific management group in the management group drop-down menu at the top of the screen, and then select a specific floor map with one of the following
- Floor map drop-down menu at the top of the screen
- Floor map panel in the center of the screen
- Floor map drop-down menu at the top of the screen
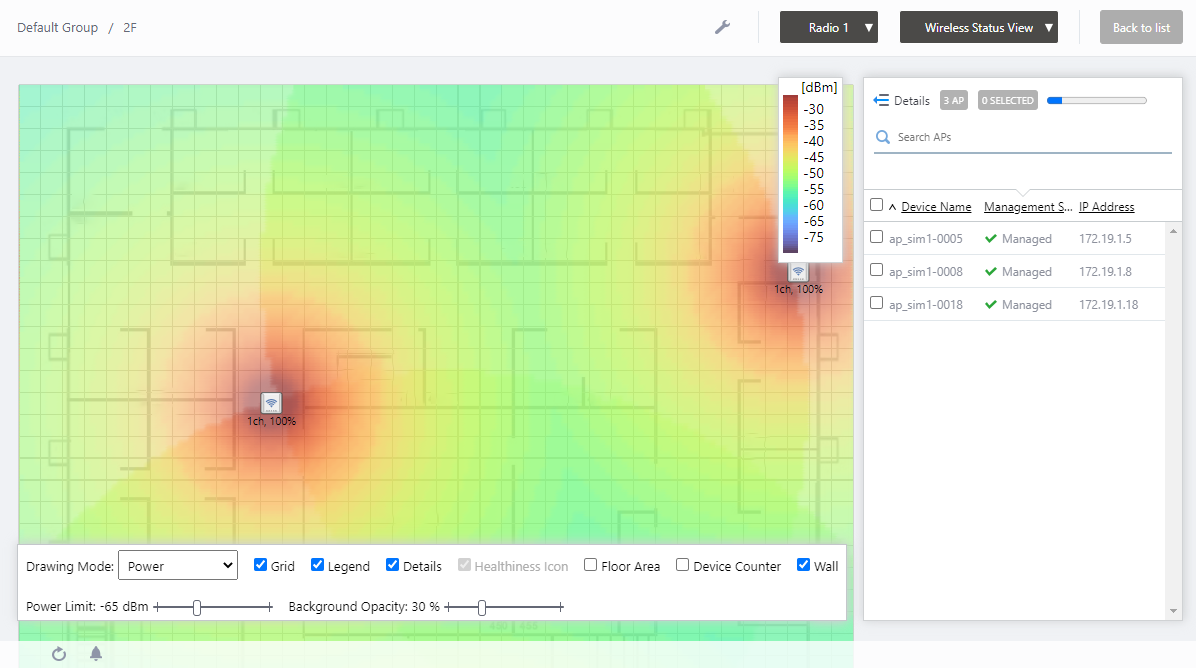
In the floor map details, you can monitor the status of APs, the number of associated clients, their locations and flow lines (when AWC-CB is used and the Client Location Estimation History function is enabled), and the connections of APs in the AWC-SC configuration, as well as monitor rogue APs detected by each managed AP.
You can also locate APs on the floor map, edit the area, and edit the walls in the floor map detail view.
- When you select a specific management group in the management group drop-down menu at the top of the screen, and then select a specific floor map with one of the following
04 Jul 2023 09:16