Floor Map Detail [Add AP to Map]
In this view, you can place an AP on the floor map.
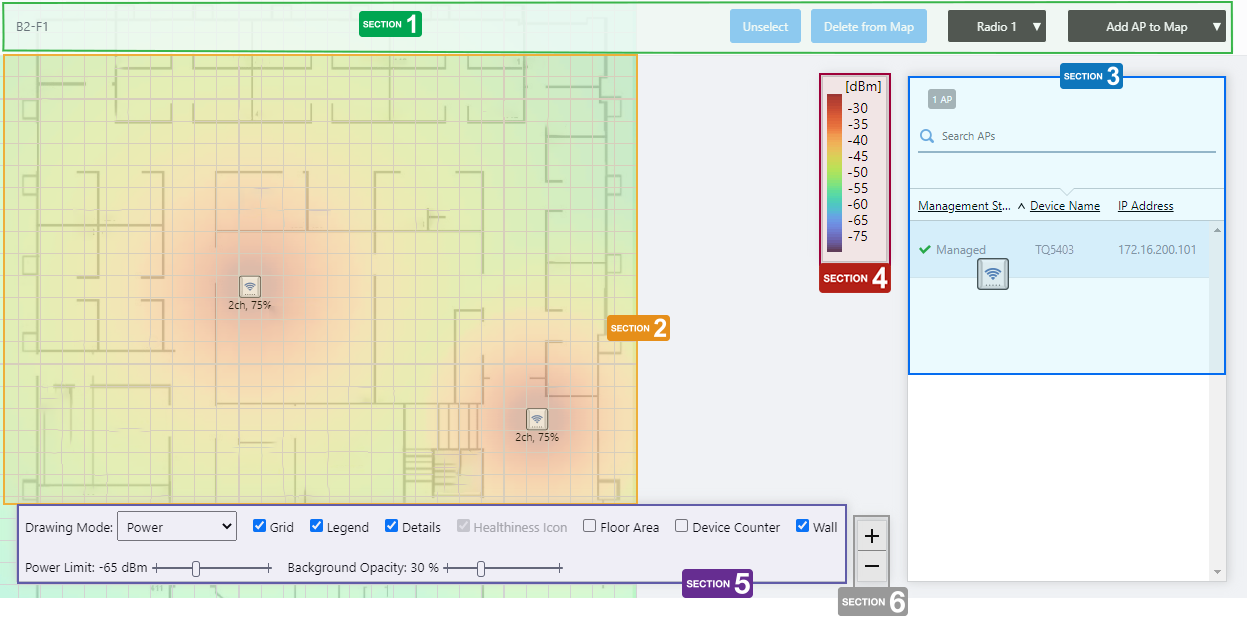
Section 1
| Item Name | Description |
|---|---|
| Management Group / Floor Map Group | The floor map name and the management group of the selected floor map will be displayed. |
| "Unselect" button | Deselects the currently selected (highlighted by blue dot) wireless APs. |
| "Delete from Map" button | Removes the currently selected (highlighted by blue dot) wireless APs from the map. |
| Radio dropdown menu | Select which radio band information to display from Radio 1, Radio 2, Radio 3, or "All Radios". The default is "All Radios". If you select "All Radios", wireless client information for all bands (Radio 1, Radio 2, and Radio 3) will be displayed. |
| View Selection dropdown menu | Lets you change what information is displayed on the Floor Map Details screen.
|
| "Back to list" button | Click to return to the Floor Map List screen. |
Section 2
- When you click the row of the AP you want to place on the Map from the list of unallocated APs in Section 3, the mouse pointer changes to the wireless AP icon.
By clicking on the grid of the floor map with the icon, you can place the AP on the floor map.
- The status of the placed AP will be displayed on the floor map, depending on what you previously selected in the View Selection dropdown menu. If you selected "Smart Connect View" in the dropdown menu, you will see the AP's Smart Connect status, and if you selected a different view, the AP status will be drawn on the floor map according to the "Wireless Status View".
- If you want to move an AP icon on the floor map, you can drag and drop it on the place you want it to move to.
- To remove an AP icon on the floor map, click on it to select it (the selected icon will drawn with a blue circle behind it) and then click the "Delete from Map" button at the top right of the content section.
You can select multiple APs by clicking them one by one.
To deselect, click on the "Unselect" button at the top right of the content section.
Section 3
Shows the wireless AP list.
The list contains only the APs that belong to the same Management Group as the map, and that are not yet placed on any map.
| Item Name | Description |
|---|---|
| X AP | Displays the number of wireless APs under the management group to which the floor map belongs, that are not yet placed on any floor map. |
| Search Wireless AP | You can search for wireless APs not placed on the floor map. The Search field lets you enter a partial string to match. The screen displays entries with that string in one of the following fields: "Management Status", "Device Name", "IP address", or "AP Profile". To remove the filter, delete the string from the search field and press enter. NoteThe search is case-sensitive. |
| Device Name | Shows the name given to the AP. |
| Status Icon | When the AP is managed by the AWC Plug-in, a green checkmark is displayed. When the AP is not managed by the AWC Plug-in, a red triangle is displayed. |
| Management Status | Shows the Management Status of the AP. |
| IP Address | Shows the AP's IP address. |
Section 4
Shows the legend of either the Wireless Status View or Smart Connect View.
The legend will be shown according to the immediately previous selection of the Views; the Smart Connect View legend for Smart Connect View, and the Wireless Status View legend for the others.
Section 5
The legend will be shown according to the immediately previous selection of the Views; the Smart Connect View legend for Smart Connect View, and the Wireless Status View legend for the others.
| Item Name | Description |
|---|---|
| Drawing Mode | The options in the Drawing Mode dropdown menu differ according to the immediately previous selection of the Views. If you chose Smart Connect View previously, the Drawing Mode dropdown comes with Topology and Traffic, and if you chose another view, the dropdown comes with Power and Channel. |
| Grid | Lets you enable or disable grid lines on the floor map. Checking this shows grid lines on the floor map. |
| Legend | Lets you enable or disable the legend. Check to display. |
| Details | Whether to display List of unallocated APs. Check to display. |
| Healthiness Icon | Whether to display the Healthiness Icon. This will work if you chose Smart Connect View from the View Selection dropdown menu immediately before, and you chose Topology from the Drawing Mode. Otherwise, this is irrelevant and disabled. Check to display. |
| Floor Area | This item is not supported. |
| Device Counter | This item is not supported. |
| Power Limit | You can set the lower limit of the wireless strength that is drawn on the heat map display, if you chose a view other than Smart Connect View from the View Selection dropdown menu immediately before. |
| Wall | If walls have been created on the floor map (using the Edit Wall page), lets you choose whether to display the walls. Check to display. |
| Opacity | Specify the opacity of the floor map background image. |
Section 6
Zoom In/Out buttons.
You can zoom in (+) or zoom out (-) of the floor map display. You can also use the mouse wheel scroll to zoom in or out.

14 Dec 2023 11:07