AP Settings
This page allows you to add or edit APs in the AWC Plug-in's management database.
Refer to Operation Reference > Wireless Configuration > Manage AP Registration for more details.
NoteWhen you search, sort or use tags to filter APs on this page, the AP selection status will be reset.
NoteIf an AP Profile contains VAPs using both WPA Enterprise and Fast Transition, when the number of APs that use this AP Profile changes, the configuration status of APs that use this AP Profile becomes "Changed".
When you make a change that affects the number of APs that use this AP Profile, a dialog box will ask you whether to apply the configuration to all APs that use this AP Profile.
If you click "OK", the configuration will be applied to all APs that use this AP profile.
General

Section 1
| Item Name | Description |
|---|---|
| "Configuration" button | Opens the "Configuration Mode" page. This page lets you change AP Profiles, and configure the channel and transmit power for managed APs. |
"Gear" icon
|
Hovering the mouse cursor over the Gear icon shows the dropdown menu items "Manual Registration", "Registration from CSV file", "Registration from Guest Node", "Export CSV file", "Export Report", "Edit Tag", "Assign AP Profile" and "Delete". "Edit Tag", "Assign AP Profile" and "Delete" can be selected only when you have selected (checked) at least one AP in the list.
|
"Spanner" icon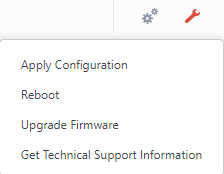
|
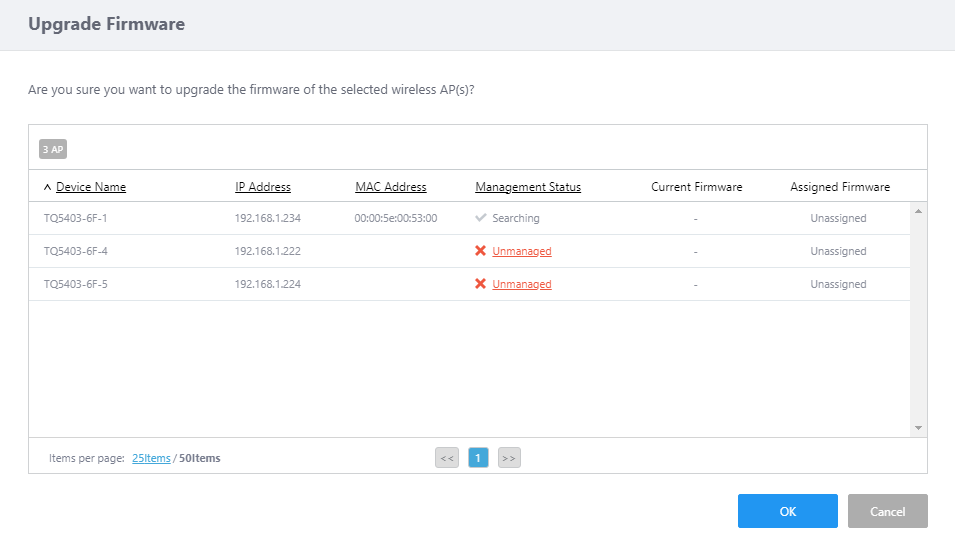
Hovering the mouse cursor over the Spanner icon shows a dropdown menu including "Apply Configuration", "Reboot", "Update Firmware", and "Get Technical Support Information". These menu items can be selected only when you have selected at least one AP in the list.NoteThe maximum number of APs to reboot in a single operation is 350. NoteThe number of APs that can be updated at a time depends on the traffic rate between the AWC Plug-in and each AP.
|
Section 2
| Item Name | Description |
|---|---|
| X AP | Shows the number of APs in the list. |
| X SELECTED | Shows the number of selected APs. |
| Search Wireless AP | Lets you filter the list of APs. The Search field lets you enter a partial string to match. The screen displays entries with that string in one of the following fields: "Device Name", "IP address", "MAC address", "AP Profile", "Management Group", "Floor Map Name", "Current Firmware" or "Serial Number". To remove the filter, delete the string from the search field and press enter. Refer to Wireless AP Details to see the "Floor Map Name", "Device Type", "Current Firmware" and "Serial Number". NoteThe search is case-sensitive. |
| Filter by tag | Lets you filter APs with tags. Clicking tags uses tags to filter the list. Clicking them again removes the filter. Clicking "Clear filter" removes the filter for all tags. |
| Tag | Clicking "Show All" under the "Search AP" box displays all tags. Clicking "Close filter list" returns to the initial format. |
| "Basic Information" / "Additional Information" buttons | Switches the contents of the list. |
Section 3
| Item Name | Description |
|---|---|
| Basic Information | |
| Checkbox | Lets you select APs. A checkbox in the header row can be used to check or uncheck all APs. Unchecking the box in the heading row deselects all entries in the list. |
| Device Name | Shows the name of the AP. If the AP was added from the Guest Device list, the guest device name is displayed. |
| Management Status | Shows the Management Status of the AP.
|
| Config Status | Shows the configuration status of the AP.
|
| IP Address | Shows the AP's IP address. If the Management Status is "Waiting", "Retrieving" is shown. |
| MAC Address | Shows the device's MAC address. If the Management Status is "Waiting", "Retrieving" is shown. |
| AP Profile | Shows the AP Profile assigned to the AP. |
| Management Group | Shows the Management Group to which the AP belongs. |
| Tag | Shows tags added to the AP. |
| Edit (pencil icon) | Opens the "Wireless AP Edit" dialog box. |
| Detail (magnifying glass icon) | Opens the "Wireless AP Detail" page. |
| Additional Information | |
| Checkbox | Lets you select APs. A checkbox in the header row can be used to check or uncheck all APs. Unchecking the box in the heading row deselects all entries in the list. |
| Device Name | Shows the name of the AP. If the AP was added from the Guest Device list, the guest device name is displayed. |
| Management Status | Shows the Management Status of the AP.
|
| Config Status | Shows the configuration status of the AP.
|
| CB Profile | Shows the CB Profile assigned to the AP. |
| SC Profile | Shows the SC Profile associated with the Management Group that the AP belongs to.NoteThe SC Profile will be shown whether Smart Connect is supported and enabled on the AP. |
| DCN Profile | Shows "Unconfigured".NoteAT-VST-APL does not support AWC-DCN. |
| Floor Map Name | Shows the name of the configured floor map. |
| Assigned Firmware | Shows the filename of the firmware image that has been uploaded on the Firmware Registration screen, and is to be applied or has been applied to the AP. |
| Edit (pencil icon) | Opens the "Wireless AP Edit" dialog box. |
| Detail (magnifying glass icon) | Opens the "Wireless AP Detail" page. |
Section 4
| Item Name | Description |
|---|---|
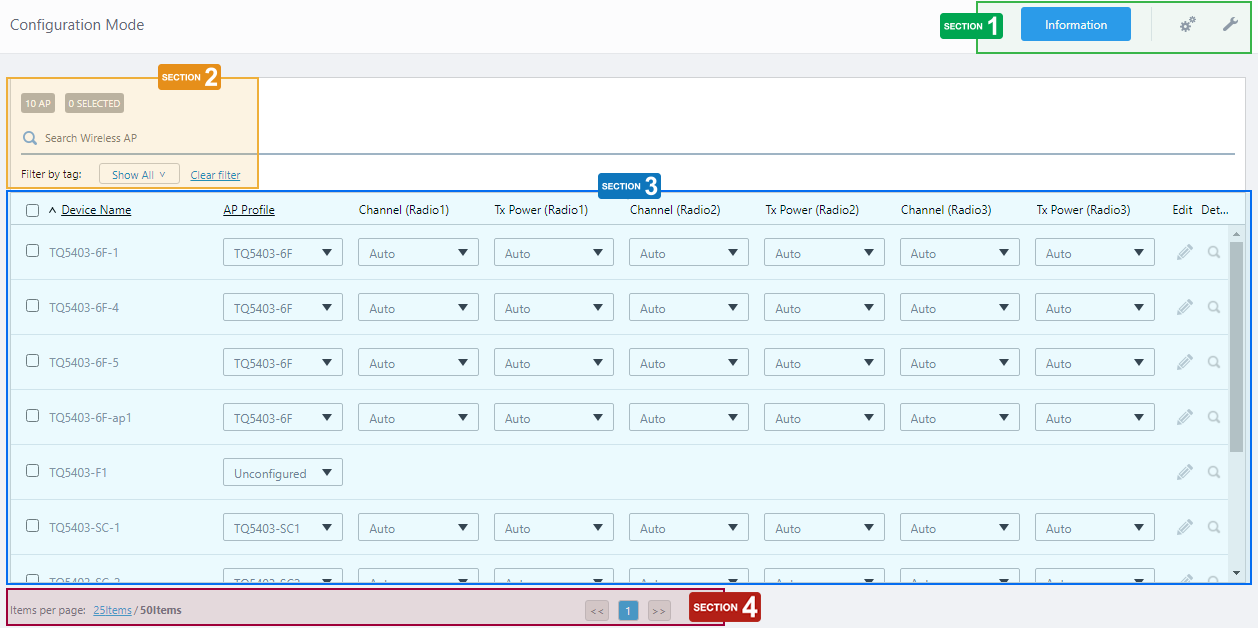
| Items per page | Specifies the number of items per page. |
| << | Goes to the first page of the list. |
| (Page Number) | Shows the current page number in the list. |
| >> | Goes to the last page of the list. |
Wireless Configuration
This page lets you change AP Profiles, and configure the channel and transmit power for managed APs.When you have finished the configuration changes on this page, apply the changes by selecting "Apply Configuration" from the menu that displays when you hover over the "Spanner" icon.
Section 1
| Item Name | Description |
|---|---|
| "Information" button | Opens the "Basic Information" page. The page lets you review addresses and Management Groups of APs in the list. |
| "Gear" icon
|
Hovering the mouse cursor over the Gear icon shows the dropdown menu items "Manual Registration", "Registration from CSV file", "Registration from Guest Device", "Export CSV file", "Edit Tag", "Assign AP Profile" and "Delete". "Edit Tag", "Assign AP Profile" and "Delete" can be selected only when you have selected (checked) at least one AP in the list.
|
| "Spanner" icon
|
Hovering the mouse cursor over the Spanner icon shows a dropdown menu including "Apply Configuration". These menu items can be selected only when you have selected at least one AP in the list.
|
Section 2
| Item Name | Description |
|---|---|
| X AP | Shows the number of APs in the list. |
| X SELECTED | Shows the number of selected APs. |
| Search Wireless AP | Lets you filter the list of APs. The Search field lets you enter a partial string to match. The screen displays entries with that string in one of the following fields: "Device Name", "IP address", "MAC address", "AP Profile", "Management Group", "Floor Map Name", "Current Firmware" or "Serial Number". To remove the filter, delete the string from the search field and press enter. Refer to Wireless AP Details to see the "Floor Map Name", "Device Type", "Current Firmware" and "Serial Number". NoteThe search is case-sensitive. |
| Filter by tag | Lets you filter APs with tags. Clicking tags uses tags to filter the list. Clicking them again removes the filter. Clicking "Clear filter" removes the filter for all tags. |
| Tag | Clicking "Show All" under the "Search AP" box displays all tags. Clicking "Close filter list" returns to the initial format. |
Section 3
| Item Name | Description |
|---|---|
| Checkbox | Lets you select APs. A checkbox in the header row can be used to check or uncheck all APs. Unchecking the box in the heading row deselects all entries in the list. |
| Device Name | Shows the name of the AP. If the AP was added from the Guest Device list, the guest device name is displayed. |
| AP Profile | Lets you change AP Profile for APs. Refer to Operation Reference > Wireless Configuration > Change Management Group or AP Profile for AP for more details. |
| Channel (Radio1) | Lets you change the channel for Radio1. Clicking the dropdown list shows a dialog box to select channels. Select "Auto" or a specific channel from the channel list available for the AP Profile. |
| Tx Power (Radio1) | Lets you change the transmit power setting for Radio1. Clicking the dropdown list shows a dialog box to specify a transmit power setting. Select a power setting from Auto, Min, Low, Middle, High, Max. |
| Channel (Radio2) | Lets you change the channel for Radio2. Clicking the dropdown list shows a dialog box to select channels. Select "Auto" or a specific channel from the channel list available for the AP Profile. |
| Tx Power (Radio 2) | Lets you change the transmit power setting for Radio2. Clicking the dropdown list shows a dialog box to specify a transmit power setting. Select a power setting from Auto, Min, Low, Middle, High, Max. |
| Channel (Radio3) | Lets you change the channel for Radio3. Clicking the dropdown list shows a dialog box to select channels. Select "Auto" or a specific channel from the channel list available for the AP Profile. |
| Tx Power (Radio3) | Lets you change the transmit power setting for Radio3. Clicking the dropdown list shows a dialog box to specify a transmit power setting. Select a power setting from Auto, Min, Low, Middle, High, Max. |
| Edit (pencil icon) | Opens the "Wireless AP Edit" dialog box. |
| Detail (magnifying glass icon) | Opens the "Wireless AP Detail" page. |
14 Dec 2023 11:07