Create CB Profiles
Next let's create CB Profiles for channel blanket wireless networks.
A CB Profile is a collection of setting items specific to channel blanketing, mainly settings for the CB VAP, which is the VAP for channel blanketing.
CB Profiles supplement configuration items specific to channel blanket, by overriding some parts of an AP Profile that are general operating settings for wireless APs.
When applying the AP Profile and CB Profile, if there is conflicting configuration between the profiles, the configuration item defined in the CB Profile takes precedence over the AP Profile, and is written to the AP. When a configuration item is included only in the AP Profile, the configurations will be applied as is.
- In the CB Profile for AT-TQ5403/5403e, up to three CB VAPs can be set for each of Radio 1 and Radio 2.
- You can apply only a single CB Profile to an AP.
We are going to create two CB Profiles as you see in the following table (the purple cells).
| Radio | TQ5403-xF-1 | TQ5403-xF-2 | TQ5403-xF-3 | Overview | |
|---|---|---|---|---|---|
| 2F | Radio 2 | Multi-channel VAP for employees' PCs | |||
| Radio 1 | AWC-CB VAP for employees' mobile devices | ||||
| 1F | Radio 2 | Multi-channel VAP for employees' PCs | |||
| Radio 1 | AWC-CB VAP for employees' mobile devices | ||||
| AWC-CB VAP for guests | |||||
CB Profile for 1F
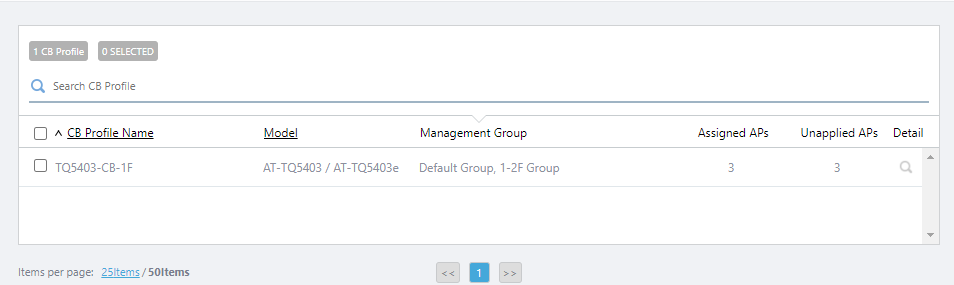
- Select "Wireless Configuration" > "CB Profile" from the AWC Plug-in menu.
The CB Profile list will appear.
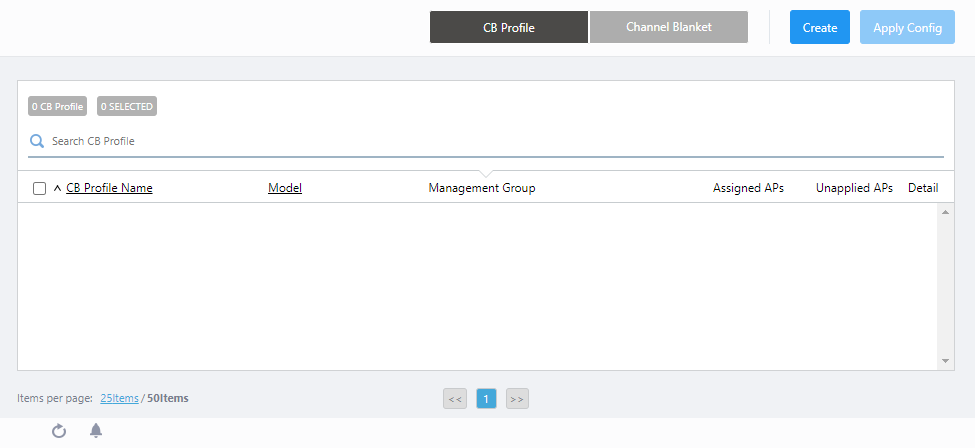
- Click "Create" at the top right corner.
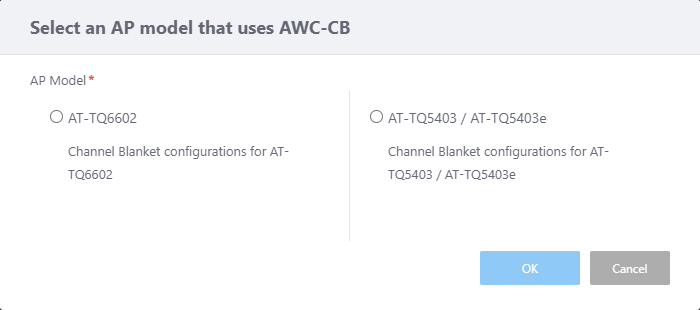
- The "Select an AP model that uses AWC-CB" dialog box will appear.

- Select an AP model.
This time, select "AT-TQ5403 / AT-TQ5403e".
- Click "OK".
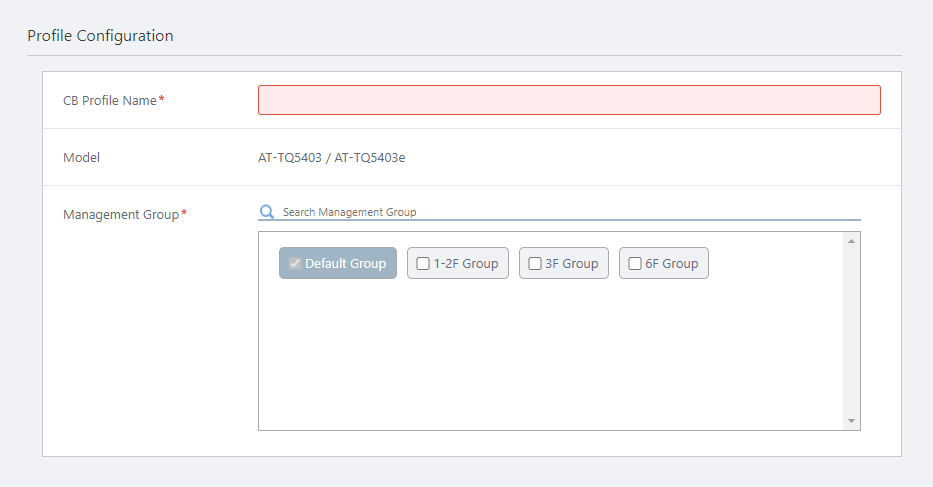
- The "Create CB Profile" screen will appear.
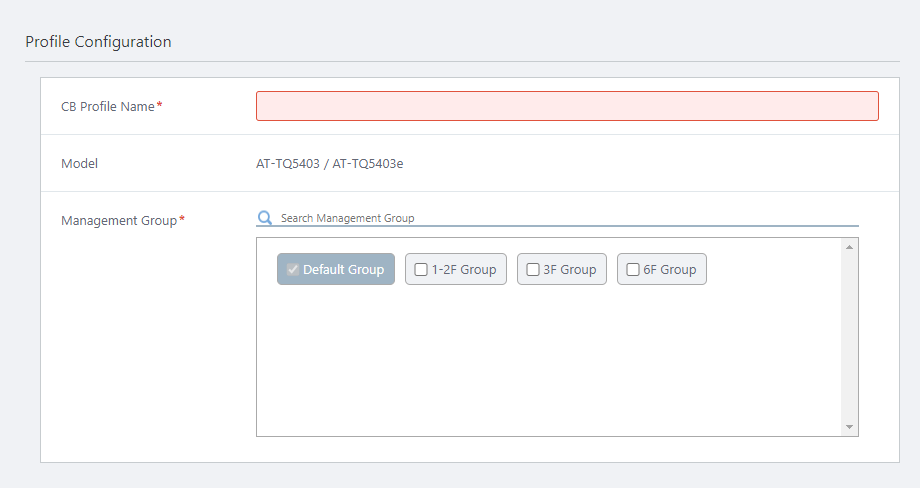
- Configure general parameters in the "Profile Configuration" section.
- Enter "TQ5403-CB-1F" in "CB Profile Name".
- Select the management group that you want apply this CB Profile to.
A CB Profile can be used in multiple management groups by selecting those groups on this screen.
Here we check the "1-2F Group" that we created earlier.
Note that you cannot uncheck the "Default Wireless Group".
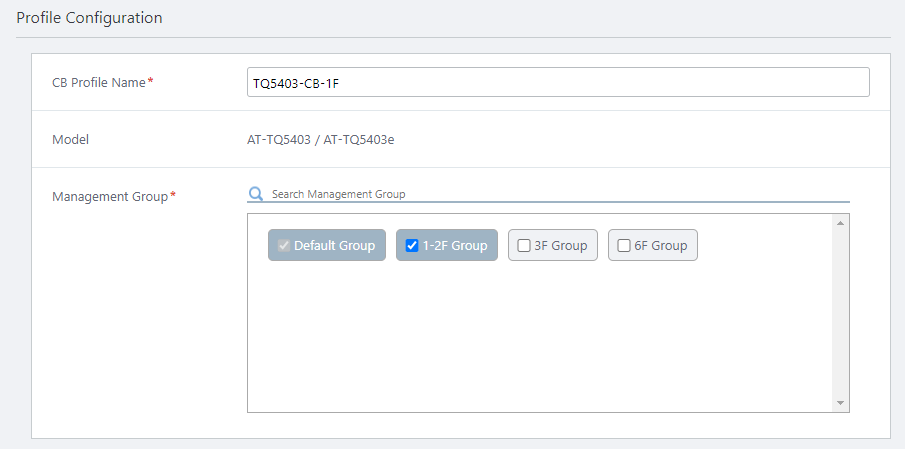
- Enter "TQ5403-CB-1F" in "CB Profile Name".
- Configure VAPs in the "VAP (Multiple SSID) Configuration" section.
First, Create a CB VAP "ForStaff-Mobile" for employees' mobile devices, as CB VAP 1.
As mentioned when creating the AP Profile, here we enable "Wireless Client Isolation" so that guest computers cannot see each other. Please note that this setting (Wireless Client Isolation) affects all VAPs (multi-channel and CB) on the same radio. As we should enable this on Radio 1 to block traffic between guests on CB VAP "ForGuest", it is also enabled on the CB VAP "ForStaff-Mobile", therefore employees' devices cannot communicate with each other. In this configuration, both employees have to connect to the multi-channel VAP if they want to discover each other's devices.
Table 2: CB VAP "ForStaff-Mobile" Configuration
Item Name Value Description Radio Radio 1 Select a radio band to use for this CB VAP, from Radio 1 (2.4GHz) and Radio 2 (5GHz W52) VAP 1 Specify a VAP number for this CB VAP configuration. Channel
1
Select a channel to use for this CB VAP
This setting is applied to all VAPs (multi-channel and CB) on the same radio.
VAP Status Enable Specify "Enable" or "Disable". VLAN ID
100
Specify a VLAN ID used for communication between the CB VAP and associated clients (mandatory)
Note
Specify a VLAN ID that is different from the AP's management VLAN. When the AP is detected as a guest device, a parent AMF device is configured to collect the guest device information automatically ("dynamic discovery"), and wireless clients get their IP addresses via DHCP.
SSID ForStaff-Mobile Specify an SSID (network name) to use on the CB VAP. Broadcast SSID Enable Specify whether to broadcast the SSID on the CB VAP. Security WPA Personal Specify a security method for the VAP. Security Key (WPA-PSK) 5+@f/=0N1y Specify an encryption key for the VAP. WPA versions WPA2 Specify a WPA version to use on the VAP. Encryption Protocol CCMP Specify an encryption protocol to use on the VAP. Management Frame Protection Disable Specify whether to protect management frames from eavesdropping and forging. Broadcast Key Refresh Rate 0 Specify an interval at which to refresh the broadcast key that is sent to clients on the VAP. Specifying "0" stops the key from refreshing. MAC Access Control Disable Specify whether to use MAC Access Control on the VAP. Area Authentication Disable Specify whether to use the Area Authentication function. Fast Roaming Disable Specify whether to use Fast Roaming of wireless clients. Wireless Client Isolation
Enable
Specify whether to block communication between wireless clients connected to the same VAP.
This setting is applied to all VAPs (multi-channel and CB) on the same radio.
Inactivity Timer 300 Specify the delay before disconnecting a client that disappears without notifying the APs. Duplicate AUTH received Ignore Select how to process connection requests from clients that have maintained a connection. Association Advertisement Enable Specify whether to use Association Advertisement. DTIM Period 1 Specify how frequently to insert a DTIM (Delivery Traffic Indication Map) in the AP's beacons (every 1 to 255 beacons). RSSI Threshold
30
Specify the numerical value of the parameter related to beacon control of CB VAP, in the range of 0 to 91.
Adjusting this parameter may improve the connection / communication status in a Channel Blanket environment.
Note
This setting is normally used for support purposes. Do not change the value.
Tx Power Max Select the AP's transmission power. Proxy ARP Enable Specify whether to use Proxy ARP. 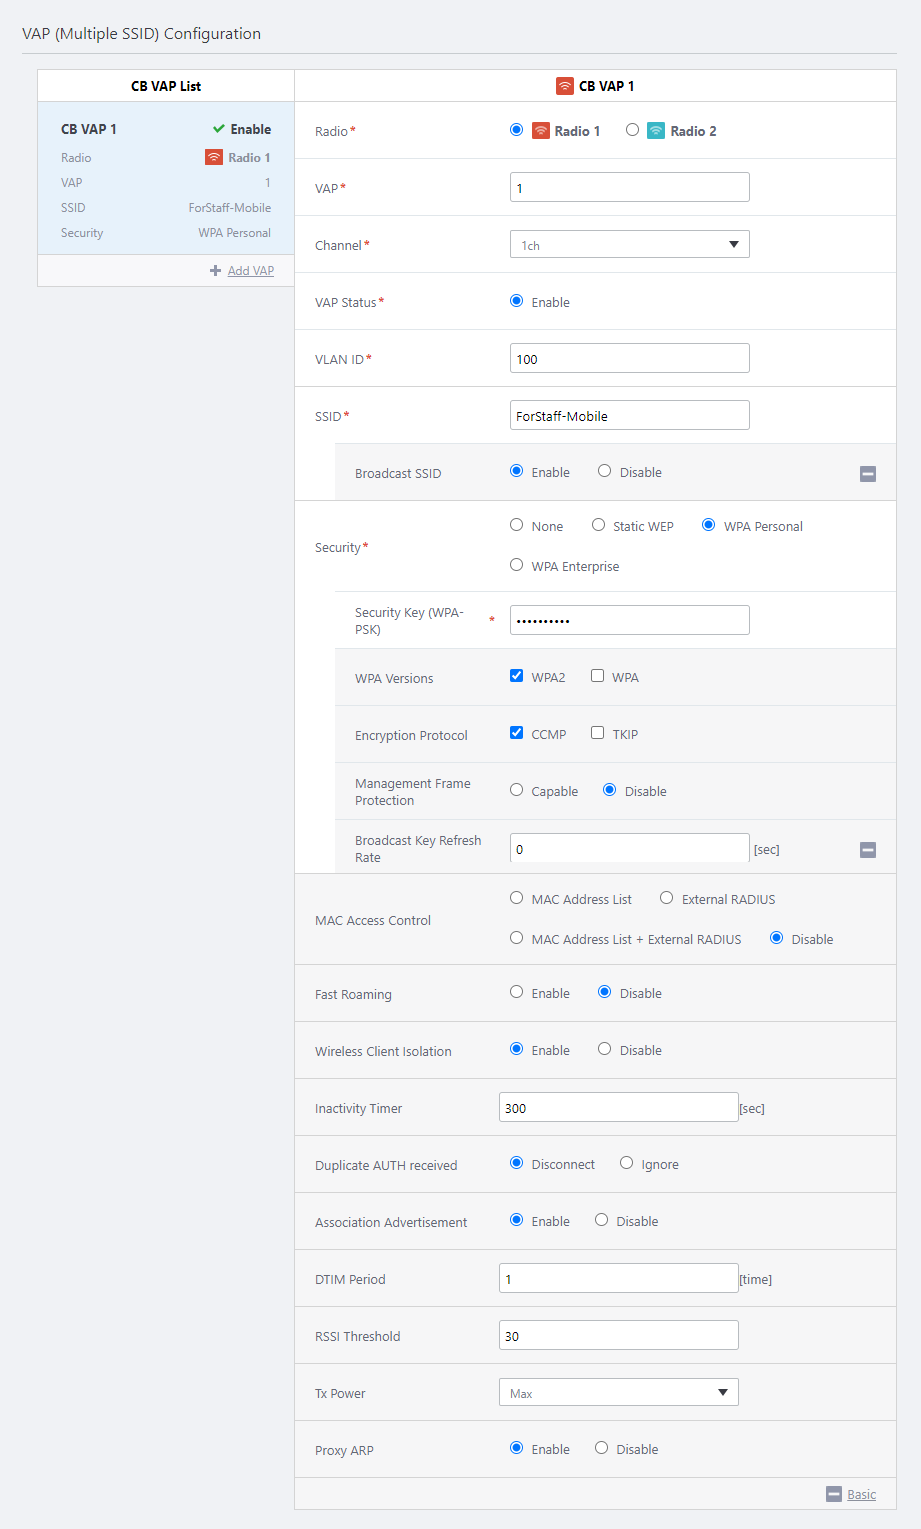
- Next, click "+ Add VAP" on "VAP (Multiple SSID) Configuration" to create another CB VAP for guests.
- Now we are going to create a CB VAP "ForGuest" for guests' computers (CB VAP 2).
We don't use any security on the CB VAP for guests.
Table 3: CB VAP "ForGuest" Configuration
Item Name Value Description Radio Radio 1 Select a radio band to use for this CB VAP, from Radio 1 (2.4GHz) and Radio 2 (5GHz W52) VAP 2 Specify a VAP number for this CB VAP configuration. Channel
1
Select a channel to use for this CB VAP
This setting is applied to all VAPs (multi-channel and CB) on the same radio.
VAP Status Enable Specify "Enable" or "Disable". VLAN ID
200
Specify a VLAN ID used for communication between the CB VAP and associated clients (mandatory)
Note
Specify a VLAN ID that is different from the AP's management VLAN. When the AP is detected as a guest device, a parent AMF device is configured to collect the guest device information automatically ("dynamic discovery"), and wireless clients get their IP addresses via DHCP.
SSID ForGuest Specify an SSID (network name) to use on the CB VAP. Broadcast SSID Enable Specify whether to broadcast the SSID on the CB VAP. Security None Specify a security method for the VAP. MAC Access Control Disable Specify whether to use MAC Access Control on the VAP. Area Authentication Disable Specify whether to use the Area Authentication function. Wireless Client Isolation
Enable
Specify whether to block communication between wireless clients connected to the same VAP.
This setting is applied to all VAPs (multi-channel and CB) on the same radio.
Inactivity Timer 300 Specify the delay before disconnecting a client that disappears without notifying the APs. Duplicate AUTH received Ignore Select how to process connection requests from clients that have maintained a connection. Association Advertisement Enable Specify whether to use Association Advertisement. DTIM Period 1 Specify how frequently to insert a DTIM (Delivery Traffic Indication Map) in the AP's beacons (every 1 to 255 beacons). RSSI Threshold
30
Specify the numerical value of the parameter related to beacon control of CB VAP, in the range of 0 to 91.
Adjusting this parameter may improve the connection / communication status in a Channel Blanket environment.
Note
This setting is normally used for support purposes. Do not change the value.
Tx Power Max Select the AP's transmission power. Proxy ARP Enable Specify whether to use Proxy ARP. 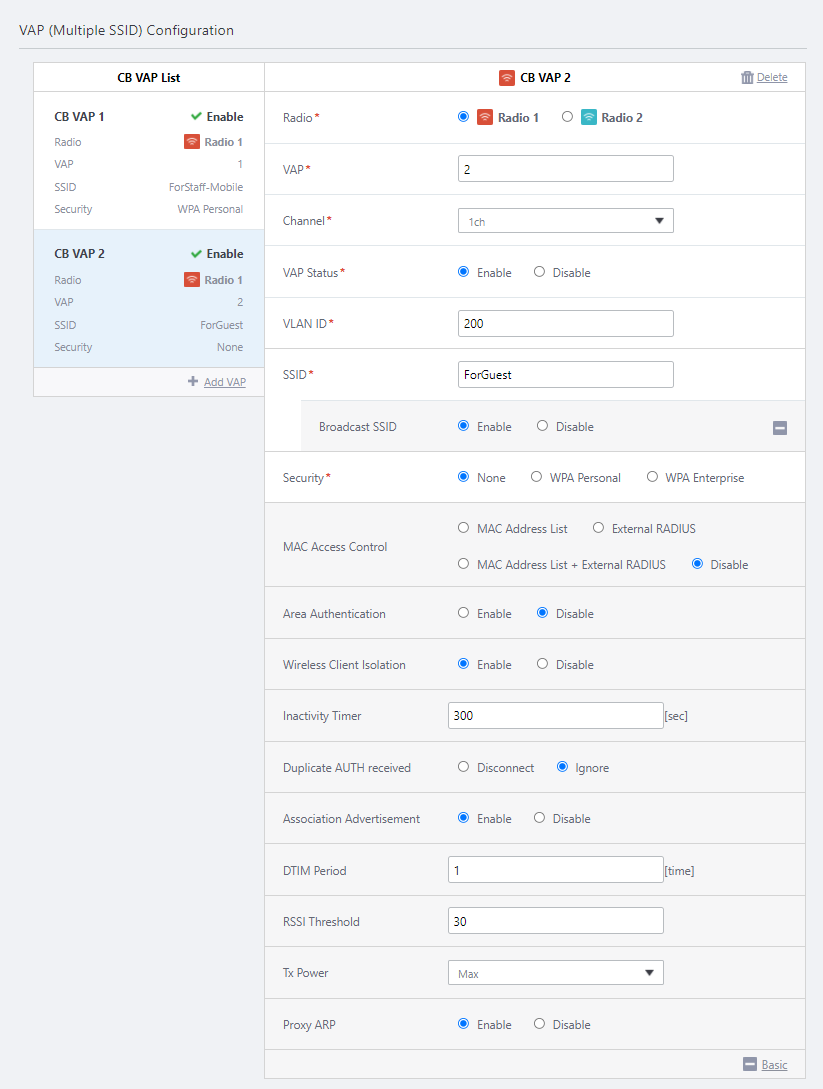
- Now we are going to create a channel blanket to apply the CB Profile to.
Click the "Create CB" button in the "Channel Blanket List" section.
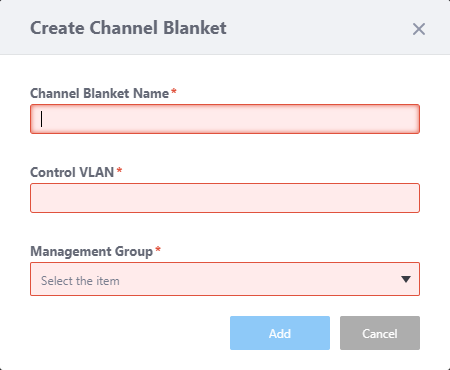
The "Create Channel Blanket" dialog box will appear.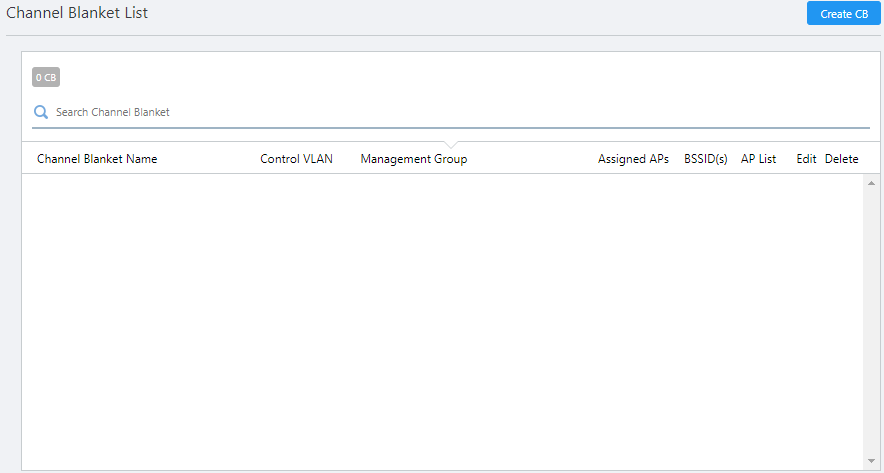
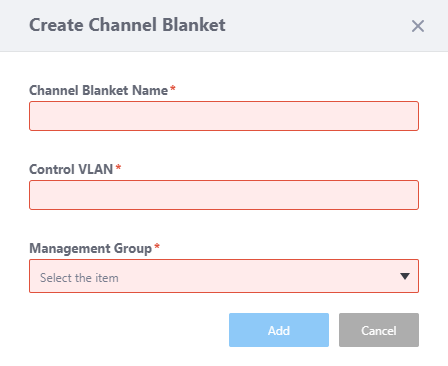
- Enter "1F Blanket" in "Channel Blanket Name".
- Configure the "Control VLAN".
The Control VLAN for a channel blanket should be different from the management VLAN of the APs and VLANs for the VAPs to which the wireless clients will belong.
Here we enter "101".
- Select the management group whose APs you want to add to this channel blanket.
Here we select "1-2F Group".

- Click "Add" to create the channel blanket "1F Blanket".
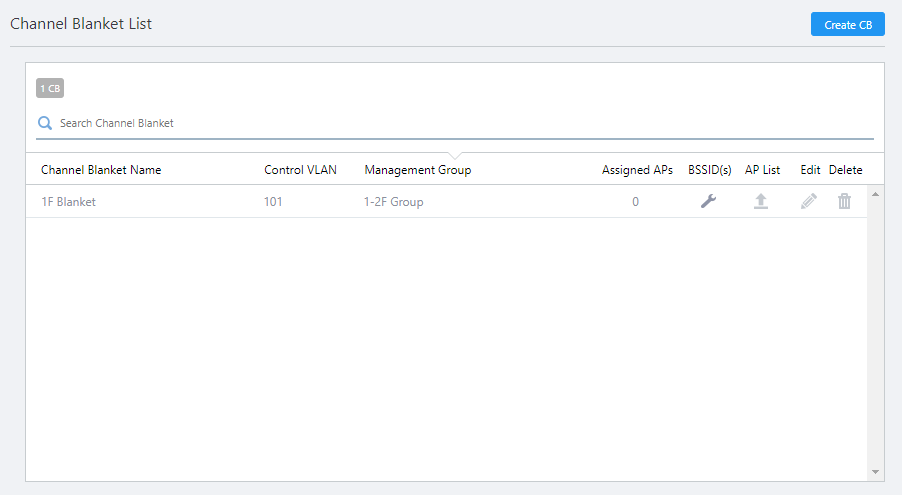
Now you can see "1F Blanket" in the channel blanket list.
- Next let's add APs to the channel blanket "1F Blanket".
Click the "AP List" button on the "1F Blanket" row in the channel blanket list.
The "AP List" dialog box will appear.
In the title, the channel blanket name follows "AP List", in brackets. In this case, the title is "AP List (Channel Blanket Name: 1F Blanket)".

- Click "Edit AP List".
The "Add/Remove APs" dialog box will appear.
In this dialog box, you can select APs from a floor map or from the list of the APs in the management group.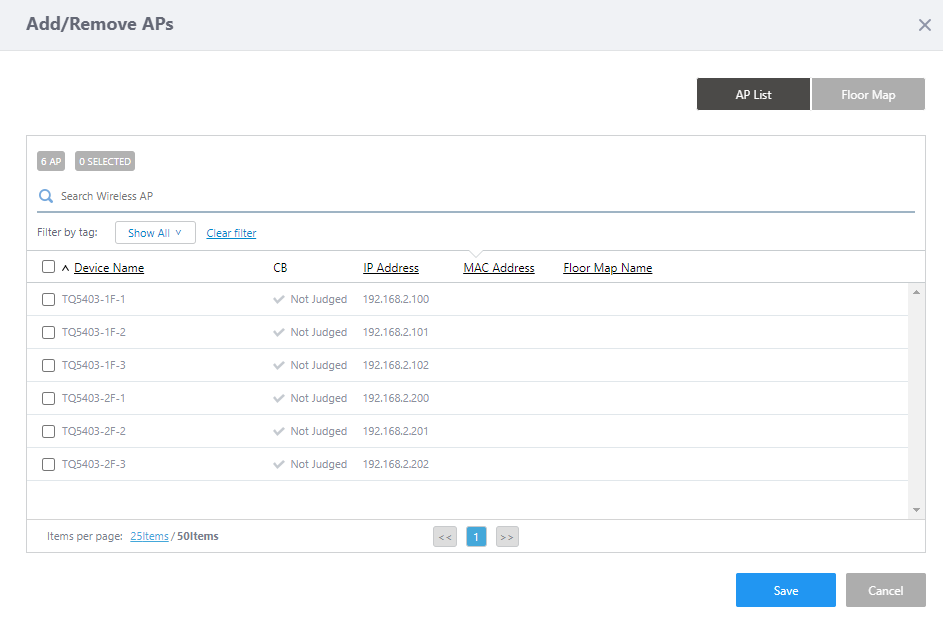
By default, the list of APs in the management group is displayed.
- Click the "Floor Map" button in the upper right corner to switch to the panel view of the floor map.
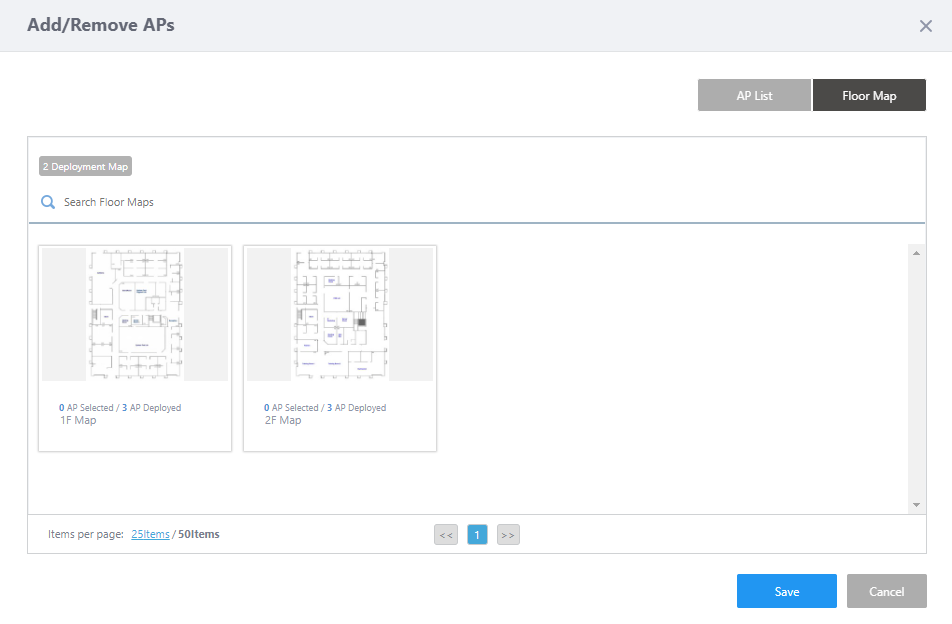
- Click "1F Map" panel.
APs placed on the "1F Map" will be displayed as icons on the map.

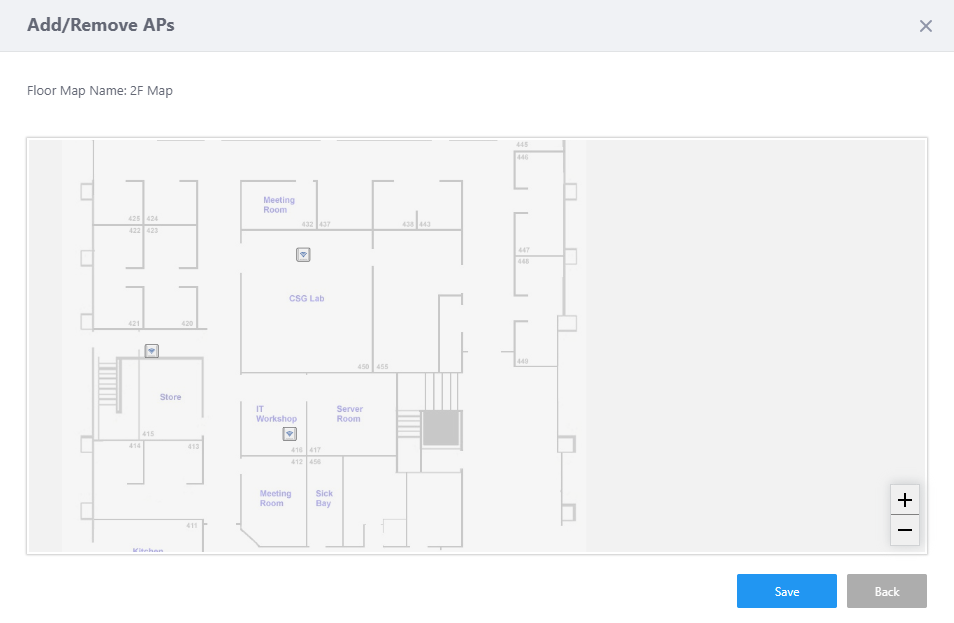
- Select APs to join the channel blanket by clicking their icons on the map.
- When you hover over an AP, its IP address, MAC address and model name will pop up.
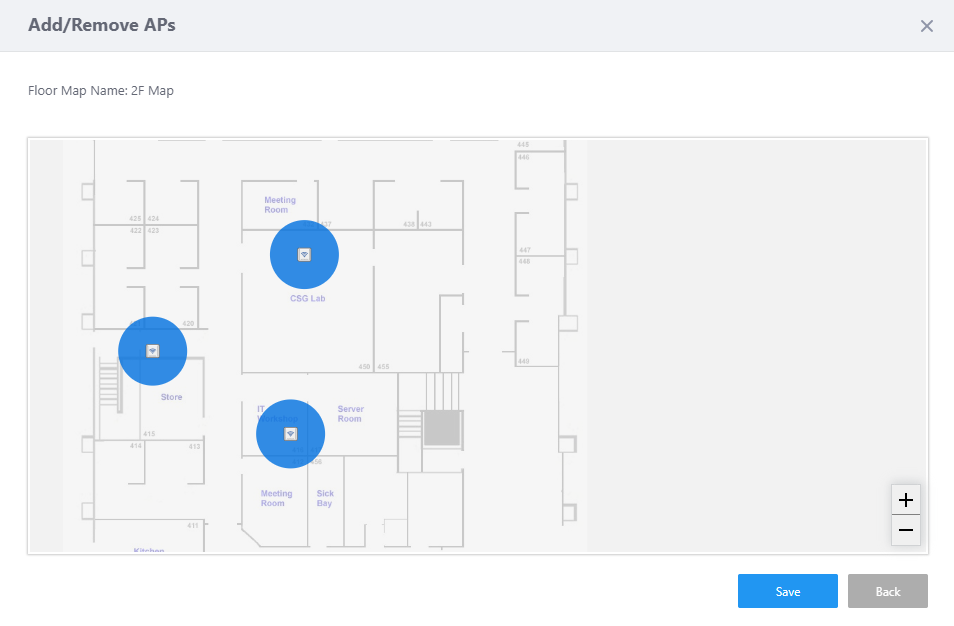
- When you click an AP icon, a blue circle will appear around the AP and show that it is selected. You can select multiple APs.
- Clicking an AP icon again deselects it.
- An AP Icon in dark gray shows that the AP already belongs to another channel blanket.
In this example, you cannot see AP icons in dark gray because no AP belongs to a channel blanket.
Here we select all three APs.
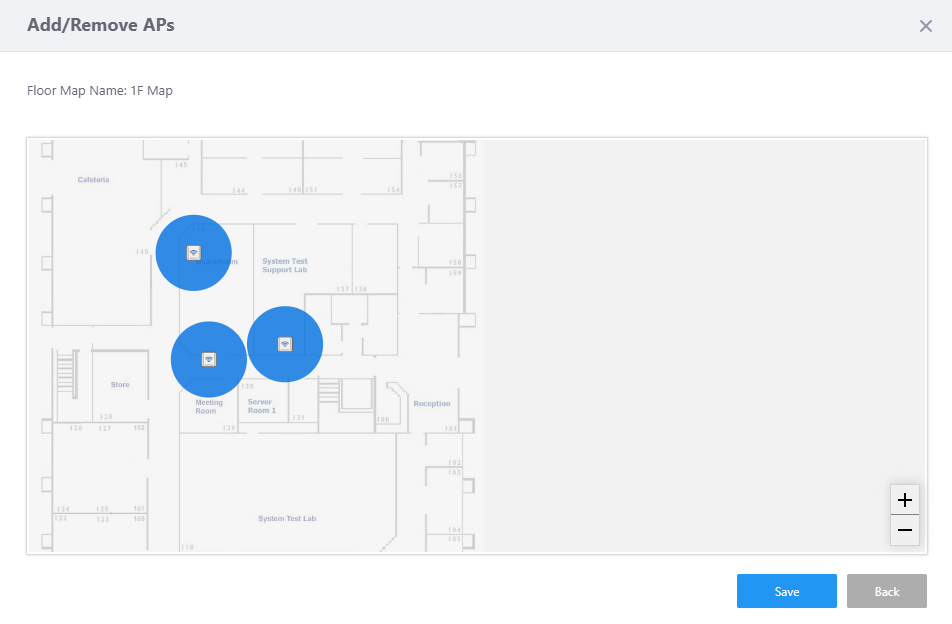
- When you hover over an AP, its IP address, MAC address and model name will pop up.
- Click "Save" in the "Add/Remove APs" dialog box to save the selection.
Now you can see the selected APs on the "AP List" dialog box.
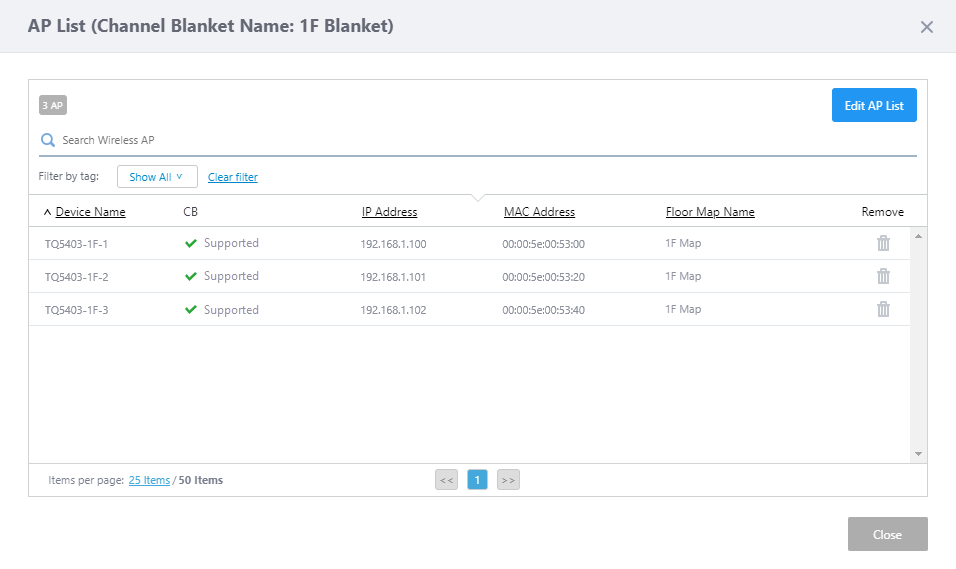
Make sure that the correct APs are selected, then click "Close" to close the "AP List" dialog box.
This returns you to the "Channel Blanket List" section of the "Create Channel Blanket" screen.
In the "1F Blanket" line, you can see that "Assigned APs" is updated to "3".

- Click "Add" at the top right of the Content screen to save the configuration.
CB Profile for 2F
Next let's create a CB Profile for the second floor.We will create a CB VAP for employees' mobile devices like we did for the CB VAP for 1F.
- Select "Wireless Configuration" > "CB Profile" from the AWC Plug-in menu to go back to the CB Profile list screen.
- Click "Create" at the top right corner.
- The "Select an AP model that uses AWC-CB" dialog box will appear.
- Select an AP model.
This time, select "AT-TQ5403 / AT-TQ5403e".
- Click "OK".
- The "Create CB Profile" screen will appear.
- Configure general parameters in the "Profile Configuration" section.
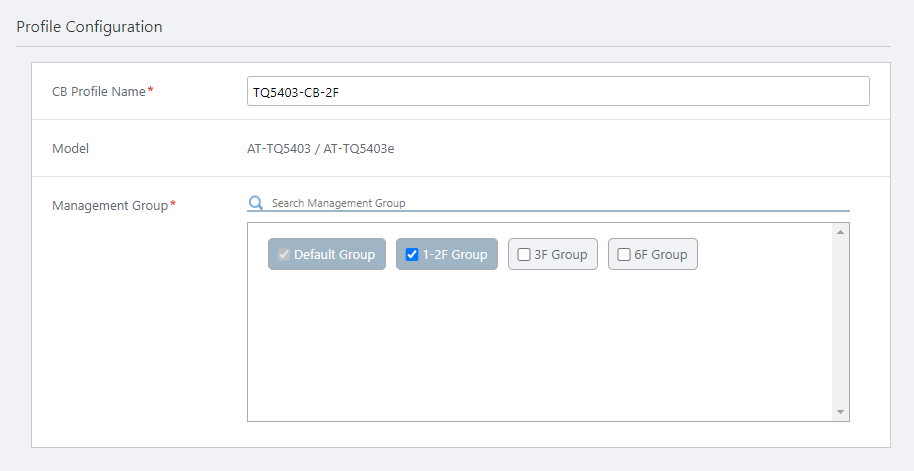
- Enter "TQ5403-CB-2F" in "CB Profile Name".
- Select the management group that you want apply this CB Profile to.
A CB Profile can be used in multiple management groups by selecting those groups on this screen.
Here we check the "1-2F Group" that we created earlier.
Note that you cannot uncheck the "Default Wireless Group".
- Enter "TQ5403-CB-2F" in "CB Profile Name".
- Configure VAPs in the "VAP (Multiple SSID) Configuration" section.
Create a CB VAP "ForStaff-Mobile" for employees' mobile devices, CB VAP 1.
Because this CB VAP has no direct relationship to the one created for 1F, in spite of having the same name, and we are not going to create a CB VAP for guests on the 2nd floor, we could disable "Wireless Client Isolation". But in this example, we will use the same settings as before.
Table 4: CB VAP "ForStaff-Mobile" Configuration
Item Name Value Description Radio Radio 1 Select a radio band to use for this CB VAP, from Radio 1 (2.4GHz) and Radio 2 (5GHz W52) VAP 1 Specify a VAP number for this CB VAP configuration. Channel
1
Select a channel to use for this CB VAP
This setting is applied to all VAPs (multi-channel and CB) on the same radio.
VAP Status Enable Specify "Enable" or "Disable". VLAN ID
100
Specify a VLAN ID used for communication between the CB VAP and associated clients (mandatory)
Note
Specify a VLAN ID that is different from the AP's management VLAN. When the AP is detected as a guest device, a parent AMF device is configured to collect the guest device information automatically ("dynamic discovery"), and wireless clients get their IP addresses via DHCP.
SSID ForStaff-Mobile Specify an SSID (network name) to use on the CB VAP. Broadcast SSID Enable Specify whether to broadcast the SSID on the CB VAP. Security WPA Personal Specify a security method for the VAP. Security Key (WPA-PSK) 5+@f/=0N1y Specify an encryption key for the VAP. WPA versions WPA2 Specify a WPA version to use on the VAP. Encryption Protocol CCMP Specify an encryption protocol to use on the VAP. Management Frame Protection Disable Specify whether to protect management frames from eavesdropping and forging. Broadcast Key Refresh Rate 0 Specify an interval at which to refresh the broadcast key that is sent to clients on the VAP. Specifying "0" stops the key from refreshing. MAC Access Control Disable Specify whether to use MAC Access Control on the VAP. Area Authentication Disable Specify whether to use the Area Authentication function. Fast Roaming Disable Specify whether to use Fast Roaming of wireless clients. Wireless Client Isolation
Enable
Specify whether to block communication between wireless clients connected to the same VAP.
This setting is applied to all VAPs (multi-channel and CB) on the same radio.
Inactivity Timer 300 Specify the delay before disconnecting a client that disappears without notifying the APs. Duplicate AUTH received Ignore Select how to process connection requests from clients that have maintained a connection. Association Advertisement Enable Specify whether to use Association Advertisement. DTIM Period 1 Specify how frequently to insert a DTIM (Delivery Traffic Indication Map) in the AP's beacons (every 1 to 255 beacons). RSSI Threshold
30
Specify the numerical value of the parameter related to beacon control of CB VAP, in the range of 0 to 91.
Adjusting this parameter may improve the connection / communication status in a Channel Blanket environment.
Note
This setting is normally used for support purposes. Do not change the value.
Tx Power Max Select the AP's transmission power. Proxy ARP Enable Specify whether to use Proxy ARP. 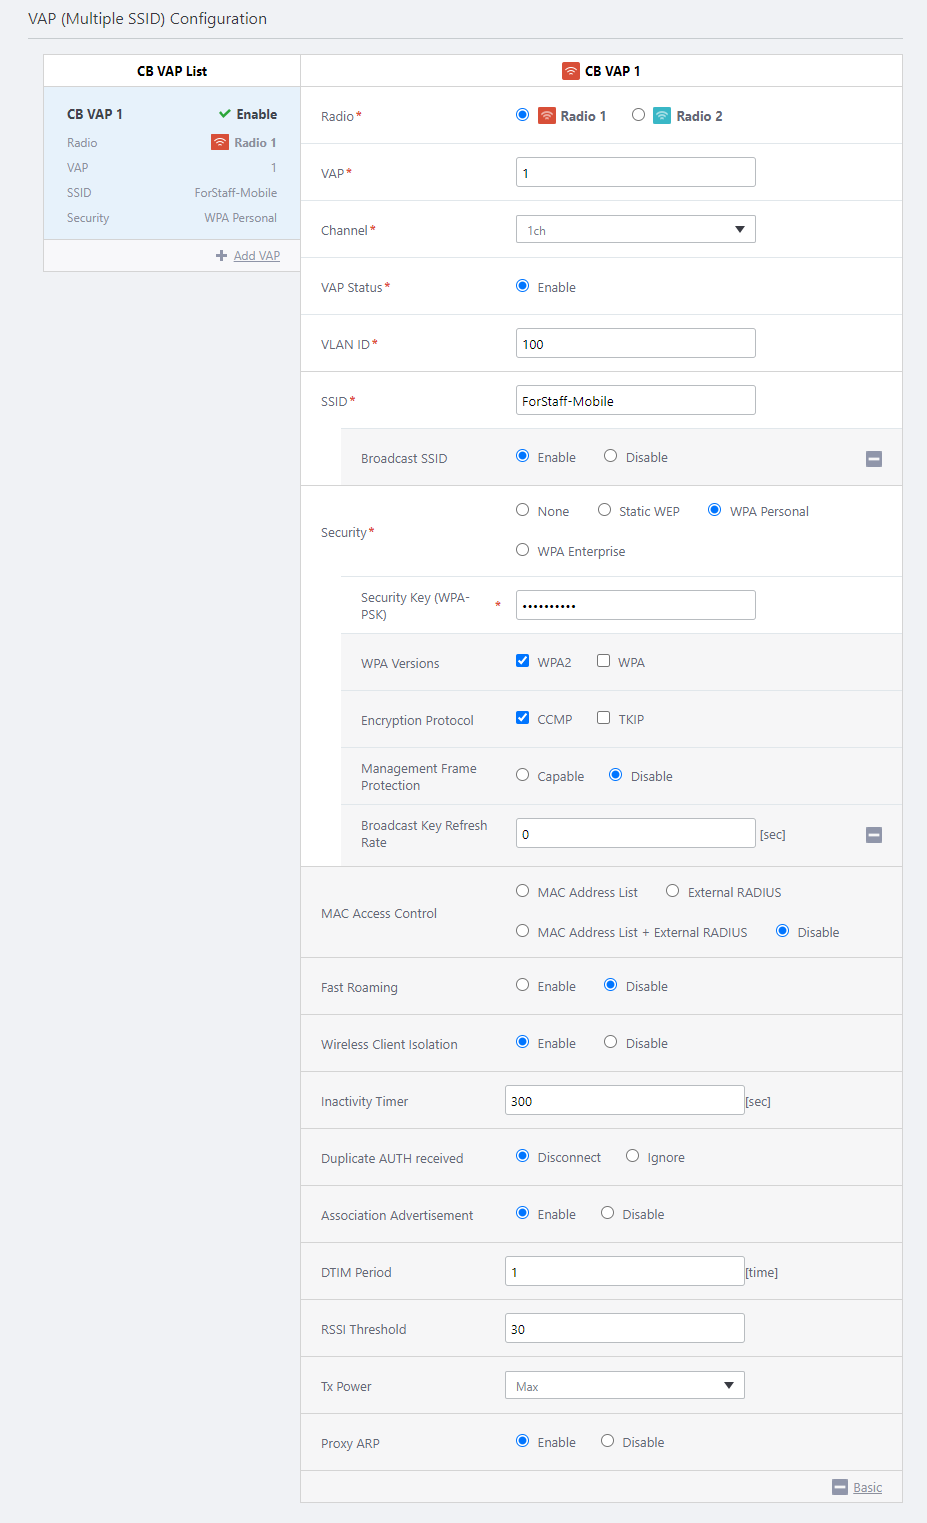
- Now we are going to create a channel blanket to apply the CB Profile to.
Click the "Create CB" button in the "Channel Blanket List" section.
The "Create Channel Blanket" dialog box will appear.
- Enter "2F Blanket" in "Channel Blanket Name".
- Configure the "Control VLAN".
The Control VLAN for a channel blanket should be different from the management VLAN of the APs and VLANs for the VAPs to which the wireless clients will belong.
Here we enter "201".
- Select the management group whose APs you want to add to this channel blanket.
Here we select "1-2F Group".
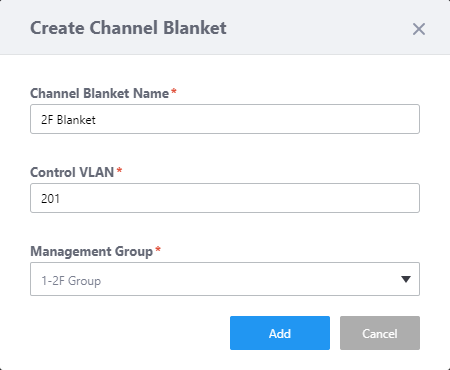
- Click "Add" to create the channel blanket "2F Blanket".
Now you can see "2F Blanket" in the channel blanket list.

- Next let's add APs to the channel blanket "2F Blanket".
Click the "AP List" button on the "2F Blanket" row in the channel blanket list.
The "AP List" dialog box will appear.
Its title includes "Channel Blanket Name: 2F Blanket".
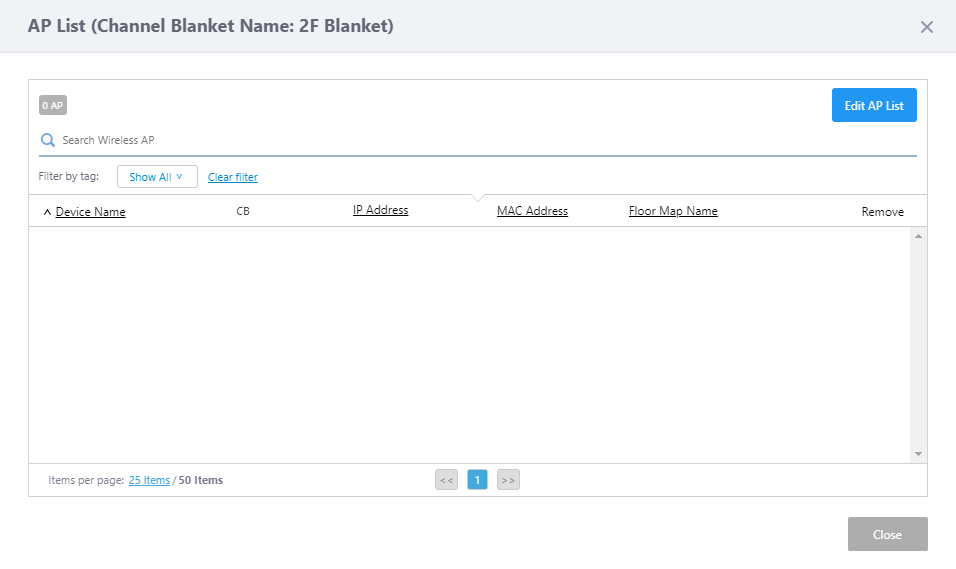
- Click "Edit AP List".
The "Add/Remove APs" dialog box will appear.
In this dialog box, you can select APs from a floor map or from the list of the APs in the management group.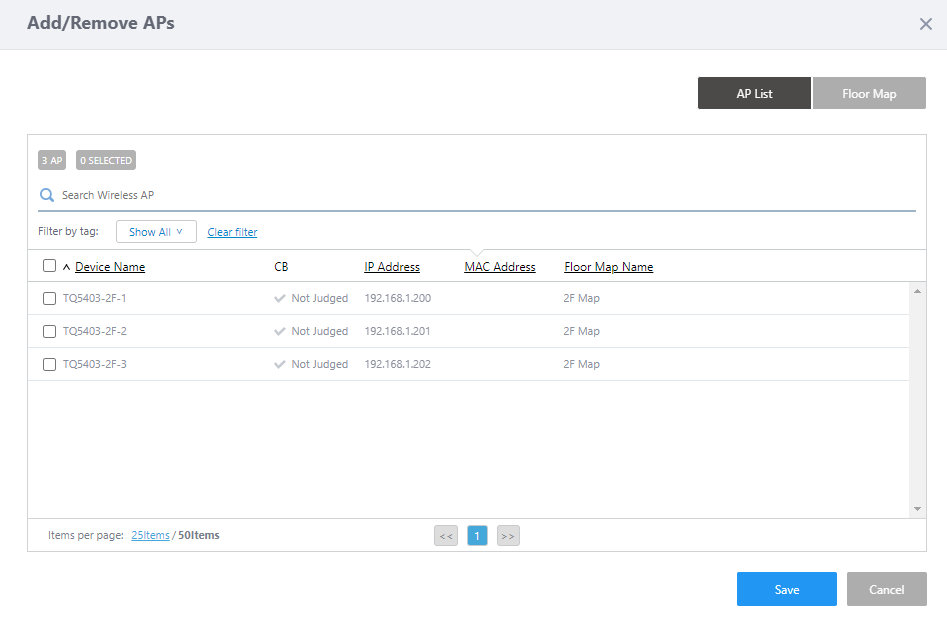
By default, the list of APs in the management group is displayed.
- Click the "Floor Map" button in the upper right corner to switch to the panel view of the floor map.
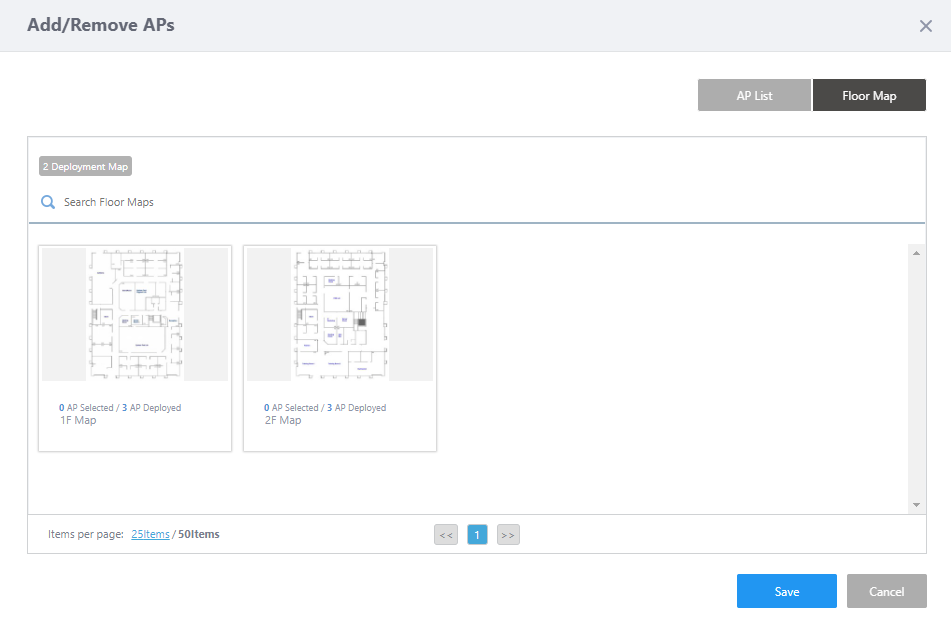
- Click "2F Map" on Floor Map Panels.
APs placed on the "2F Map" will be displayed as icons on the map.
- Select APs to join the channel blanket by clicking their icons on the map.
Here we select all three APs.
- Click "Save" in the "Add/Remove APs" dialog box to save the selection.
Now you can see the selected APs on the "AP List" dialog box.
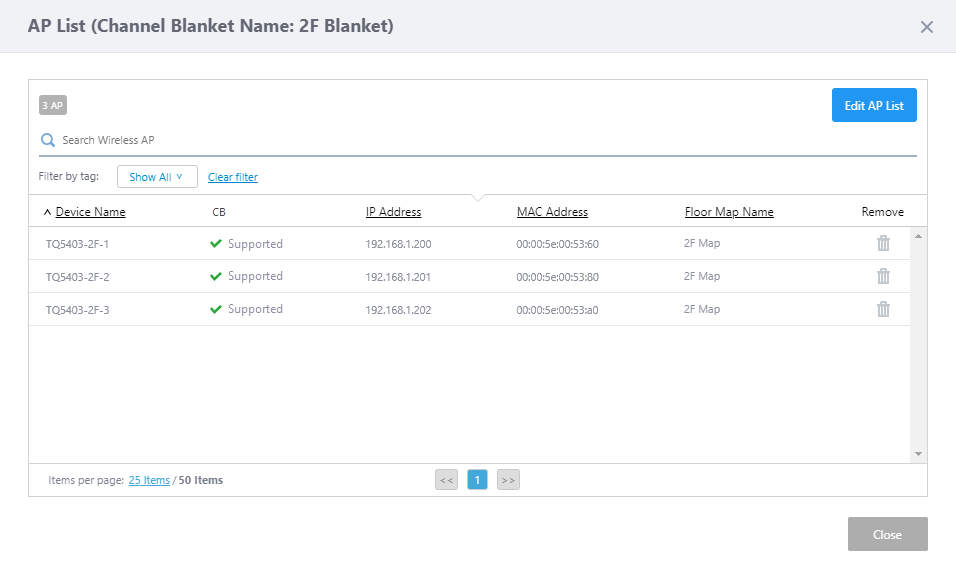
Make sure that the correct APs are selected, then click "Close" to close the "AP List" dialog box.
This returns you to the "Channel Blanket List" section of the "Create Channel Blanket" screen.
In the "2F Blanket" line, you can see that "Assigned APs" is updated to "3".

- Click "Add" at the top right of the Content screen to save the configuration.
21 Oct 2022 11:56