Vista Appliance Storage
You can configure the AT-VST-APL on the same subnet as the Vista Manager EX as "Vista Appliance Storage" (hereinafter referred to as "VAS") as extended storage for the AWC Plug-in, and use it to record the management status of APs and the status of connected clients.
This screen allows you to detect and configure AT-VST-APL that can be configured as a VAS, observe the status of the VAS, and export and import the historical data recorded in the VAS.
The AT-VST-APL, which can be configured as a VAS, requires the AWC-VAS application to be running.
The AWC-VAS application is installed on the AT-VST-APL management screen.
NoteWhen using the AWC-VAS application, AT-VST-APL must be configured for VAS only. Applications other than AWC-VAS cannot be used.
NoteSet a static IP address for the AWC-VAS application container. If you set up a dynamic IP address and the IP address changes, you will need to re-register the VAS.
NoteWhen using the AWC-VAS application, please set NTP to AT-VST-APL.
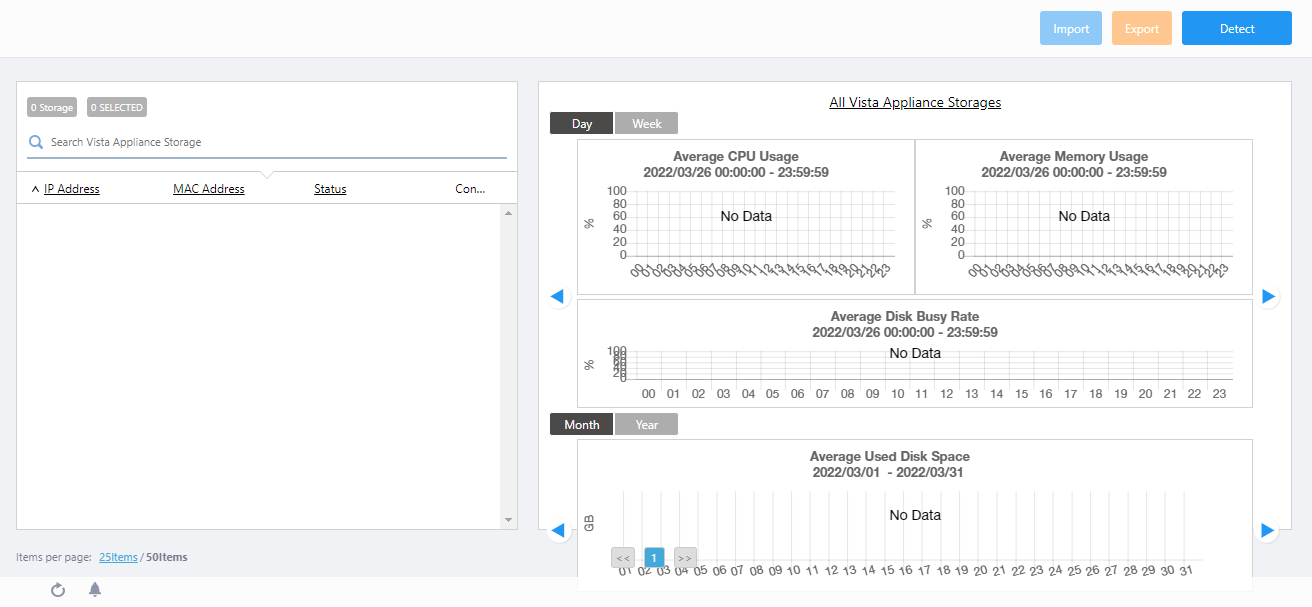
Selecting "Vista Appliance Storage" from the AWC Plug-in menu will display a list of VAS configured for the AWC Plug-in and a screen for managing the usage of VAS resources (CPU, memory, and disk).
◼ VAS Registration
- Select "Vista Appliance Storage" from the AWC Plug-in menu.
- Click "Detect" from the header.
The "VAS Configuration" dialog box will appear.
- Wait for a while until the AT-VST-APLs that can be configured as VAS are listed.
- Select the desired VAS according to the IP address and MAC address.
- Click on the Configure button.
Note that in order to record the management status of wireless APs and wireless client history in the configured VAS, it is necessary to set the Floor Map History Setting and Assoc Client History Setting in the "VAS History Mode Setting" and the Retention Period for saving data in the System Setting screen.
◼ Header
| Item Name | Description |
|---|---|
| "Import" button |
Displays "Import History Data" dialog box. 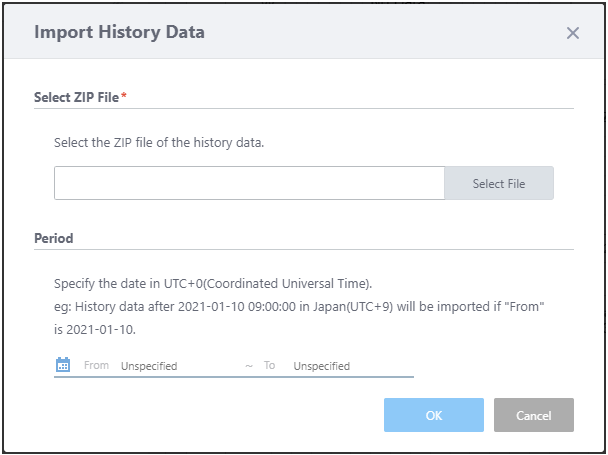 Restores the previously exported VAS history data for the VAS selected in the VAS list.
|
| "Export" button |
Displays "Export History Data" dialog box. 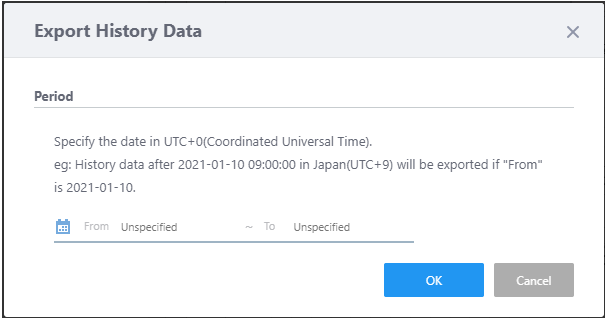 Download history data from the VAS selected in the VAS list, specifying the period. The format of the file name is "export_vas_atawc-X.X.X_-YYYYMMDDhhmmss.zip".
|
| "Detect" button |
Displays the "VAS Configuration" dialog box. 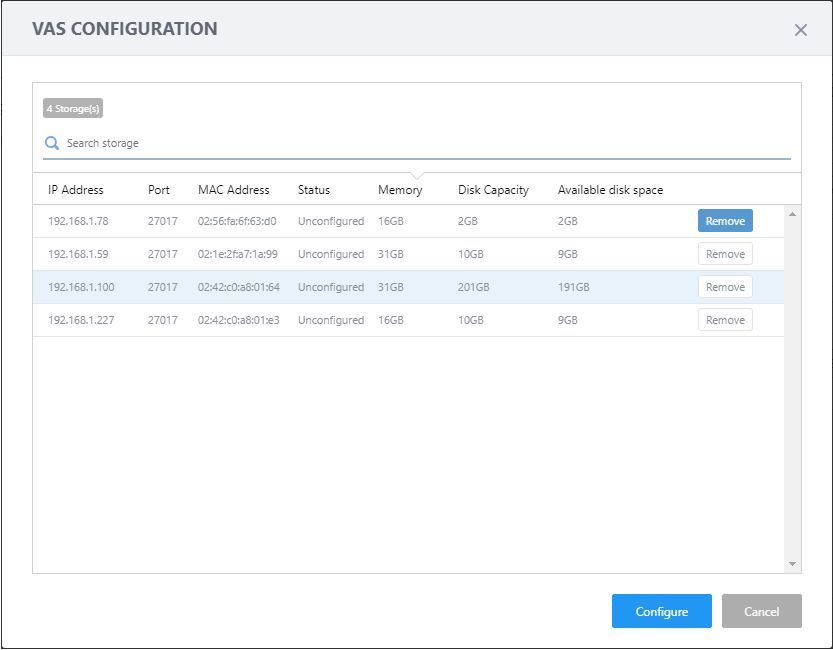 By selecting a storage from the list and clicking on the "Configure" button, the selected storage will be configured as a VAS for the AWC Plug-in and added to the VAS list.
|
◼ VAS List
| Item Name | Description |
|---|---|
| X Storage | Displays the total number of VAS configured for the AWC plug-in. |
| X SELECTED | Displays the number of VAS currently selected. |
| Search Vista Appliance Storage |
Filter entries in the list by entering a partial string in the search box. The box will perform incremental search for the entries which have the matching string in either the "IP Address" or "MAC Address" fields. To remove the filter, delete the string from the Search field and press Enter. NoteThe search is case-sensitive. |
| IP Address | Displays the VAS IP address. |
| MAC Address | Displays MAC address of VAS. |
| Status | Displays the status of the VAS (Up/Down/Unstable). |
| "Edit" button (pencil) |
The "Vista Appliance Storage Setting" dialog box will appear. You can set disk space thresholds for warning and stopping. 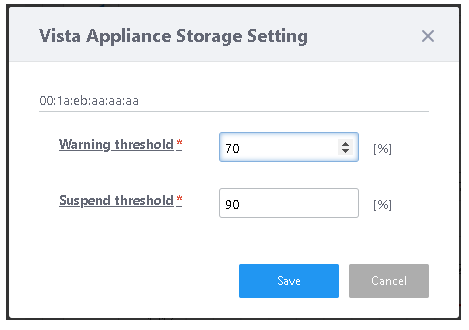
|
◼ VAS status graphs
Displays graphs of CPU, memory, and disk usage for all registered VAS, or for a specific VAS selected in the VAS list.
- Graphs for one day (hourly basis) / one week (daily basis)
- CPU Usage
- Memory Usage
- Disk Busy Rate
- CPU Usage
- Graphs for one month (daily basis) / one year (monthly basis)
- Used Disk Rate
- Used Disk Rate
21 Oct 2022 11:56