Configure CB Profile
This section describes how to create, edit and delete a CB Profile.
Create CB Profile
- Select "Wireless Configuration" > "CB Profile" from the AWC Plug-in menu.
The CB Profile list will appear.
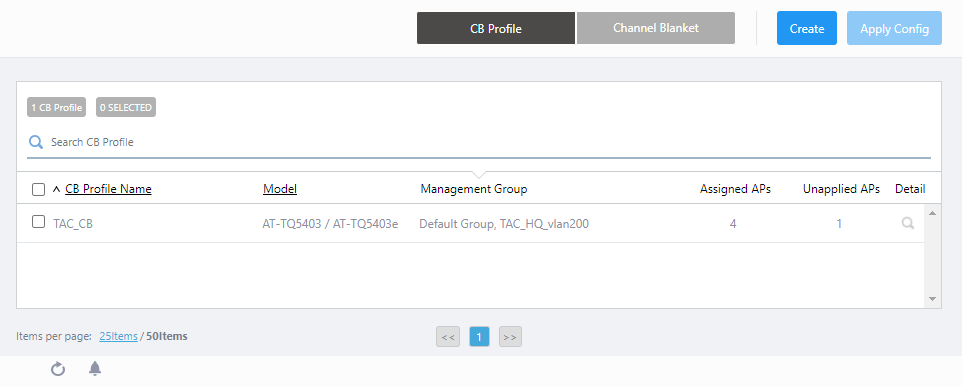
- Click "Create" at the top right corner.
- The "Select an AP model that uses AWC-CB" dialog box will appear.
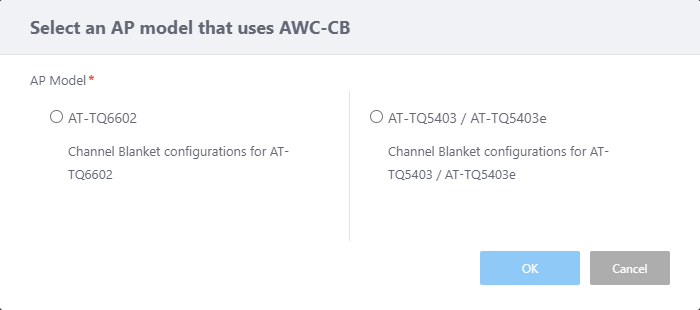
Table 1: "Select an AP model that users AWC-CB" dialog box
Item Name Description AP Model
Select an AP model.
- AT-TQ6602:
Select this for TQ6602.
- TQ5403 / TQ5403e:
Select this for TQ5403 and TQ5403e.
- AT-TQ6602:
- Select an AP model.
- Click "OK".
- The "Create CB Profile" screen will appear.
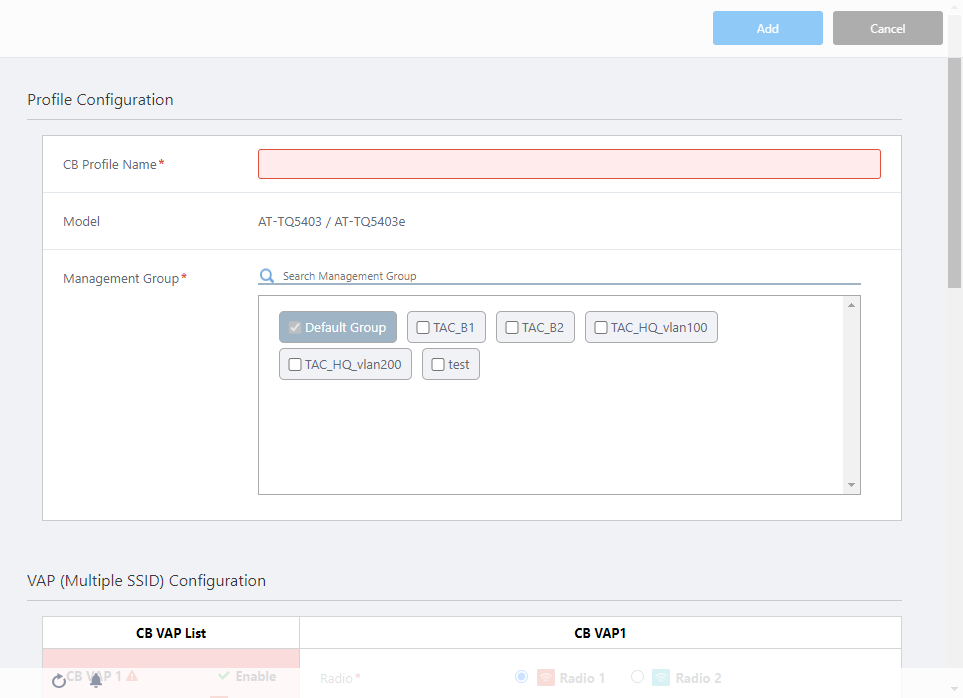
Table 2: CB Profile
Item Name Description Profile Configuration 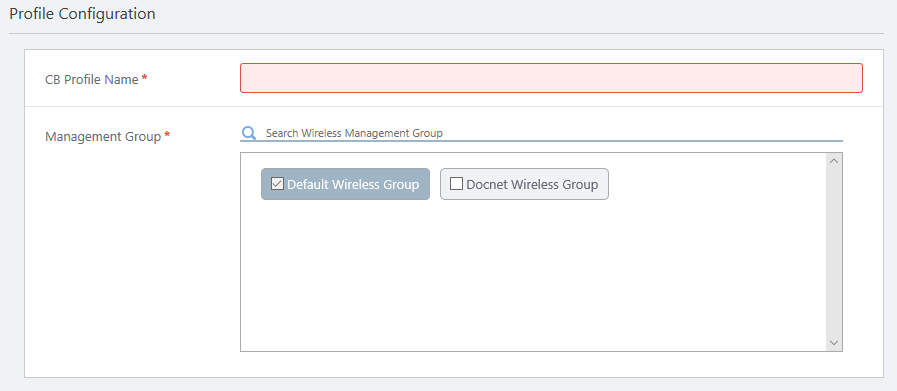
CB Profile Name Enter a name for the CB Profile. Max 100 characters. (mandatory) Models Displays the AP model selected in the "Select an AP model that uses AWC-CB" dialog box. Management Group
Select a management group that you want to apply this CB Profile to. You cannot uncheck "Default Wireless Group". (mandatory)
- Search Wireless Management Group: Groups in the list can be filtered by entering a partial name in the search box.
The Search field lets you enter a partial string to match. The screen displays entries with that string in their name.
To remove the filter, delete the string from the Search field and press Enter.
Note
The search is case-sensitive.
VAP (Multiple SSID) Configuration 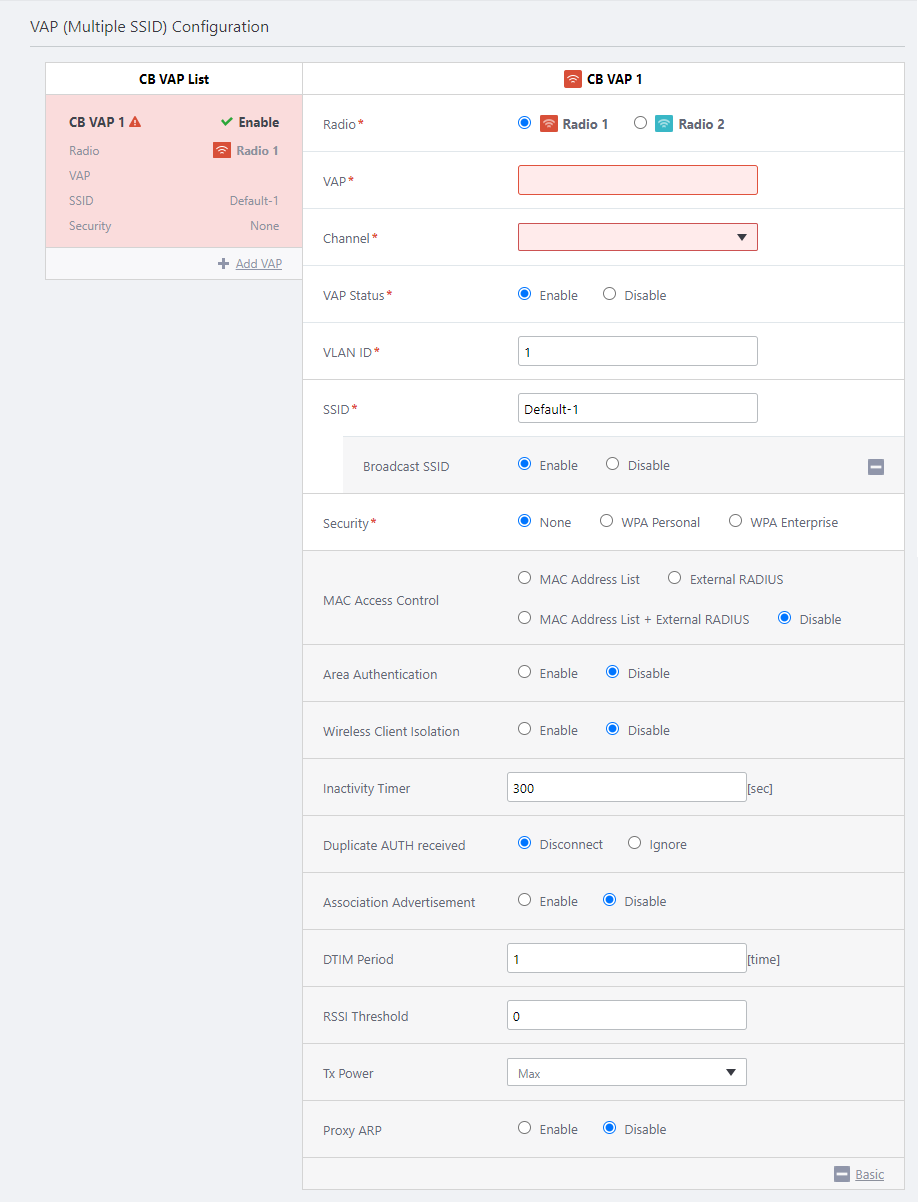
CB VAP List
Shows a list of configured CB VAPs.
This includes the status, radio band, VAP number, SSID and security setting of the CB VAP.
+ Add VAP
Creates a new CB VAP.
A CB VAP name is assigned a number sequentially from 1. Note that the number in the CB VAP Name has nothing to do with the "VAP Number" (described later) for the CB VAP. The number of VAPs that can be created depends on the AP model you select.
- AT-TQ6602:
10 CB VAPs for each radio band (Radio 1 - 2.4GHz and Radio 2 - 5GHz W52), i.e. 20 CB VAPs in total - TQ5403 / TQ5403e:
3 CB VAPs for each radio band (Radio 1 - 2.4GHz and Radio 2 - 5GHz W52), i.e. 6 CB VAPs in total
Note
It is recommended to use 5 or less VAPs per radio band in total, including both multi-channel and blanket VAPs.
Radio
Select a radio band to use for this CB VAP, from Radio 1 (2.4GHz) and Radio 2 (5GHz W52) (mandatory)
Note
"Radio 2 - 5GHz W53" and "Radio 3 - W56" cannot be used for CB VAPs.
Note
When applying a CB profile to TQ6602, if the bandwidth is set to 80+80MHz in Radio 2 of the AP profile, only W52 is used, because W53 cannot be used for CB VAP. The APs will operate with 80 MHz bandwidth in that radio band.
VAP
Specify a CB VAP Number. (mandatory)
This can be specified as a number between 1 to 8 for TQ5403 and TQ5403e, and 1 to 16 for TQ6602.
If you specify the same number for a CB Profile as an existing AP Profile, the CB VAP is used for the number (the AP Profile's VAP with the number is not used because it is overriden by the CB VAP with the same number).
Note
If you do not use multi-channel networks, create a dummy multi-channel VAP 1 in an AP Profile, then create a CB VAP with the "VAP number" of 1 to override the dummy multi-channel VAP. We recommend you configure security on the dummy VAP too.
Channel
Select a channel to use for this CB VAP (mandatory)
- Radio 1: 1ch to 13ch
- Radio 2 (W52) : 36ch, 40ch, 44ch, 48ch
Note
Select a channel according to the bandwidth used for the corresponding band set in the AP Profile.
For example, if the bandwidth used for Radio 2 is 40MHz, when creating CB VAP for Radio 2, select the channel from either 36ch or 44ch. 40ch and 48ch are not supported.
Channels that can be selected can be confirmed by "Auto Channel Selection" in the AP Profile.Note
Selecting a channel that is disabled in "Auto Channel Selection" in the AP Profile is not supported.
VAP Status
Enable or disable the CB VAP.
- If you select "Enable", the CB VAP is enabled on the APs that are applied to the CB Profile.
- If you select "Disable", the CB VAP is not used. The VAP that is properly configured and enabled in the AP Profile will also be disabled.
The default is "Enable".
VLAN ID
Specify a VLAN ID used for communication between the CB VAP and associated clients (mandatory)
Note
Specify a VLAN ID that is different from the AP's management VLAN. When the AP is detected as a guest device, a parent AMF device is configured to collect the guest device information automatically ("dynamic discovery"), and wireless clients get their IP addresses via DHCP.
SSID
Specify an SSID (network name) to use on the CB VAP.
The SSID is mapped to the VLAN ID. Enter a name between 1 to 32 alphanumeric characters.
The default is "Default-X" (where X is an automatically assigned CB VAP number). (mandatory)
Broadcast SSID
Specify whether to broadcast the SSID on the CB VAP.
- When enabled, the SSID is included in beacons. When you configure a wireless client, you may be able to see the SSID in a list of wireless networks to connect. This setting also allows wireless clients to connect using an "ANY" connection.
- When disabled, the SSID is not included in beacons. You may not be able to see the SSID in a wireless network list on a wireless client. In this case, you have to enter the same SSID as the AP on a wireless client. This setting also denies wireless clients from connecting using an "ANY" connection.
The default is "Enable".
Note
An "ANY" connection is a connection where a wireless client tries to connect to an AP by specifying a wildcard or null as the SSID. Even when an "ANY" connection is allowed, clients cannot connect to APs without knowing the correct security key.
Security
Select the security protocol for the CB VAP; one of "None", "Static WEP", "WPA Personal" or "WPA Enterprise".
The default is "None".
Note
"Static WEP" can be configured only on VAP1 of each radio. In addition, if the Security is set to Static WEP in the VAP Settings of CB Profile, do not use a "Mode" that contains IEEE 802.11n in the Radio Configuration of the AP Profile. Select IEEE 802.11b/g on Radio 1 or IEEE 802.11a on Radio 2 instead.
- None:
No authentication or encryption is performed. Everyone can connect to the CB VAP.
Note
If you use "None" to build a network such as a guest hotspot, you should consider the consequences for the overall security of your entire network.
- Static WEP:
Uses RC4 encryption with fixed keys. Per-client authentication is not performed. We recommend using "WPA Personal" for fixed key security because WEP is vulnerable.
- WPA Personal:
Performs authentication and encryption between an AP and a wireless client. It uses per-client keys which are generated from a pre-shared key (PSK). It uses CCMP (AES) as the encryption algorithm.
- WPA Enterprise:
Performs authentication and encryption between an AP and a wireless client. It uses per-client keys which are generated on a RADIUS server. It uses CCMP (AES) as the encryption algorithm.
◼Static WEP Configuration:
- Key Length:
Select the WEP key length. The default is 128bit.
- 64bit:
You can directly enter a WEP key with 10 hex digits. Or you can enter 5 ASCII characters to automatically generate a WEP key.
- 128bit:
You can directly enter a WEP key with 26 hex digits. Or you can enter 13 ASCII characters to automatically generate a WEP key.
- 64bit:
- Key Type:
Select a generation method for the WEP key. The default is "Hex".
- ASCII:
Lets you enter an arbitrary string to automatically generate a WEP key. The string is case-sensitive.
- Hex:
Lets you directly enter a WEP key with hexadecimal characters (0 to 9, A to F, a to f). Hex characters are not case-sensitive.
- ASCII:
- Key Index:
Specify a key to use. The default is 1.
- Security Key (WEP Key):
Enter a WEP key (in hex) or a seed of a key (in ASCII) according to the selected "Key Length" and "Key Type".
You have to enter the same WEP key as the one specified by "Key Index" on the wireless client.
- WEP Authentication Method:
"Open System" is the recommended option here. The default is "Open System".
It is recommended to use the default "Open System" for security.
- Open System:
All wireless clients are allowed to connect regardless of whether they have the correct WEP key. But as wireless clients are only allowed to connect, they cannot communicate without a valid WEP key.
This option is not only for "WEP" but is also used for "None", "WPA Personal" and "WPA Enterprise".
- Shared Key:
Only wireless clients with the correct WEP key can connect. Wireless clients cannot connect without a valid key.
- Open System and Shared Key:
A client configured to use Shared Key can connect if it has a valid WEP key.
A client configured to use Open System can connect regardless of whether it has a correct key.
- Open System:
◼WPA Personal Configuration:
- Security Key (WPA-PSK):
Specify an encryption key for the VAP. The key should contain 8 to 63 alphanumeric and symbol characters. The key is case-sensitive.
- WPA Versions:
Select the WPA version(s) to use.
You can select "WPA2" only, or both "WPA2" and "WPA".
The default is "WPA2". Select both for a mixed environment. In that case, the security level of the wireless network is the same as WPA.
Note
WPA is based on a draft of IEEE 802.11i while WPA2 is based on the final version of IEEE 802.11i and therefore meets all mandatory items required by the standard.
- Encryption Protocol:
You can select "CCMP" only, or both "CCMP" and "TKIP".
"CCMP" uses the standard encryption algorithm approved by the US Secretary of Commerce. This standard has a strong algorithm.
Note
According to the WPA standard, TKIP is mandatory while CCMP is optional. Our products implement both algorithms.
- Management Frame Protection (MFP):
Specify whether to protect management frames from eavesdropping and forging. Select "Capable" to use MFP. Otherwise select "Disable". The default is "Disable".
Note
The option "Capable" is displayed only with "WPA2" for the WPA version.
- Broadcast Key Refresh Rate:
Specify an interval, between 0 and 86400 seconds, at which to refresh the broadcast key that is sent to clients on the VAP. A value of 0 means that the key is never refreshed. The default is 0.
Note
When you create multiple CB VAPs, the Broadcast Key Refresh Rate will be set to a single value common to all VAPs.
◼WPA Enterprise Configuration:
- RADIUS Server IP Address:
Enter the IP address of the primary RADIUS server.
You can configure primary and secondary RADIUS servers. The primary IP address is mandatory while the secondary is optional.
- RADIUS Server Secret:
Enter a password to connect to the RADIUS server with 128 or less alphanumeric and symbol characters. The password can contain spaces.
Enter a password for each of the primary and secondary RADIUS server.
- RADIUS Server Port Number:
Enter a port number between 1 and 65535 on which the primary and secondary RADIUS server is listening. The default is 1812.
- WPA Versions:
Select the WPA version(s) to use.
You can select "WPA2" only, or both "WPA2" and "WPA".
The default is "WPA2". Select both for a mixed environment. In that case, the security level of the wireless network is the same as WPA.
Note
WPA is based on a draft of IEEE 802.11i while WPA2 is based on the final version of IEEE 802.11i and therefore meets all mandatory items required by the standard.
- Encryption Protocol:
You can select "CCMP" only, or both "CCMP" and "TKIP".
"CCMP" uses the standard encryption algorithm approved by the US Secretary of Commerce. This standard has a strong algorithm.
Note
According to the WPA standard, TKIP is mandatory while CCMP is optional. Our products implement both algorithms.
- Management Frame Protection (MFP):
Specify whether to protect management frames from eavesdropping and forging. Select "Capable" to use MFP. Otherwise select "Disable". The default is "Disable".
Note
The option "Capable" is displayed only with "WPA2" for the WPA version.
- Broadcast Key Refresh Rate:
Specify an interval, between 0 and 86400 seconds, at which to refresh the broadcast key that is sent to clients on the VAP. A value of 0 means that the key is never refreshed. The default is 0.
Note
Changing the Broadcast Key Refresh Interval is not supported with channel blanket. Do not change its value from the default "0".
- RADIUS Accounting:
Specify whether to use RADIUS accounting server to record the resources (such as connection time) used by each user. Select "Enable" to perform accounting. Otherwise select "Disable". The default is "Disable".
- RADIUS Accounting Port Number:
Specify a port number on which the RADIUS accounting server is listening. This is valid only when RADIUS Accounting is enabled. The default is 1813.
Note
This item is not supported. Do not enable it.
Note
The RADIUS Session-Timeout attribute is not supported on a CB VAP (It is discarded by the APs).
Captive Portal
Specify whether to use Captive Portal on the VAP. Captive Portal displays an authentication page before granting web access.
- If you select "External RADIUS", the APs will query the RADIUS server.
- If you select "Click-through", APs will display a Click-through page instead of performing RADIUS authentication. The Click-through page does not require authentication with a username/password, but can be configured to show an arbitrary "Terms of Use" that users have to accept before use, or to redirect to an external page.
- If you select "External page redirection", clients will be able to connect using third-party web credentials such as social networking sites.
- Select "Disable" to not use Captive Portal.
The default is "Disable".
If you select "External RADIUS", "Click-through", or "External Page Redirect", the following additional items are displayed:
Note
This setting is displayed when "TQ6602" is selected as AP Model.
Note
You can not enable Captive Portal on the radio used for the WDS connection.
◼Captive Portal External RADIUS Configuration:
If you select "External RADIUS" for Captive Portal, configure the following items:
- Authentication Page Proxy:
Specify whether to use an external authentication page or not.
- Enable:
shows an external authentication page. Specify the page URL in "Base URL".
- Base URL:
Specify the base URL of the external web authentication page.
Clients will access the page through the AP's proxy feature instead of direct connection.
The HTML filename of the external authentication page must be "radius_login.html".
The AP's proxy will get the page from "Base URL/radius_login.html" and send it back to clients.
For example, when you specify "http://www.example.com/captive_portal" in "Base URL", the APs will present the content of the page at "http://www.example.com/captive_portal/radius_login.html" to connecting clients.
For details of the format of radius_login.html, refer to Operation Reference > Authentication > Web Authentication with Captive Portal.
- Base URL:
- Disable:
Shows an authentication page embedded in the APs.
- Enable:
- RADIUS Server Primary IP Address:
Enter the IP address of the primary RADIUS server. (mandatory)
- RADIUS Server Primary Secret:
Enter the password to connect to the primary RADIUS server with 128 or less alphanumeric and symbol characters. (mandatory)
- RADIUS Server Secondary IP Address:
Enter the IP address of the secondary RADIUS server. Leave it blank if you are not using a secondary RADIUS server.
- RADIUS Server Secondary Secret:
Enter the password to connect to the secondary RADIUS server with 128 or less alphanumeric and symbol characters. Leave it blank if you are not using a secondary RADIUS server.
- RADIUS Server Port Number:
Enter a port number between 1 and 65535 on which the primary and secondary RADIUS server is listening to. The default is 1812.
- Redirect type (after user is authenticated):
Specify a page to be shown after the user passes web authentication.
- Keep Session:
Show the original URL that was entered in the client's browser before web authentication.
- Fixed URL
Always show a fixed URL that you specify.
- Disable
Do not redirect the browser after successful web authentication.
- Keep Session:
- Walled Garden:
Shows the number of entries on the page that use the Walled Garden feature.
The Walled Garden feature allows you to specify which pages can be viewed by users who have not yet completed the authentication. If they try to view a page other than specified, the Captive Portal page will appear again.
Clicking on this will bring up the "Walled Garden List" dialog box.
- Walled Garden List
You can register addresses to use the Walled Garden feature.
- Address:
The address of the site that is accessible from inside the Walled Garden, in the form of an FQDN, an IP address or an IP address/mask. Max 50 entries can be registered.
- "Add" button:
Registers the address entered in the Address field to the list.
- "Clear" button:
Deletes the entry of the Address field.
- "Import from CSV file" button:
Imports the addresses from a CSV file.
The CSV file can contain one address per line, described in one of the following formats: FQDN, IP address or IP address/mask.
- X Address:
Shows the number of address entries registered to the list.
- Search Walled Garden Address:
Searches for a specific address in the list.
- Address:
Shows an address entry.
- Delete:
Deletes the selected entry.
- "Save" button:
Saves changes to the Walled Garden List.
- "Close" button:
Discard the changes to the Walled Garden List and close the Walled Garden List dialog box.
- Address:
- Walled Garden List
- Session Timeout:
Specify the client's authentication session timeout; between 0 and 86400 (seconds).
After the client is successfully authenticated, the session will be automatically terminated when the time set for timeout elapses.
The default is 3600.
- Session Timeout Action:
Select the action to be taken when the session is timed out, from "Reauthentication" or "Disconnection".
The default is "Reauthentication".
◼Captive Portal Click-through Configuration:
If you select "Click-through" for Captive Portal, configure the following items:
- Authentication Page Proxy:
Specify whether to use an external Click-through page or not.
- Enable:
shows an external authentication page. Specify the page URL in "Base URL".
- Base URL:
Specify the base URL of the external Click-through page.
Clients will access the page through the AP's proxy feature instead of direct connection.
The HTML filename of the external Click-through page must be "click_through_login.html".
The AP's proxy will get the page from "Base URL/click_through_login.html" and send it back to clients.
For example, when you specify "http://www.example.com/captive_portal" in "Base URL", APs will present the content of the page at "http://www.example.com/captive_portal/click_through_login.html" to connecting clients.
For details of the format of click_through_login.html, refer to Operation Reference > Authentication > Web Authentication with Captive Portal.
- Base URL:
- Disable:
Shows an authentication page embedded in the APs.
Note
"Terms of Use" to show on the Authentication Page can be configured on each AP's web interface.
- Enable:
- Redirect type (after user is authenticated):
Specify a page to be shown after the user passes web authentication.
- Keep Session:
Show the original URL that was entered in the client's browser before web authentication.
- Fixed URL
Always show a fixed URL that you specify.
- Disable
Do not redirect the browser after successful web authentication.
- Keep Session:
- Walled Garden:
Shows the number of entries on the page that use the Walled Garden feature.
The Walled Garden feature allows you to specify which pages can be viewed by users who have not yet completed the authentication. If they try to view a page other than specified, the Captive Portal page will appear again.
Clicking on this will bring up the "Walled Garden List" dialog box.
- Walled Garden List
You can register addresses to use the Walled Garden feature.
- Address:
The address of the site that is accessible from inside the Walled Garden, in the form of an FQDN, an IP address or an IP address/mask. Max 50 entries can be registered.
- "Add" button:
Registers the address entered in the Address field to the list.
- "Clear" button:
Deletes the entry of the Address field.
- "Import from CSV file" button:
Imports the addresses from a CSV file.
The CSV file can contain one address per line, described in one of the following formats: FQDN, IP address or IP address/mask.
- X Address:
Shows the number of address entries registered to the list.
- Search Walled Garden Address:
Searches for a specific address in the list.
- Address:
Shows an address entry.
- Delete:
Deletes the selected entry.
- "Save" button:
Saves changes to the Walled Garden List.
- "Close" button:
Discard the changes to the Walled Garden List and close the Walled Garden List dialog box.
- Address:
- Walled Garden List
- Session Timeout:
Specify the client's authentication session timeout; between 0 and 86400 (seconds).
After the client is successfully authenticated, the session will be automatically terminated when the time set for timeout elapses.
The default is 3600.
- Session Timeout Action:
Select the action to be taken when the session is timed out, from "Reauthentication" or "Disconnection".
The default is "Reauthentication".
◼Captive Portal External Page Redirect:
If you have selected "External Page Redirect" on the Captive Portal, you will need to configure the following items.
- External Page URL:
Enter the URL to which the APs redirect the users with 1 to 128 alphanumeric characters. The default is empty.
- RADIUS Server Primary IP Address:
Enter the IP address of the primary RADIUS server. (mandatory)
- RADIUS Server Primary Secret:
Enter the password to connect to the primary RADIUS server with 128 or less alphanumeric and symbol characters. (mandatory)
- RADIUS Server Secondary IP Address:
Enter the IP address of the secondary RADIUS server. Leave it blank if you are not using a secondary RADIUS server.
- RADIUS Server Secondary Secret:
Enter the password to connect to the secondary RADIUS server with 128 or less alphanumeric and symbol characters. Leave it blank if you are not using a secondary RADIUS server.
- RADIUS Server Port Number:
Enter a port number between 1 and 65535 on which the primary and secondary RADIUS server is listening to. The default is 1812.
- Redirect type (after user is authenticated):
Specify a page to be shown after the user passes web authentication.
- Keep Session:
Show the original URL that was entered in the client's browser before web authentication.
- Fixed URL
Always show a fixed URL that you specify.
- Disable
Do not redirect the browser after successful web authentication.
- Keep Session:
- Walled Garden:
Shows the number of entries on the page that use the Walled Garden feature.
The Walled Garden feature allows you to specify which pages can be viewed by users who have not yet completed the authentication. If they try to view a page other than specified, the Captive Portal page will appear again.
Clicking on this will bring up the "Walled Garden List" dialog box.
- Walled Garden List
You can register addresses to use the Walled Garden feature.
- Address:
The address of the site that is accessible from inside the Walled Garden, in the form of an FQDN, an IP address or an IP address/mask. Max 50 entries can be registered.
- "Add" button:
Registers the address entered in the Address field to the list.
- "Clear" button:
Deletes the entry of the Address field.
- "Import from CSV file" button:
Imports the addresses from a CSV file.
The CSV file can contain one address per line, described in one of the following formats: FQDN, IP address or IP address/mask.
- X Address:
Shows the number of address entries registered to the list.
- Search Walled Garden Address:
Searches for a specific address in the list.
- Address:
Shows an address entry.
- Delete:
Deletes the selected entry.
- "Save" button:
Saves changes to the Walled Garden List.
- "Close" button:
Discard the changes to the Walled Garden List and close the Walled Garden List dialog box.
- Address:
- Walled Garden List
- Session Timeout:
Specify the client's authentication session timeout; between 0 and 86400 (seconds).
After the client is successfully authenticated, the session will be automatically terminated when the time set for timeout elapses.
The default is 3600.
- Session Timeout Action:
Select the action to be taken when the session is timed out, from "Reauthentication" or "Disconnection".
The default is "Reauthentication".
MAC Access Control
Select the MAC Access Control method to apply to the relevant VAPs.
- If you select "External RADIUS", the APs will query the RADIUS server.
- When you select "MAC Address List", filtering is performed using the MAC address list specified in the AP Profile's "Basic Configuration" section.
- Selecting "MAC Address List + External RADIUS" allows or denies connections only to the MAC addresses recorded in the list. This list refers to both the MAC address list selected in the MAC address list field at the top of the screen and the external RADIUS server.
Firstly, it will try to authenticate using the MAC address list. If a connection cannot be established, it will try to authenticate using an External RADIUS server. If the preceding MAC address list allows a user to connect, the user can still connect even if the external RADIUS server does not grant the access.
- If you select "Disable", no MAC access control is performed.
The default is "Disable".
When you select either "External RADIUS" or "MAC Address List + External RADIUS", additional items are also displayed.
Note
When using MAC Access Control with "External RADIUS" on CB VAP, TQ5403, TQ5403e firmware version 6.0.1-2.x or later or TQ6602 firmware version 7.0.1-0.1 or later are required.
Note
"MAC Address List" is only available if you have selected "TQ Series" for Series and selected a "MAC Address List" in the "Basic Configuration" section.
Note
The option "MAC Address List + External RADIUS" is displayed with selecting "TQ5403 / TQ5403e" for AP model in "Select an AP model that uses AWC-CB" dialog box.
◼When "External RADIUS" or "MAC Address List + External RADIUS" is selected:
- RADIUS Server Primary IP Address:
Enter the IP address of the primary RADIUS server. (mandatory)
- RADIUS Server Primary Secret:
Enter the password to connect to the primary RADIUS server with 128 or less alphanumeric and symbol characters.
- RADIUS Server Secondary IP Address:
Enter the IP address of the secondary RADIUS server. Leave it blank if you are not using a secondary RADIUS server.
- RADIUS Server Secondary Secret:
Enter the password to connect to the secondary RADIUS server with 128 or less alphanumeric and symbol characters. Leave it blank if you are not using a secondary RADIUS server.
- Port Number:
Enter a port number between 1 and 65535 on which the primary and secondary RADIUS server is listening to. The default is 1812.
- User-Name Format Delimiter:
A client's MAC address is sent to the RADIUS server as a User-Name attribute.
Specify an octet delimiter to use in a User-Name attribute from "Hyphen", "Colon" and "None". The default is "Hyphen".
- User-Name Format Case:
Specify which case to use in a User-Name attribute from "Upper" and "Lower". The default is "Lower".
- User-Password Format Type:
Specify what is used for a User-Password attribute when a client MAC address is sent to the RADIUS server for authentication. The default is "User Name".
- If you select "Fixed Password", a string specified in "User-Password Format Password" is always used as the value of the User-Password attribute.
- If you select "User Name", the same string as the User-Name attribute (MAC Address) is sent to the RADIUS server as the value of the User-Password attribute.
- If you select "Fixed Password", a string specified in "User-Password Format Password" is always used as the value of the User-Password attribute.
- User-Password Format Password:
Specify a fixed password string which is used when "User-Password Format Type" is set to "Fixed Password".
By default (where "User-Name Format Delimiter" is "Hyphen", "User-Name Format Case" is "Lower" and "User-Password Format Type" is "User Name"), authentication credentials (User-Name and User-Password attributes) of a client will be sent to the RADIUS server as follows:
- User-Name ab-cd-ef-12-34-56
- User-Password ab-cd-ef-12-34-56
Area Authentication
Specify whether to use the Area Authentication function.
When "Enable" is selected, the AWC Plug-in will make use of the Client Location Estimation function to find the wireless clients estimated to be in the specific area on the floor map and allow only these clients to connect to this VAP.
Specify the area to permit the clients to connect to in the Floor Map screen separately.
Note
To use the Area Authentication on CB VAP, the following conditions must be met:
- "Associated Client Location Estimation History" is set effectively in the System Setting screen.
- On TQ5403 or TQ5403e APs, Channel Blanket is working, and the VAP with Area Authentication option enabled in the CB Profile is applied.
- Wireless client has requested connection to the CB VAP of the corresponding channel blanket.
For more details about channel blanket and floor map, refer to Operation Reference > Floor Map > Configure Floor Maps and Operation Reference > Channel Blanket > Overview respectively.Note
Area Authentication is not supported on TQ6602.
Note
Area Authentication cannot be used in combination with MAC Access Control.
Fast Roaming
Specify whether to use Fast Roaming of wireless clients.
When you select "Enable", you can configure various fast roaming functions.
The default is "Disable".
◼Fast Roaming Configuration Items
- Fast Transition:
Specify whether to use IEEE 802.11r (Fast Basic Service Set Transition).
When enabled, wireless clients can do IEEE 802.11r fast transition when roaming from one AP to another.
The default is "Disable".
- Distributed System:
Specify whether to request authentication via distributed system (DS).
When enabled, wireless clients send an authentication request to the destination AP via the current (source) AP. (Over The DS.)
When disabled, wireless clients send an authentication request to the destination AP directly over the radio. (Over The Air)
The default is "Disable".
- Mobility Domain:
Specify a mobility domain with 4 hexadecimal digits (0 to 9, A to F, a to f). This is not case-sensitive.
A wireless client can perform IEEE 802.11r fast transition between the APs in the same mobility domain.
The default is "a1b2".
- PMK-R0 Lifetime
Specify a PMK-R0 lifetime, between 1 and 65535 minutes.
Once the lifetime expires, IEEE 802.11r fast transition is not performed.
The default is 10000.
- AES Key
Specify an AES key that is used to exchange PMK-R1 between APs with 32 hexadecimal digits (0 to 9, A to F, a to f). This is not case-sensitive. The default is empty.
Note
This is mandatory for every function in the "Fast Roaming" section. Configure this item even if you only use IEEE 802.11k or IEEE 802.11v and you are not going to use IEEE 802.11r fast transition.
- IEEE 802.11k RRM
Specify whether to use IEEE 802.11k RRM (Radio Resource Management).
The default is "Disable".
- IEEE 802.11v WNM
Specify whether to use IEEE 802.11v WNM (Wireless Network Management).
The default is "Disable".
Wireless Client Isolation Specify whether to block communications between wireless clients connected to the same CB VAP. Select "Disable" to allow communications between wireless clients. Otherwise select "Enable". The default is "Disable". Inactivity Timer
Note
Specify the time, between 5 and 65535 seconds, after which a client will be disconnected if it disappears without disassociating from an AP.With this version, combination with Inactivity Timer is not supported on CB VAPs. Use the default setting.
It should also be specified in multiples of 15. If you specify a value that is not a multiple of 15, it will be converted to the nearest multiple greater than the specified value.
The default is 300 (seconds).
Duplicate AUTH received
Select how to process connection requests from clients that have maintained a connection.
If you select "Disconnect", it disconnects the previous connection and then accepts the new connection.
If you select "Ignore", it connects as normal, without disconnecting.
The default is "Disconnect".
Note
When "Management Frame Protection" is set to "Capable", "Disconnect" is used regardless of this item's setting.
Association Advertisement
Specify whether to use Association Advertisement.
When enabled, a notification broadcast frame is sent to the network configured in Control VLAN when a Wireless Client connects to the AP. The AP that receives this frame updates its wireless client connection information.
The default is "Disable".
Note
To make this function take effect, APs on the same subnet must have "Roaming Notification" set to "Enable" for each other.
DTIM Period
Specify how frequently to insert a DTIM (Delivery Traffic Indication Map) in the AP's beacons (every 1 to 5 beacons).
The default is 1. The value of 1 means that a DTIM is inserted in every beacon.
For example, if you set the DTIM interval to 2, one in two beacons has a DTIM inserted (i.e. a beacon with a DTIM and one without a DTIM are transmitted in turn).
When a wireless client operates in power-saving mode, DTIM notifies the client that there is a packet to send to the client. The AP will send the packet to the client once the client is ready to communicate.
Increasing the DTIM interval reduces power consumption but also makes communication less responsive.
Note
This setting is normally used for support purposes. Do not change the value.
RSSI Threshold
Specify the numerical value of the parameter related to beacon control of CB VAP, in the range of 0 to 91.
Adjusting this parameter may improve the connection / communication status in a Channel Blanket environment.
The default is 0.
Note
This setting is normally used for support purposes. Do not change the value.
Tx Power
The AP's transmission power can be selected from five levels: "Min", "Low", "Middle", "High" and "Max".
The default is "Max".
Note
This setting is normally used for support purposes. Do not change the value.
Note
If you change the Tx Power in the AP-specific configuration settings, the AP-specific setting has priority.
Proxy ARP
Specify whether to use Proxy ARP.
- If enabled, when a managed wireless AP receives an ARP request for a connected client, the wireless AP that has a connection to the client will send an ARP response on behalf of the client. The wireless AP that does not have a connection to the client will discard the ARP request, thereby reducing unnecessary traffic.
In this case, since multiple wireless APs have connections to the client in a channel blanket, the wireless AP with the strongest connection will send the ARP response representing all the connected APs. Neighboring APs that are more sparsely connected do not send proxy responses even if they hold the ARP information of the corresponding connected client, thus avoiding multiple ARP responses for the same client.
- If you select "Disable", Proxy ARP will not be activated. That means ARP requests are broadcasted from all wireless APs to their subordinate clients. The corresponding clients send ARP responses themselves.
The default is "Disable".
Channel Blanket List 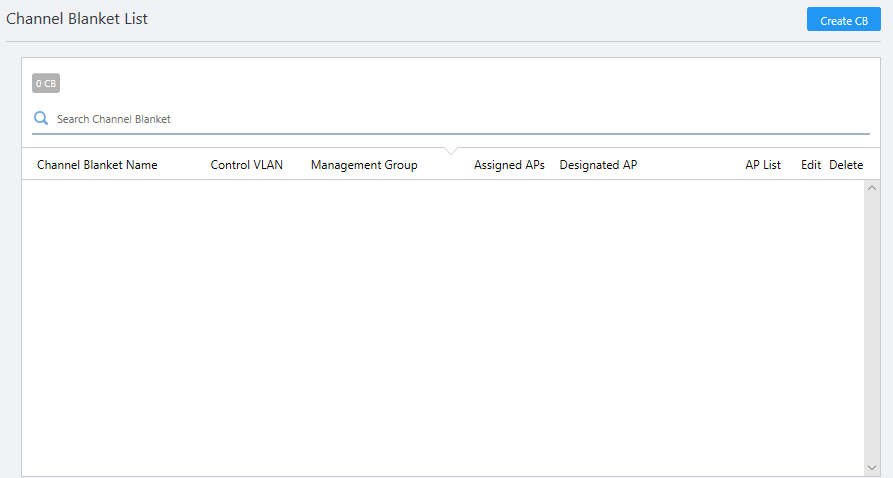
Lets you create channel blanket wireless networks.
Refer to Operation Reference > Channel Blanket > Create Channel Blanket for more details.
- Search Wireless Management Group: Groups in the list can be filtered by entering a partial name in the search box.
- Configure items in the "Profile Configuration" and "VAP (Multiple SSID) Configuration" sections as required.
- Click "Save" at the top right of the Content section to save the configuration.
After saving the CB Profile, create a channel blanket, starting from step 4 of Operation Reference > Channel Blanket > Create Channel Blanket.
Edit CB Profile
- Select "Wireless Configuration" > "CB Profile" from the AWC Plug-in menu.
- Click "Detail" (magnifying glass icon) to the right of the CB Profile you want to edit.
- Configuration information for the CB Profile is displayed. Click "Edit" at the top right corner.
- Change the information as needed.
- Click "Save" at the top right of the Content section.
Delete CB Profile
- Select "Wireless Configuration" > "CB Profile" from the AWC Plug-in menu.
- Click "Detail" (magnifying glass icon) to the right of the CB Profile you want to edit.
- Configuration information for the CB Profile is displayed. Click "Delete" at the top right of the Content section.
- The "Confirm" dialog box will appear.
- Click "Delete".
21 Oct 2022 11:56