Authentication policy settings for each authentication method of port authentication
Common port authentication methods using the RADIUS protocol include the following:
- MAC Address-based Authentication (hereinafter referred to as MAC-based Authentication)
MAC-based Authentication authenticates each device based on its MAC Address. No special functionality is required on the supplicant side.
- IEEE 802.1X Authentication (hereinafter referred to as 802.1X Authentication)
802.1X Authentication basically performs authentication on a per-user basis. The supplicant must support 802.1X.
- Web Authentication
Web Authentication involves entering a user name and password into the supplicant's web browser, and authentication is performed on a per-user basis, similar to 802.1X Authentication.
How to register AT-RADgate authentication policy
This section describes how to register AT-RADgate settings (mainly authentication policies) in the following cases.- MAC-based Authentication, 802.1X Authentication, Web Authentication
- Windows Active Directory Integration
- AlliedWare Plus series (including the AT-TQR Wi-Fi router) and the TQ series of Wireless LAN Access Points
- Intelligent Edge Security (IES)
MAC-based Authentication, 802.1X Authentication, Web Authentication
To register an authentication policy for each authentication method, follow the steps below.- NAS
- User
- Supplicant Profile
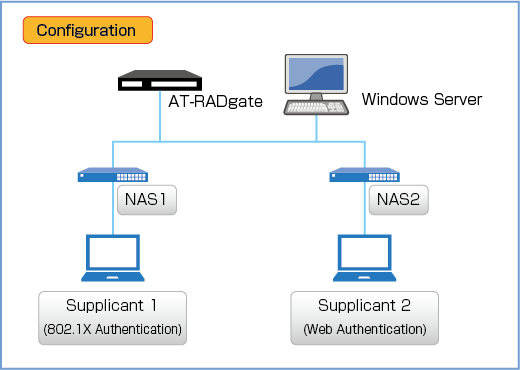
This setting assumes the following configuration. It is assumed that the basic settings for each product have been completed.
Note that it is assumed that the NAS has a dynamic VLAN function.
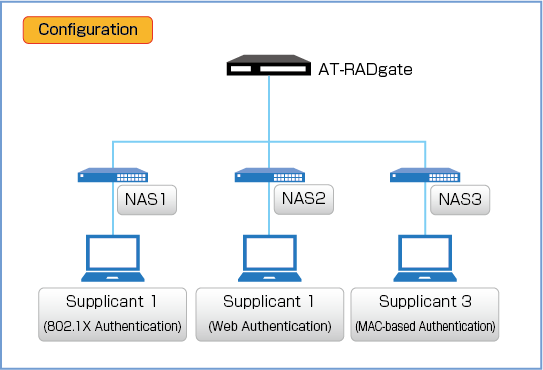
NAS and Supplicant information are below.
| NAS1 | |
|---|---|
| IP Address | 192.168.10.10/24 |
| Pre-Shared Key | secret1 |
| NAS2 | |
| IP Address | 192.168.10.20/24 |
| Pre-Shared Key | secret2 |
| NAS3 | |
| IP Address | 192.168.10.30/24 |
| Pre-Shared Key | secret3 |
| Supplicant 1 (802.1X Authentication) | |
| Login Name | user1 |
| Password | passwd1 |
| Network | vlan10 |
| Supplicant 2 (Web Authentication) | |
| Login Name | user2 |
| Password | passwd2 |
| Network | vlan20 |
| Supplicant 3 (MAC-based Authentication) | |
| Login Name | 00-00-00-00-00-01 |
| Password | 00-00-00-00-00-01 |
| Network | vlan30 |
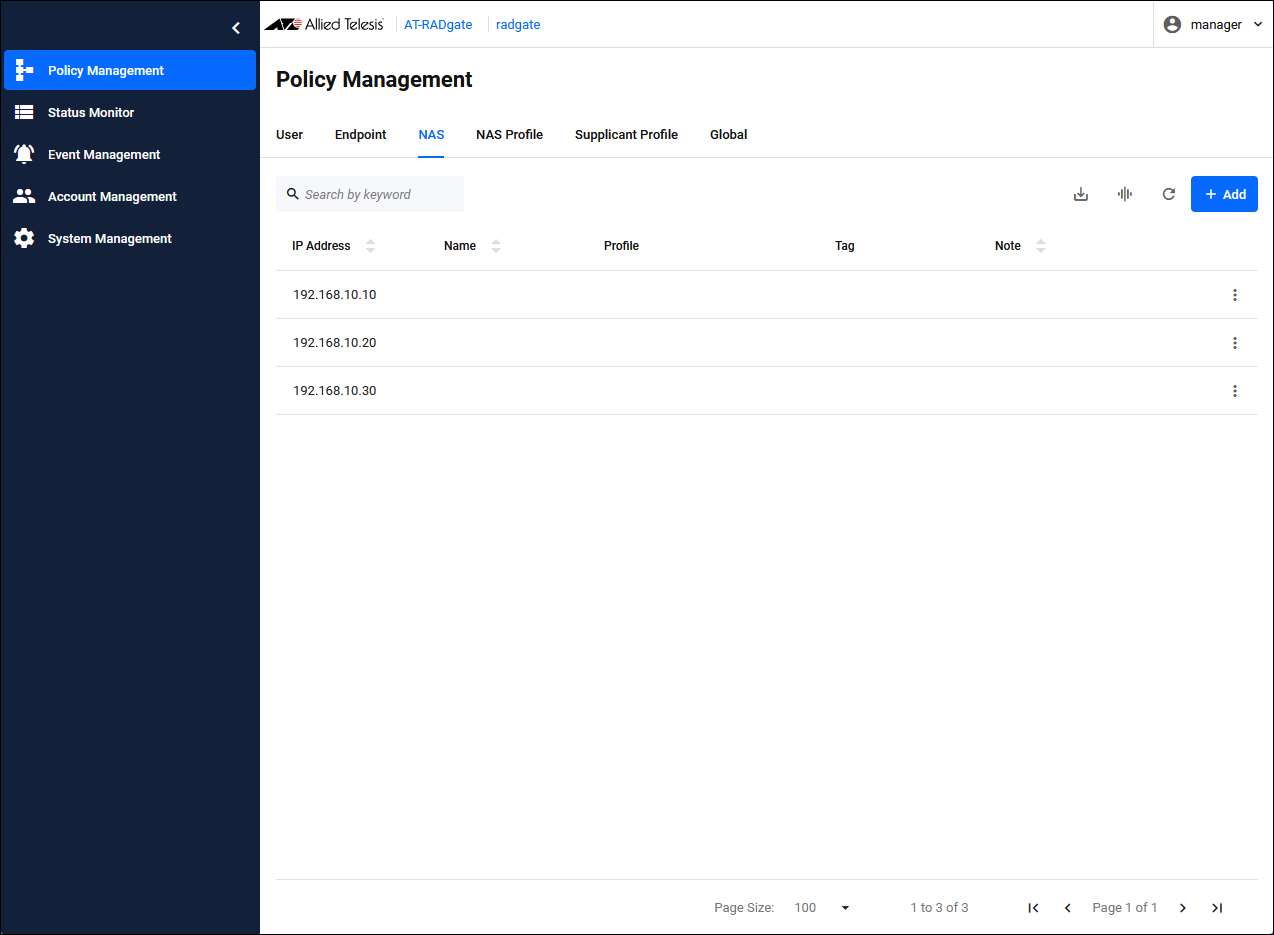
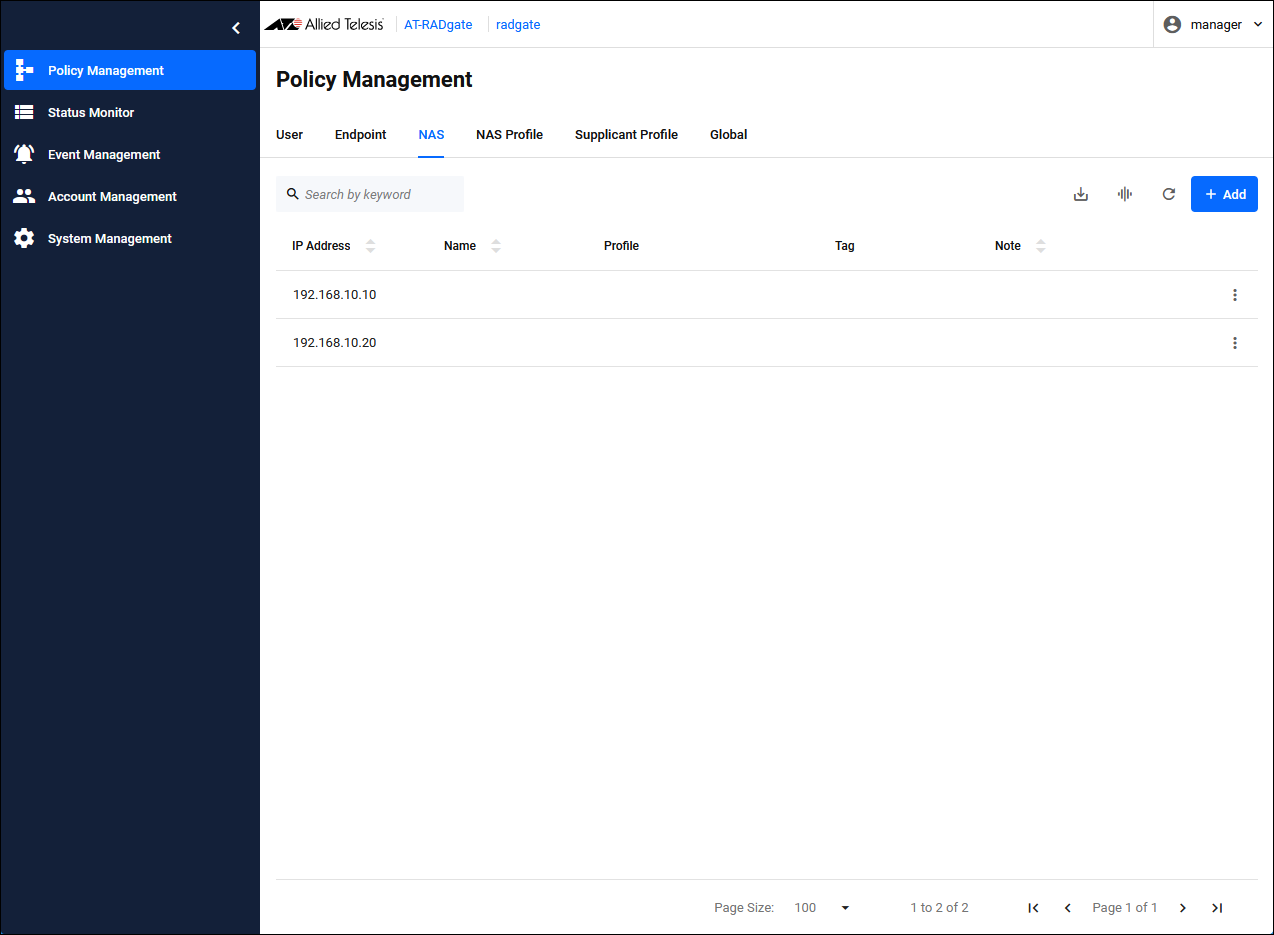
Registering NAS
Click the "Add" button in the upper right corner of the Policy Management > NAS page to display the Add NAS dialog.
| IPv4 Address | Set the IP Address of NAS1 to "192.168.10.10". |
| Pre-Shared Key | Pre-Shared Key (PSK). Set “secret1” that you set on NAS1. |
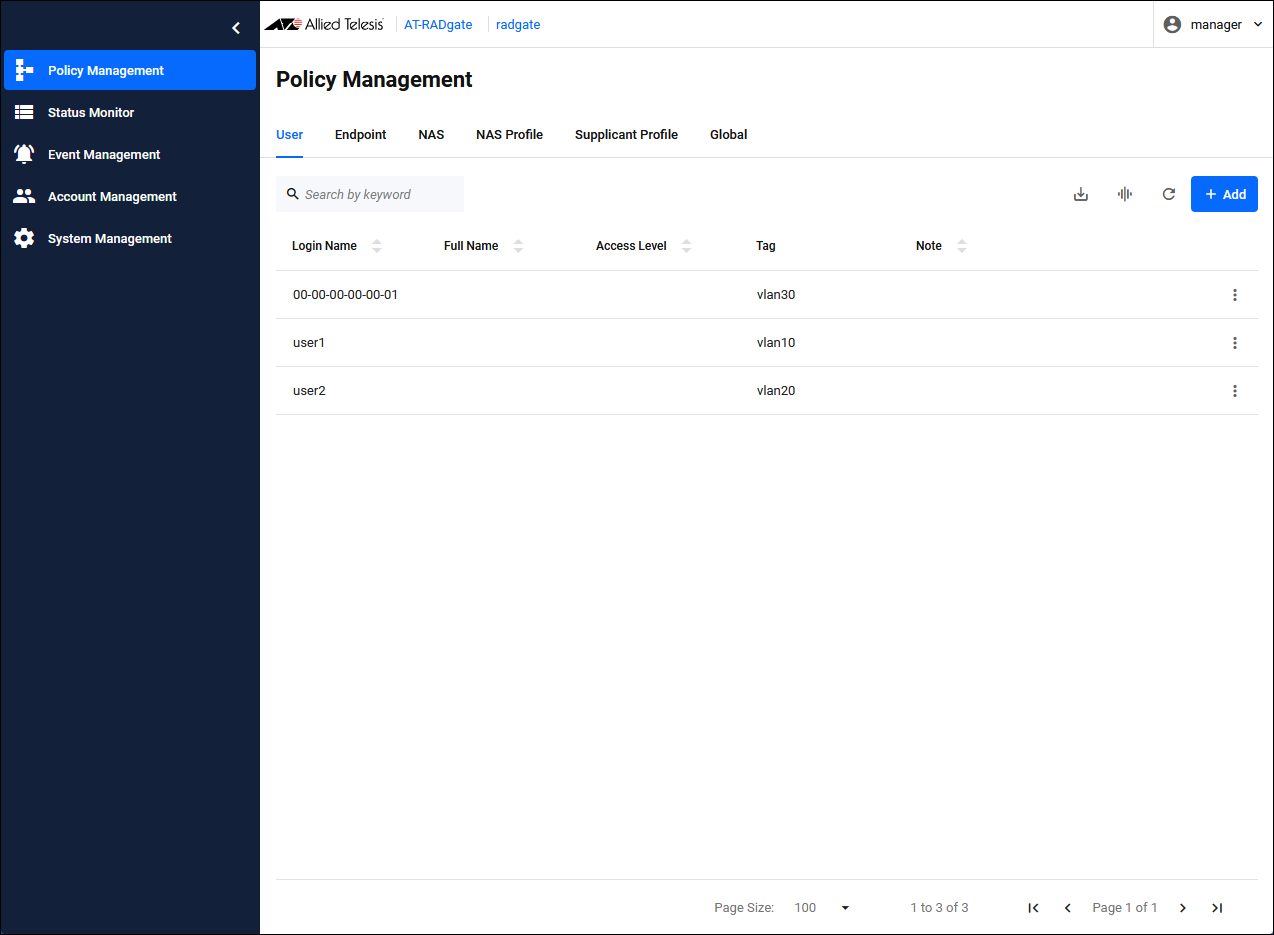
Registering User
Configure the information for each supplicant. You specify the network (VLAN) to which each supplicant is connected, but the actual network specification is done in the "Supplicant Profile." Here, we use "Tag" to link "User" and "Supplicant Profile".Click the "Add" button in the upper right corner of the Policy Management > User page to display the Add User dialog.
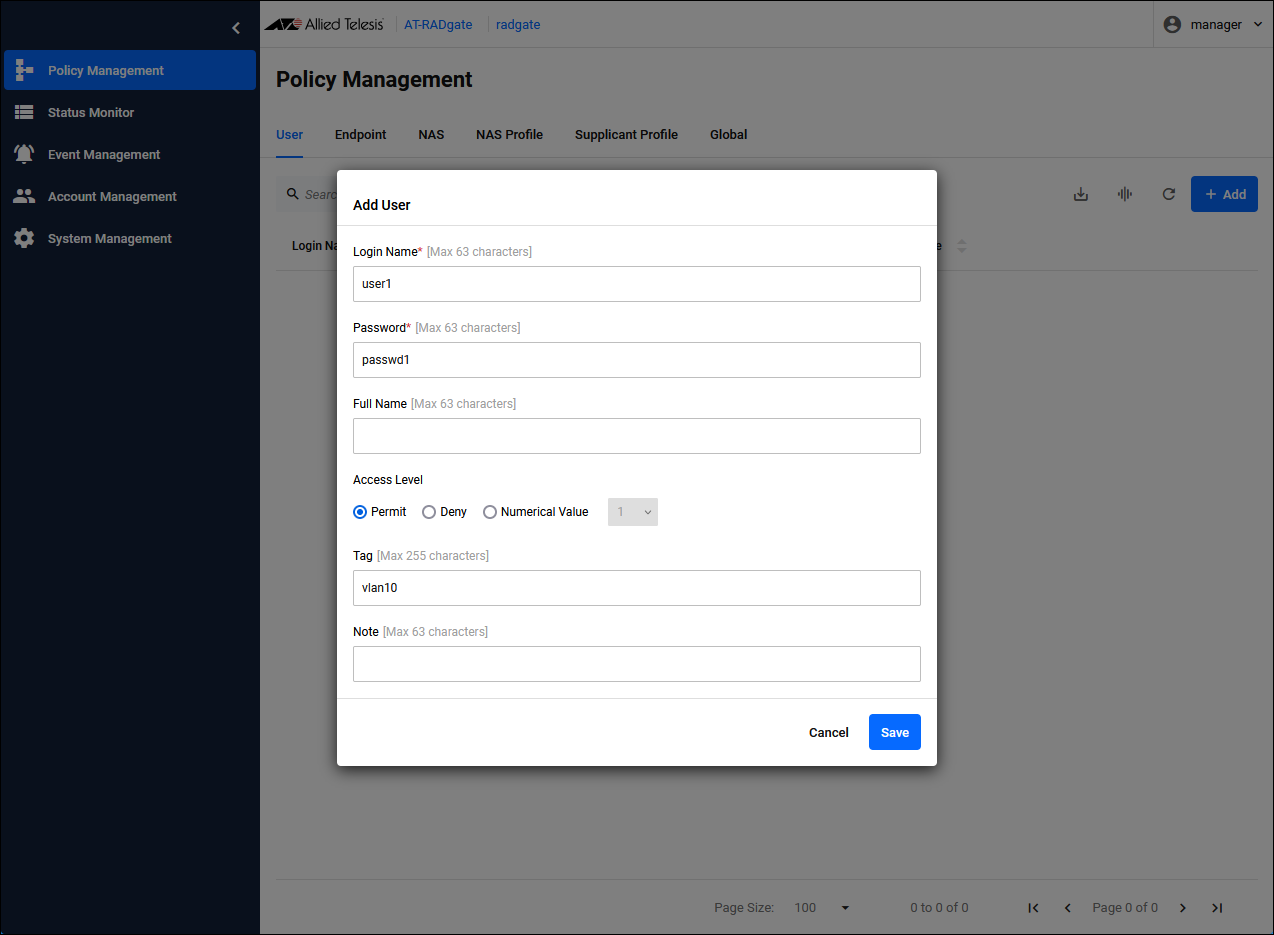
| Login Name | Set the login name "user1" for Supplicant 1. |
| Password | Set the password "passwd1" for Supplicant 1. |
| Tag | Configure "vlan10" for the network to which Supplicant 1 connects. This "vlan10" is also set in the "Supplicant Profile". |
Registering Supplicant Profile
Register Supplicant Profile and specify the network (VLAN) to which each supplicant connects.As mentioned above, "Tag" is used to link "User" and "Supplicant Profile".
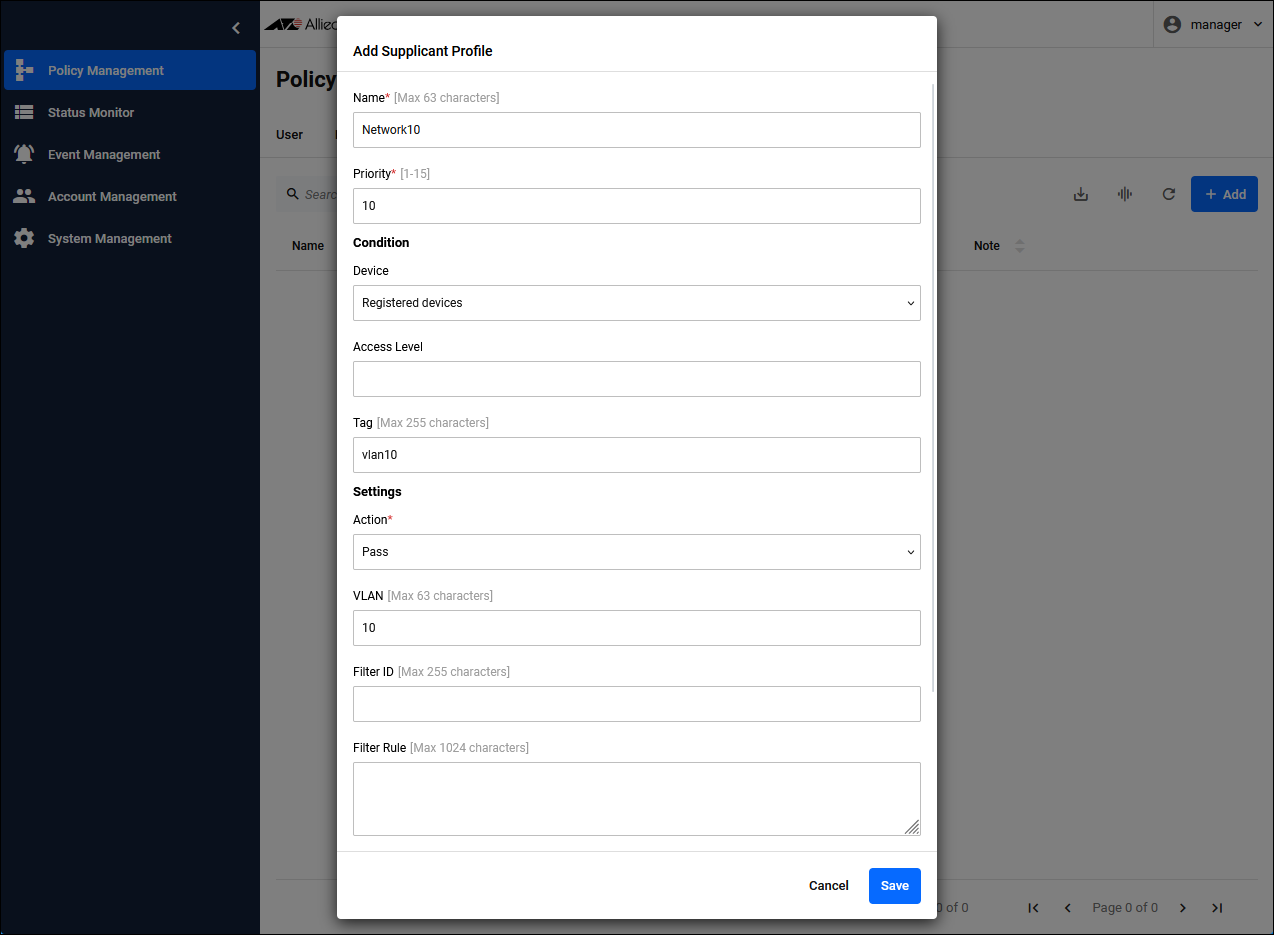
NoteClick the "Add" button in the upper right corner of the Policy Management > Supplicant Profile page to display the Add Supplicant Profile dialog. Configure the Supplicant Profile for Supplicant 1.In this case, the priorities would work as intended with the same number, but they are different numbers for clarity.
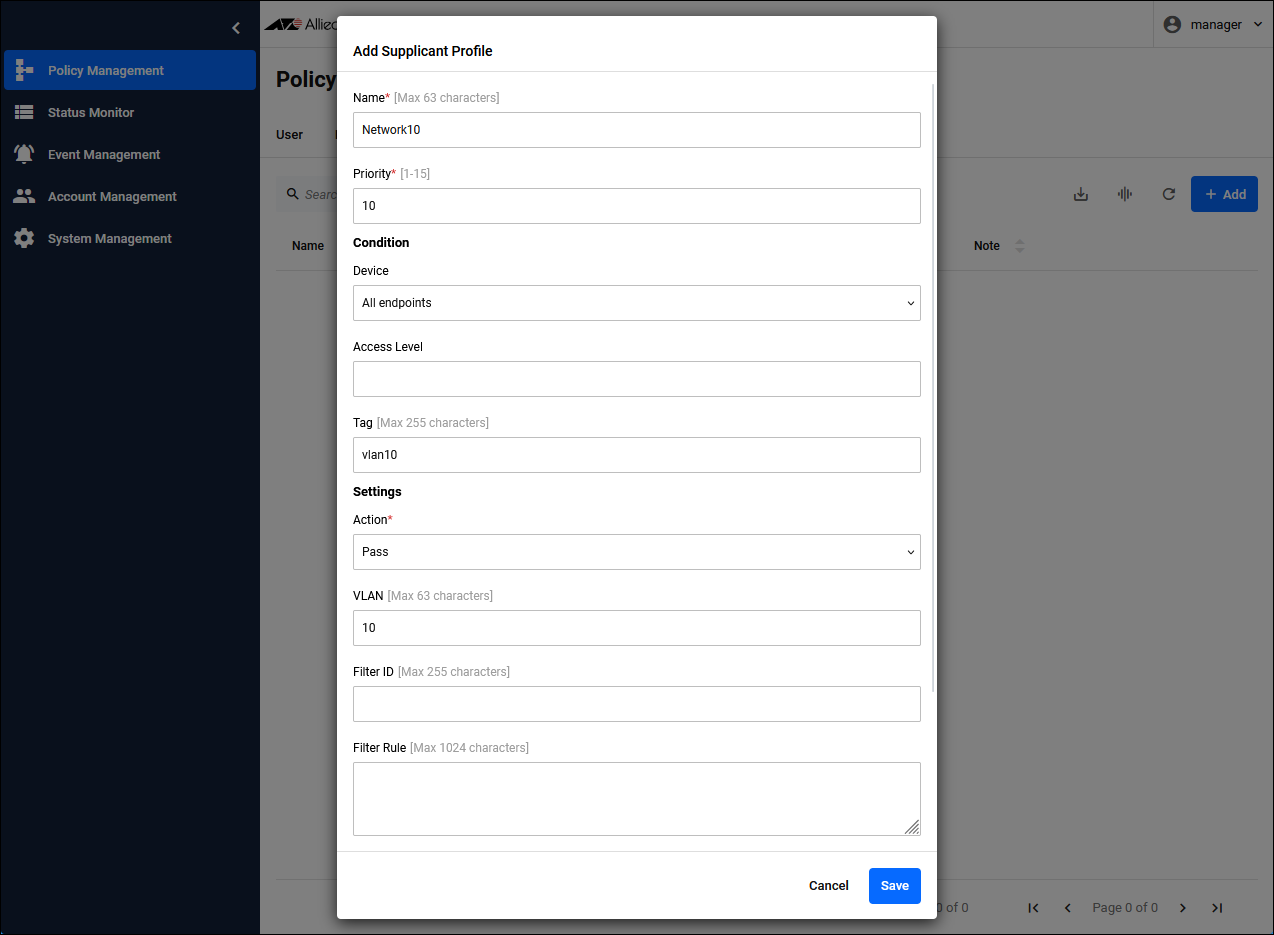
| For Supplicant 1 | |
|---|---|
| Name | Network10 |
| Priority | 10 |
| Condition / Device | All endpoints |
| Condition / Tag | vlan10 |
| Settings / Action | Pass |
| Settings / VLAN | 10 |
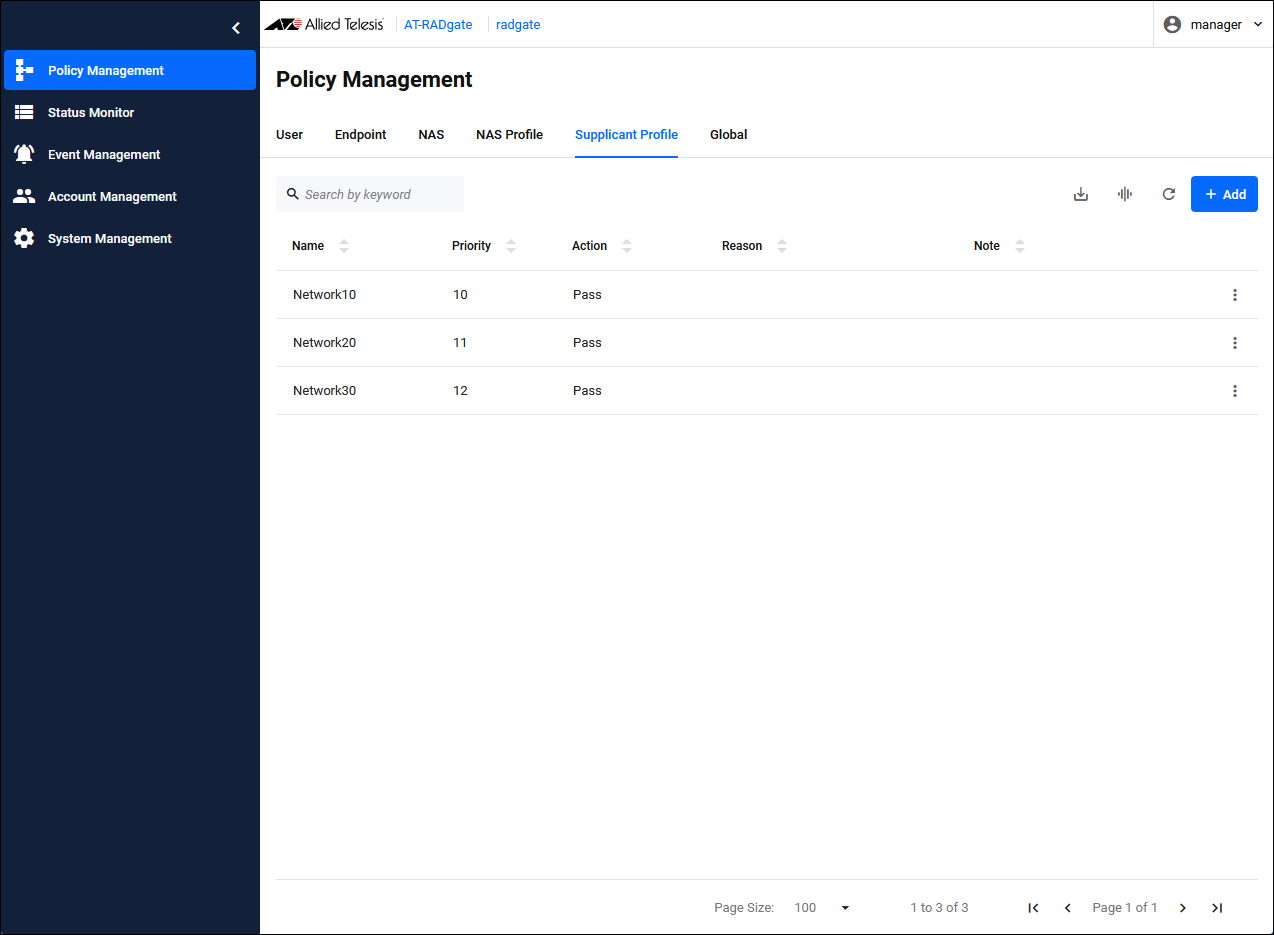
Register Supplicant 2 and Supplicant 3 in the same way as Supplicant 1.
| For Supplicant 2 | |
|---|---|
| Name | Network20 |
| Priority | 11 |
| Condition / Device | All endpoints |
| Condition / Tag | vlan20 |
| Settings / Action | Pass |
| Settings / VLAN | 20 |
| For Supplicant 3 | |
| Name | Network30 |
| Priority | 12 |
| Condition / Device | All endpoints |
| Condition / Tag | vlan30 |
| Settings / Action | Pass |
| Settings / VLAN | 30 |

Configuration is complete.
Windows Active Directory Integration
During RADIUS Authentication, AT-RADgate can query Windows Server by linking with Windows Active Directory, instead of using its own user authentication policy, and perform user authentication using the Windows Server database.NoteThe setup process is as follows:The networks to which supplicants authenticated by Windows Active Directory integration connect cannot be separated for each supplicant.
- Register Windows Active Directory settings on the AT-RADgate System Management > RADIUS Settings page
- Register the NAS policy on the AT-RADgate Policy Management page
- Register the policy for the Supplicant Profile on the AT-RADgate Policy Management page
Note that it is assumed that the NAS has a dynamic VLAN function.
Information on Windows Server, NAS, and supplicants for each authentication method are below.
| Domain Name | radgate.co.jp |
| NetBIOS Name | radgate |
| Character Set | CP1252 |
| User Name | administrator |
| Password | Password1! |
NoteUse the default setting of "CP1252" for this setting. This change is not supported in this version.
| NAS1 | |
|---|---|
| IP Address | 192.168.10.10/24 |
| Pre-Shared Key | secret1 |
| NAS2 | |
| IP Address | 192.168.10.20/24 |
| Pre-Shared Key | secret2 |
| Supplicant 1 (802.1X Authentication) | |
|---|---|
| Login Name | user1 |
| Password | passwd1 |
| Network | vlan10 |
| Supplicant 2 (Web Authentication) | |
| Login Name | user2 |
| Password | passwd2 |
| Network | vlan10 |
Windows Active Directory Configuration
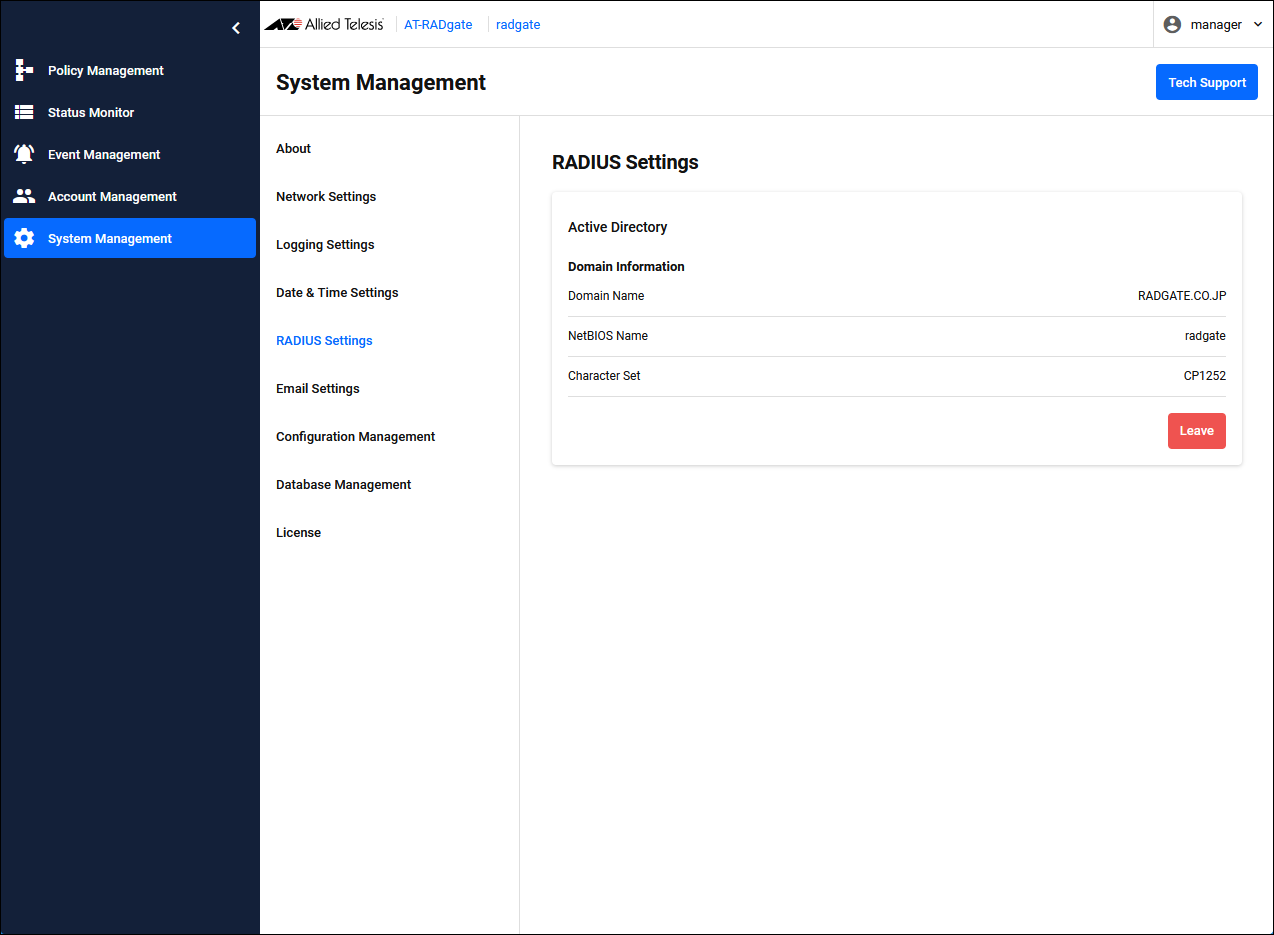
Click the "Edit" button on the right of the System Management > RADIUS Settings page to display the page for setting the AD domain information.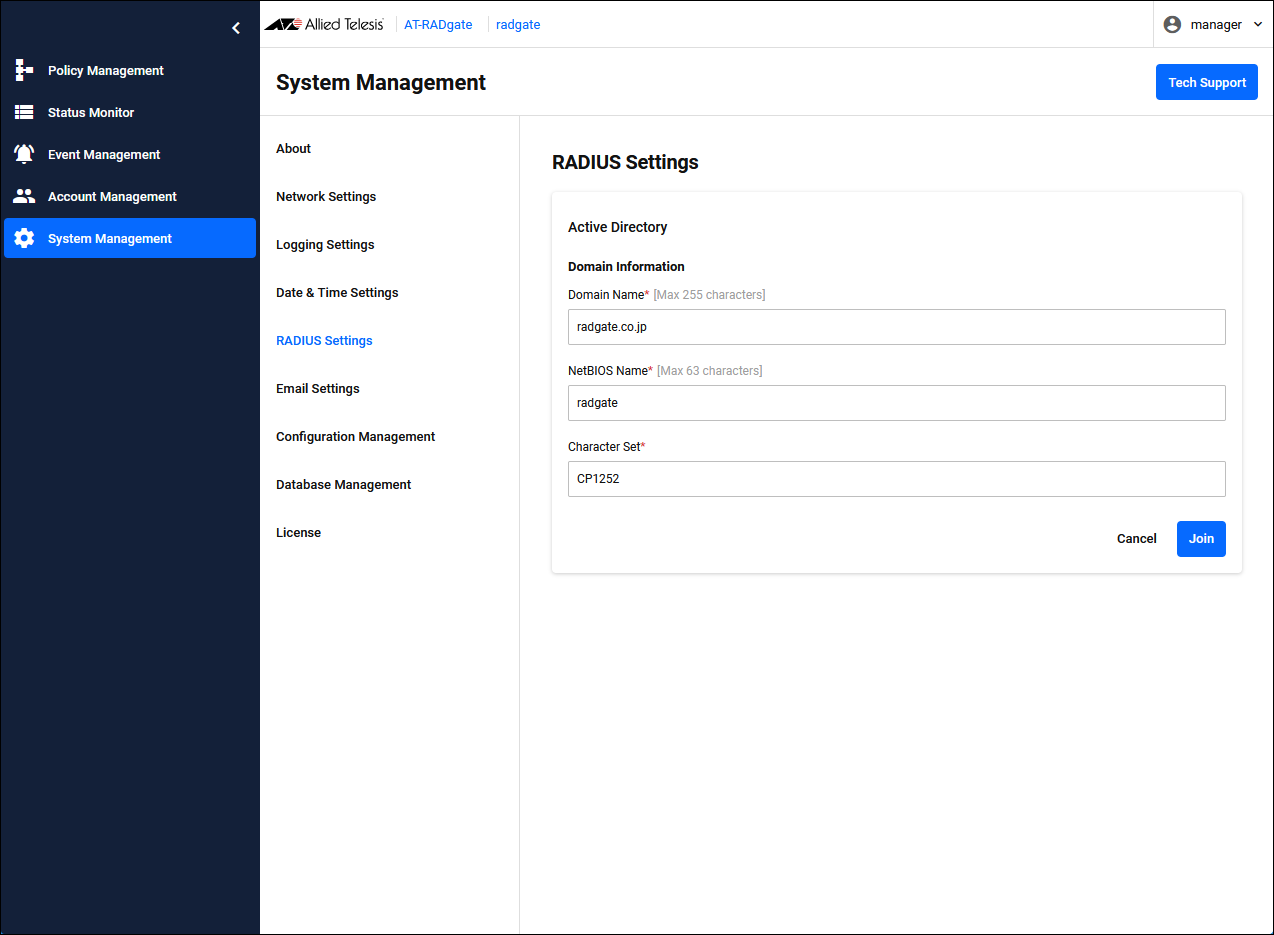
Enter the following information and click the "Join" button.
| Domain Name | radgate.co.jp |
| NetBIOS Name | radgate |
| Character Set | CP1252 (default) |
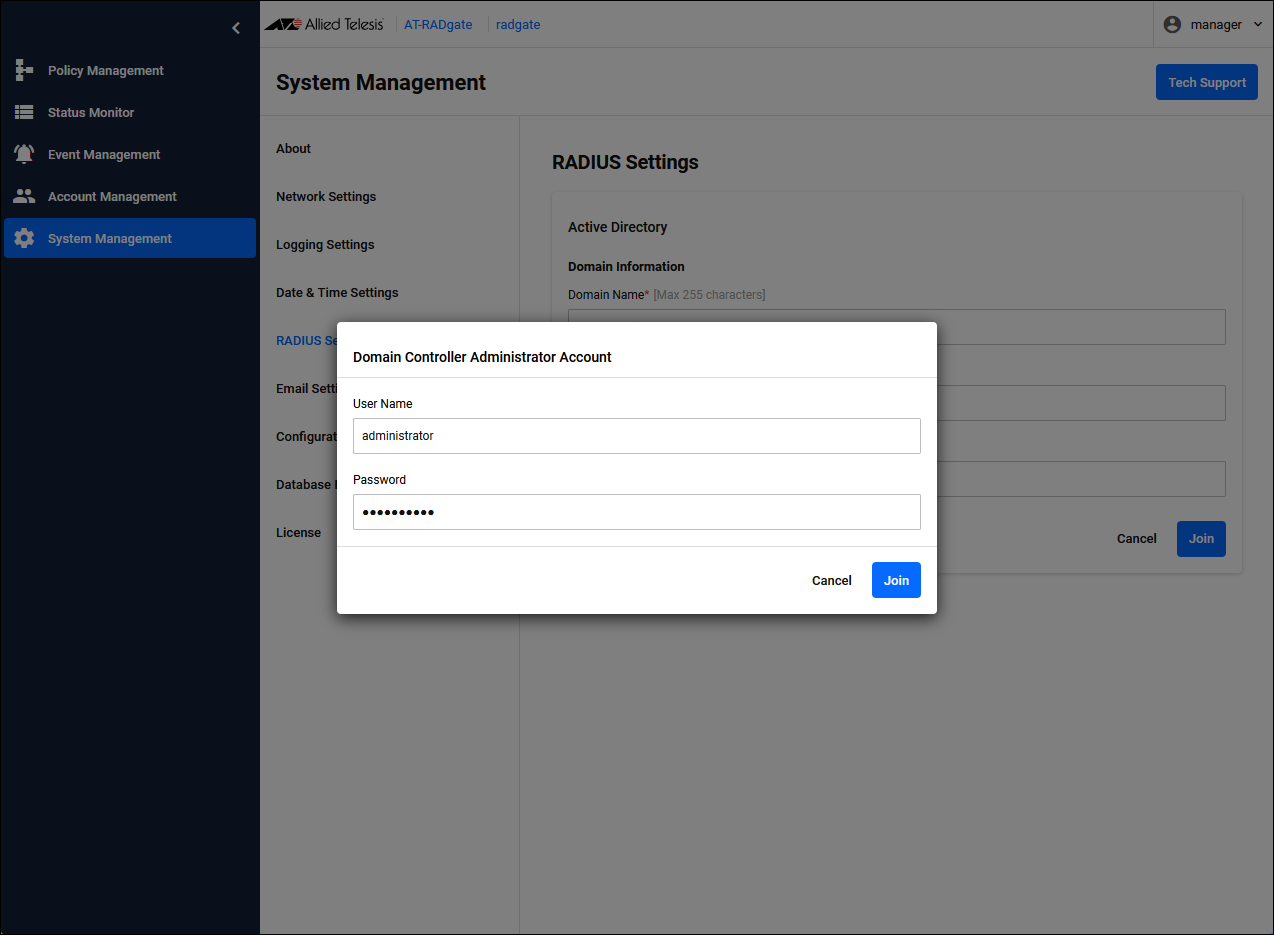
Enter the following information in the user name and password fields, then click the "Join" → "OK" button.
Note that the password is displayed on the page.
| User Name | administrator |
| Password | Password1! |
Registering NAS
Click the "Add" button in the upper right corner of the Policy Management > NAS page to display the Add NAS dialog.
| IPv4 Address | Set the IP Address of NAS1 to "192.168.10.10". |
| Pre-Shared Key | Pre-Shared Key (PSK). Set “secret1” that you set on NAS1. |
Registering Supplicant Profile
Register Supplicant Profile and specify the network (VLAN) to which the supplicant connects.NoteClick the "Add" button in the upper right corner of the Policy Management > Supplicant Profile page to display the Add Supplicant Profile dialog.Since the networks to which supplicants authenticated via Windows Active Directory linkage connect cannot be separated for each supplicant, only one Supplicant Profile can be registered.

| Name | Network10 |
| Priority | 7 (default) |
| Condition / Device | All endpoints |
| Settings / Action | Pass |
| Settings / VLAN | 10 |
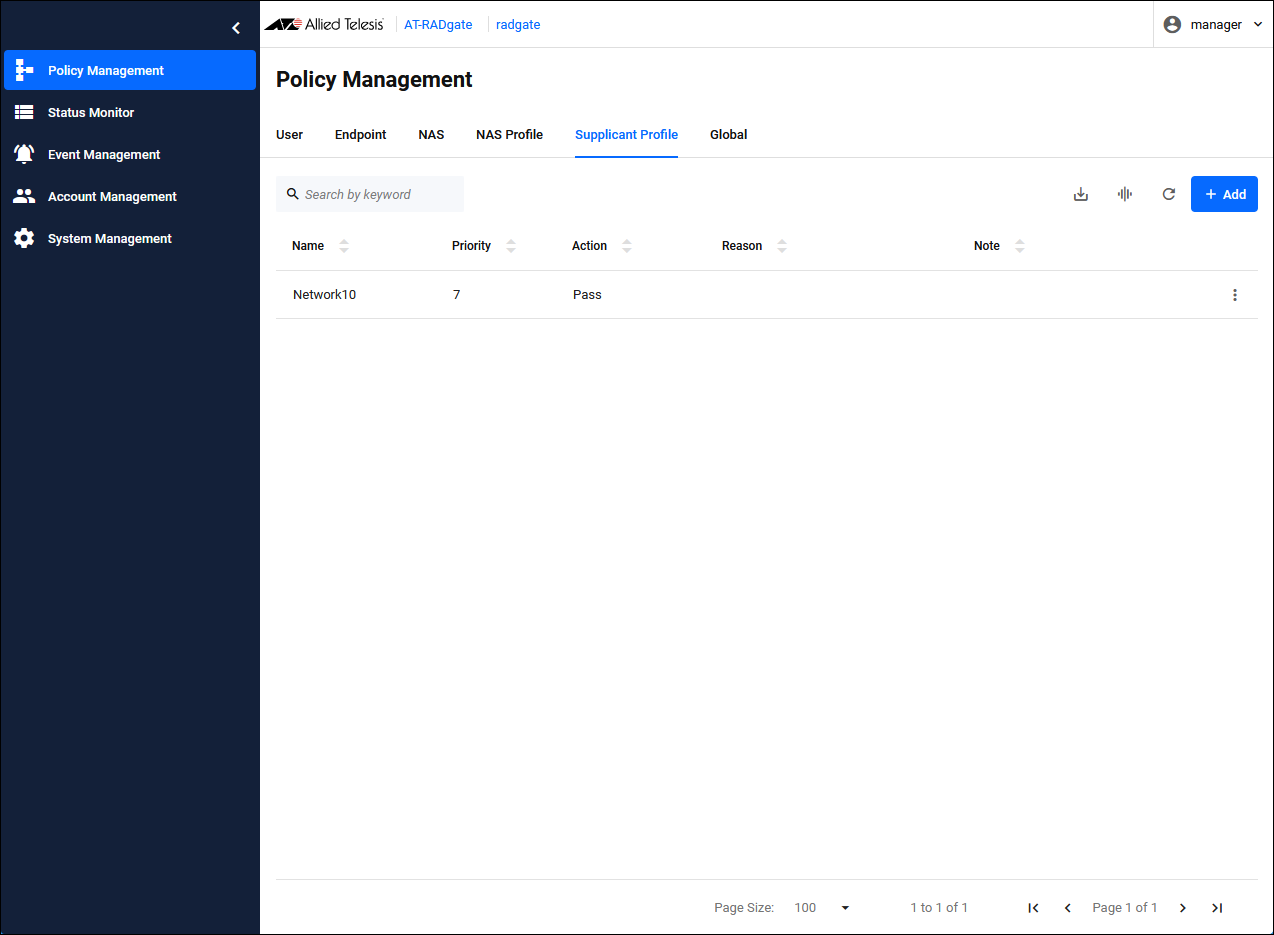
Configuration is complete.
AlliedWare Plus series (including the AT-TQR Wi-Fi router) and the TQ series of Wireless LAN Access Points
AW+ series (including the AT-TQR Wi-Fi router) and TQ series Wireless LAN Access Points store the MAC Address in the Calling-Station-Id attribute of the authentication request message, so they perform endpoint authentication if endpoint authentication is enabled. To perform endpoint authentication, check "Enable device authentication." for the NAS Profile you want to register on the Policy Management > NAS Profile page. And that NAS Profile must be configured on the NAS that authenticates the supplicant. Once you have authenticated your device, you can check the authentication status of the supplicant on the Status Monitor > Endpoint page. If a MAC-based Authentication request is received, only endpoint authentication is performed and no user authentication is performed.NoteThe order in which authentication policies are checked for each authentication method is as follows:On the Status Monitor > Endpoint page, you can also check the authentication status of the supplicant and disconnect the supplicant. The supplicant is disconnected by the AT-RADgate sending a RADIUS Dynamic Authorization Disconnect message to the NAS. The following products and functions support supplicant disconnection.
AW+ (Wi-Fi routers other than AT-TQR) series: MAC-based Authentication, 802.1X Authentication, Web Authentication (requires radius dynamic-authorization-client setting)
AW+ (AT-TQR Wi-Fi router) series: MAC-based Authentication only (mac-auth radius dynamic-authorization-client settings required)
- MAC-based Authentication
NAS → Endpoint Authentication → Supplicant Profile
- 802.1X Authentication, Web Authentication
NAS → Endpoint Authentication → User Authentication → Supplicant Profile
NoteFor an explanation of each authentication method and how to register an authentication policy, refer to Quick Tour > Authentication policy settings for each authentication method of Port Authentication.
MAC-based Authentication, 802.1X Authentication, Web Authentication
To register an authentication policy for each authentication method, follow the steps below.- NAS Profile
- NAS
- User
- Endpoint
- Supplicant Profile
This setting assumes the following configuration. It is assumed that the basic settings for each product have been completed.
Note that it is assumed that the NAS has a dynamic VLAN function.
Information on the NAS and supplicant for each authentication method are below.
| NAS1 | |
|---|---|
| IP Address | 192.168.10.10/24 |
| Pre-Shared Key | secret1 |
| NAS2 | |
| IP Address | 192.168.10.20/24 |
| Pre-Shared Key | secret2 |
| NAS3 | |
| IP Address | 192.168.10.30/24 |
| Pre-Shared Key | secret3 |
| Supplicant 1 (802.1X Authentication) | |
| MAC Address | 00-00-00-00-00-01 |
| Login Name | user1 |
| Password | passwd1 |
| Network | vlan10 |
| Supplicant 2 (Web Authentication) | |
| MAC Address | 00-00-00-00-00-02 |
| Login Name | user2 |
| Password | passwd2 |
| Network | vlan20 |
| Supplicant 3 (MAC-based Authentication) | |
| MAC Address | 00-00-00-00-00-03 |
| Network | vlan30 |
Registering NAS Profile
Click the "Add" button in the upper right corner of the Policy Management > NAS Profile page to display the Add NAS Profile dialog.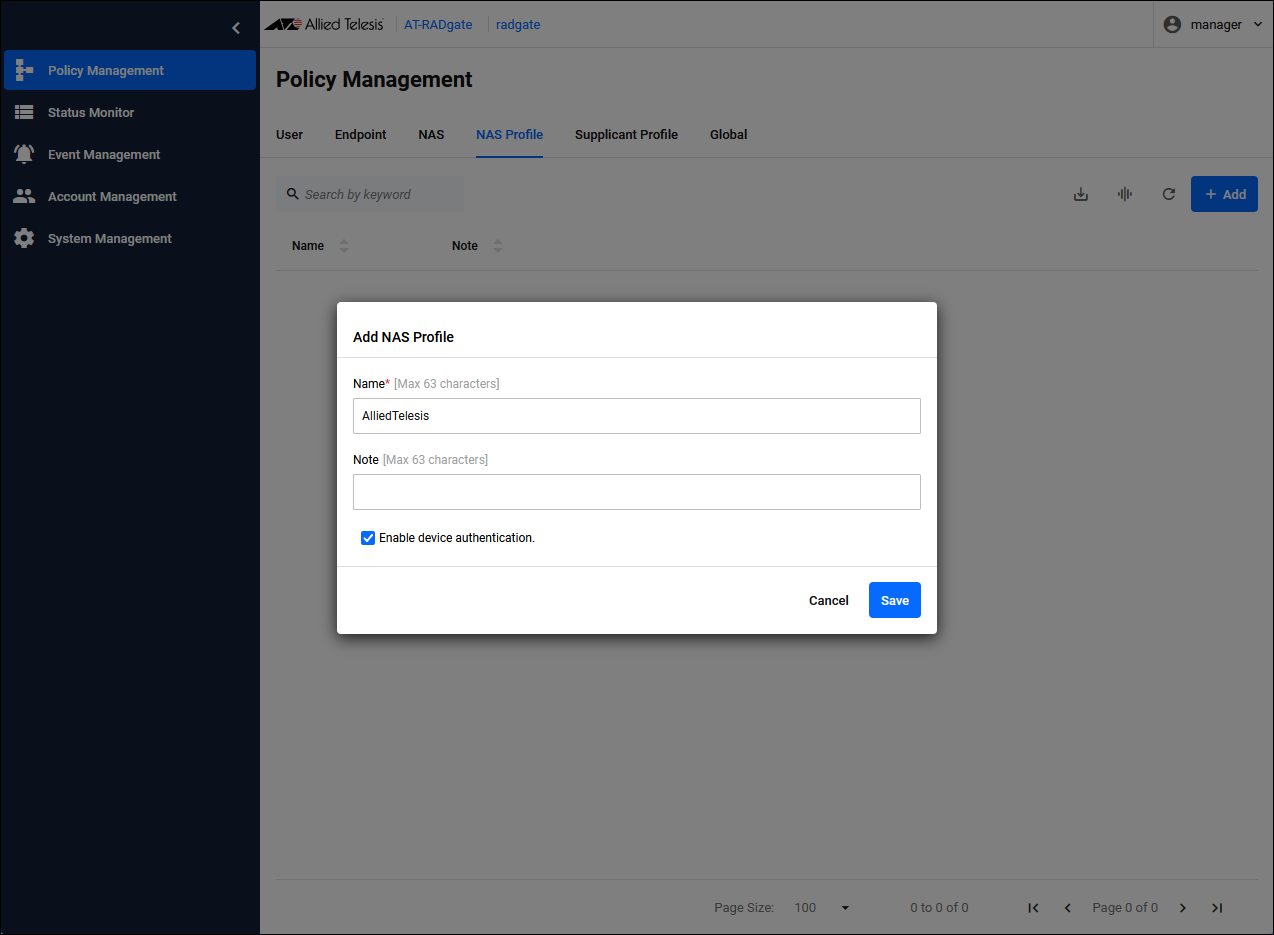
| Name | NAS Profile name. Set "AlliedTelesis". |
| Enable device authentication. | Check the check box. |
Registering NAS
Click the "Add" button in the upper right corner of the Policy Management > NAS page to display the Add NAS dialog.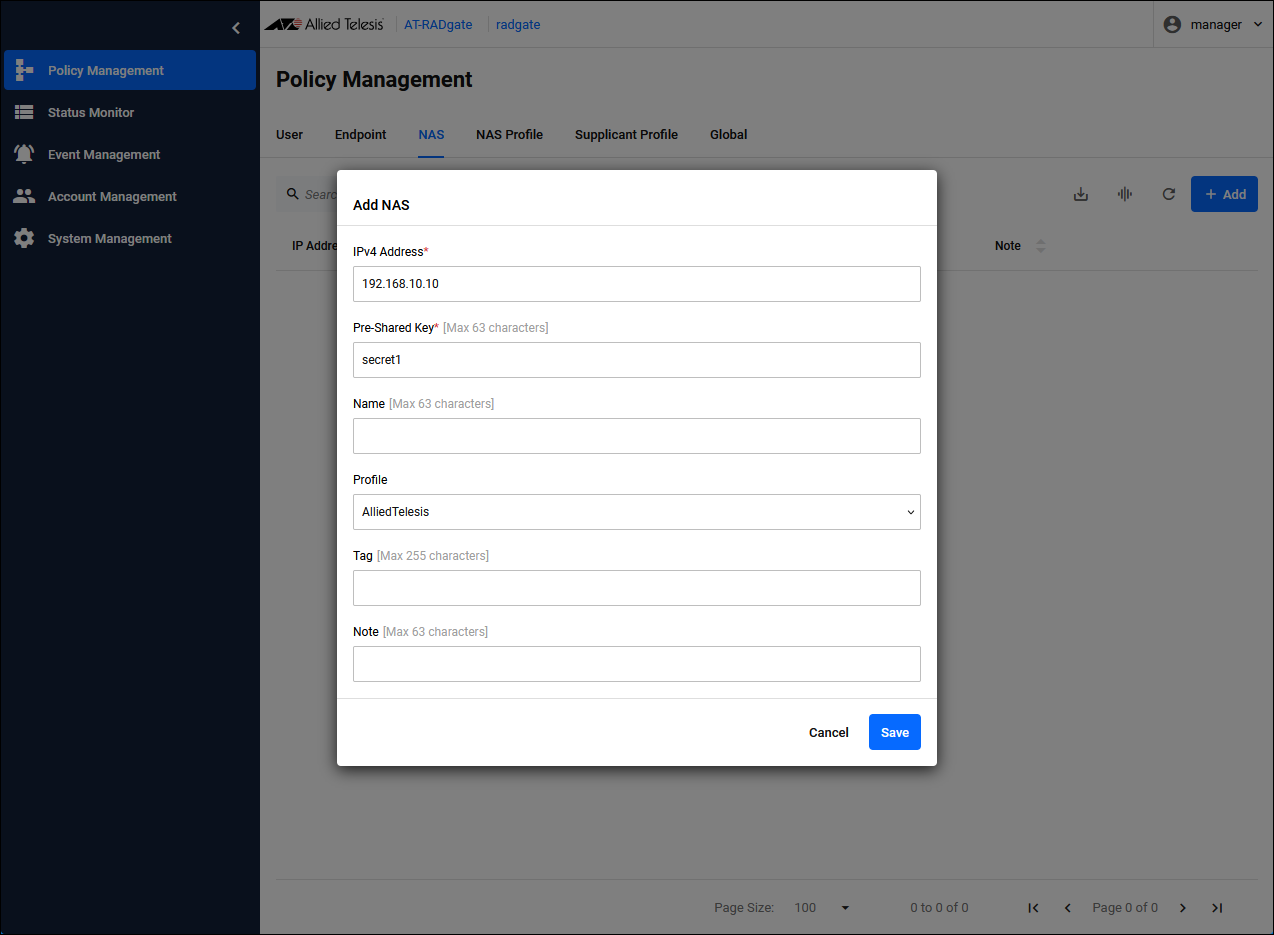
| IPv4 Address | Set the IP Address of NAS1 to "192.168.10.10". |
| Pre-Shared Key | Pre-Shared Key (PSK). Set “secret1” that you set on NAS1. |
| Profile | The NAS Profile to assign. Select the configured "AlliedTelesis". |

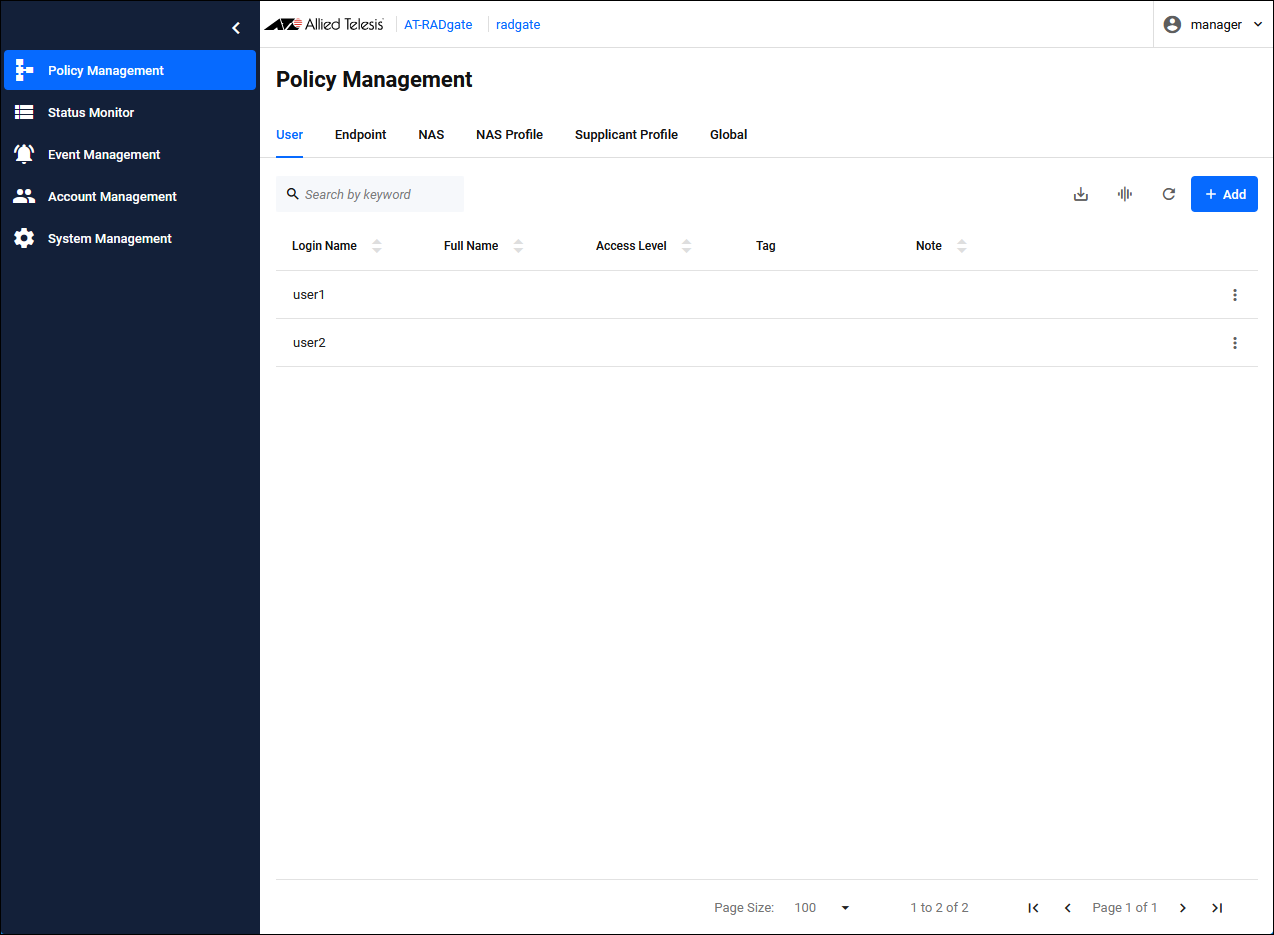
Registering User
Configure the information for each supplicant. You specify the network (VLAN) to which each supplicant is connected, but the actual network specification is done in the "Supplicant Profile." "Tag" is used to link each supplicant with a "Supplicant Profile," and the MAC Address of each supplicant is used to register the authentication policy of the endpoint for endpoint authentication. In this case, do not set a "Tag" in the user's authentication policy, but set a "Tag" in the endpoint authentication policy.In addition, Supplicant 3, which performs MAC-based Authentication, does not perform user authentication but only endpoint authentication, so there is no need to register users.
Click the "Add" button in the upper right corner of the Policy Management > User page to display the Add User dialog.

| Login Name | Set the login name "user1" for Supplicant 1. |
| Password | Set the password "passwd1" for Supplicant 1. |
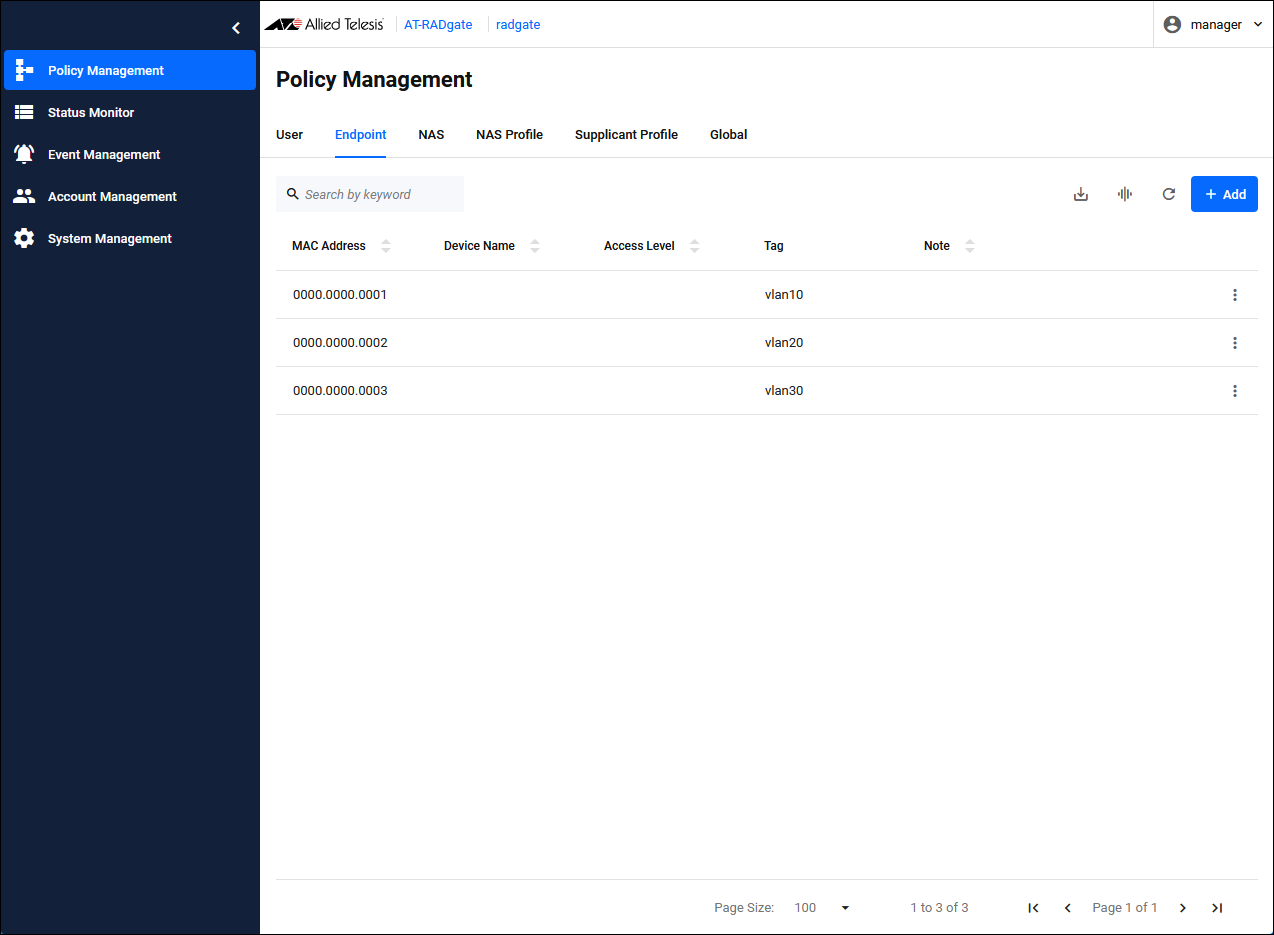
Registering Endpoint
Click the "Add" button in the upper right corner of the Policy Management > Endpoint page to display the Add Endpoint dialog.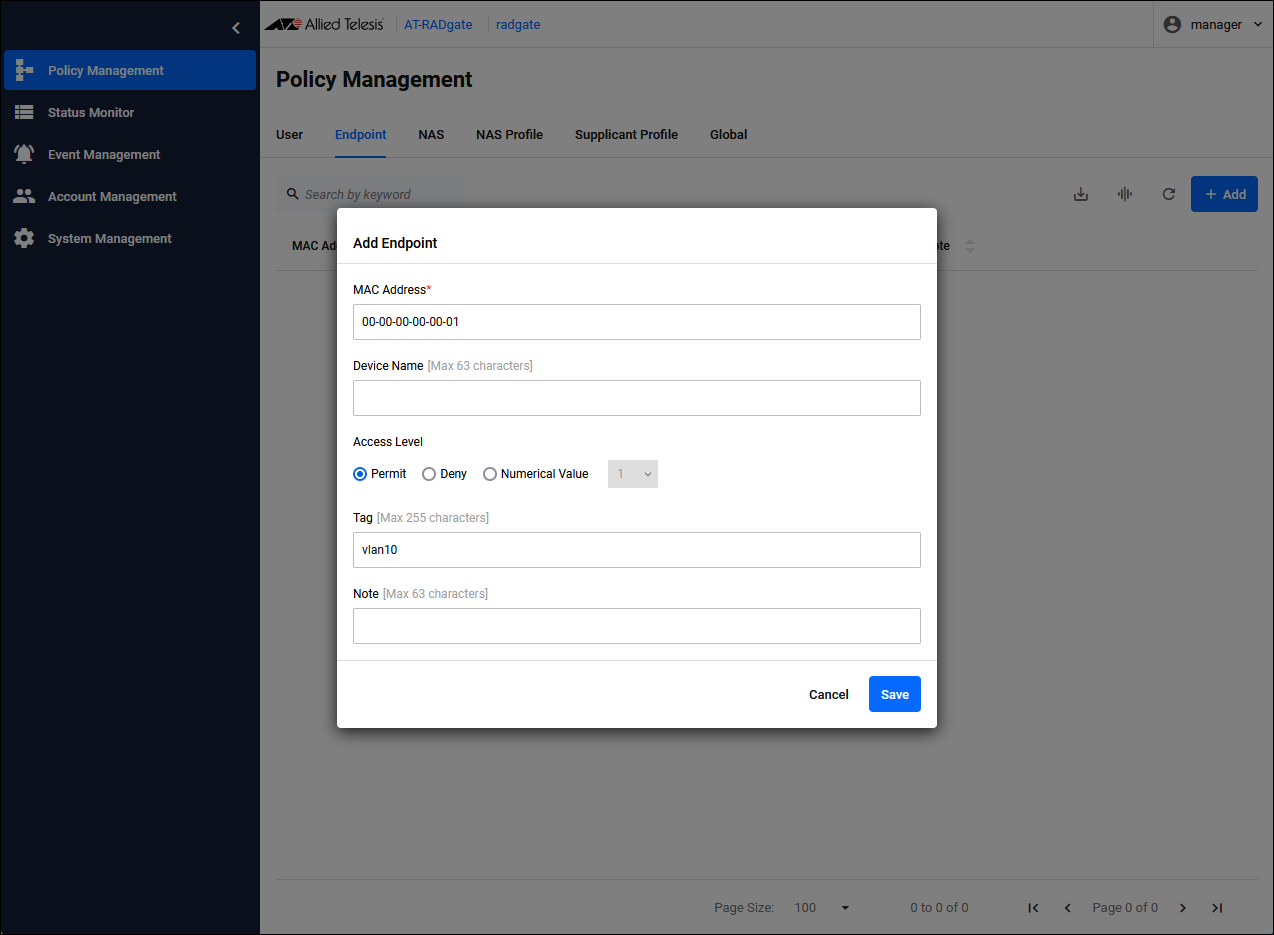
| MAC Address | Set the MAC Address of Supplicant 1 to "00-00-00-00-00-01". The MAC Address can be entered in the following formats:。 00:00:00:00:00:01 00-00-00-00-00-01 0000.0000.0001 000000000001 |
| Tag | Configure "vlan10" for the network to which Supplicant 1 connects. This "vlan10" is also set in the "Supplicant Profile". |
Registering Supplicant Profile
Register Supplicant Profile and specify the network (VLAN) to which each supplicant connects.As mentioned above, "Tag" is used to link "Endpoint" and "Supplicant Profile".
Since each supplicant is registered in the endpoint's authentication policy, the conditions for the Supplicant Profile are set to "Registered devices".
NoteClick the "Add" button in the upper right corner of the Policy Management > Supplicant Profile page to display the Add Supplicant Profile dialog. Configure the Supplicant Profile for Supplicant 1.In this case, the priorities would work as intended with the same number, but they are different numbers for clarity.
| For Supplicant 1 | |
|---|---|
| Name | Network10 |
| Priority | 10 |
| Condition / Device | Registered devices |
| Condition / Tag | vlan10 |
| Settings / Action | Pass |
| Settings / VLAN | 10 |
| For Supplicant 2 | |
|---|---|
| Name | Network20 |
| Priority | 11 |
| Condition / Device | Registered devices |
| Condition / Tag | vlan20 |
| Settings / Action | Pass |
| Settings / VLAN | 20 |
| For Supplicant 3 | |
| Name | Network30 |
| Priority | 12 |
| Condition / Device | Registered devices |
| Condition / Tag | vlan30 |
| Settings / Action | Pass |
| Settings / VLAN | 30 |
Configuration is complete.
Since endpoint authentication is enabled, you can check the authentication status of the supplicant on the Status Monitor > Endpoint page.
Intelligent Edge Security (IES)
Intelligent Edge Security (IES) uses MAC-based Authentication supported by our AW+ series (including the AT-TQR Wi-Fi router) to centrally manage whether or not supplicants (endpoints) can communicate using Vista Manager EX. AT-RADgate can also be used as an authentication server (RADIUS Server) for intelligent edge security.Intelligent Edge Security is operated using Vista Manager EX, but the following authentication policies must be registered on the AT-RADgate Policy Management page. If you add a NAS to the configuration, register it on the AT-RADgate side.
- NAS Profile
- NAS
NoteIntelligent edge security uses AT-RADgate endpoint authentication. Therefore, check the "Enable device authentication." checkbox in the NAS Profile and set that NAS Profile as the NAS that authenticates the supplicant.
NoteDo not register "Endpoint" and "Supplicant Profile" on the AT-RADgate Policy Management page. These are added via operations on the "Endpoint" tab on the "Asset Management" page of Vista Manager EX, or via "Users" and "Groups" on the "Network Services / RADIUS" page, and are registered in AT-RADgate.For information on operating Intelligent Edge Security, refer to the Vista Manager EX document posted on our website.
Note that the item names are different between Vista Manager EX and AT-RADgate, but their correspondence is as follows.
| Vista Manager EX Network Services / RADIUS |
AT-RADgate Policy Management page |
|---|---|
| User | Endpoint |
| Group | Supplicant Profile |
NoteThe setup process is as follows:The "User" and "Group" added through Vista Manager EX operations are registered in the "Endpoints" and "Supplicant Profile" of AT-RADgate, but even if Vista Manager EX or AT-RADgate is restarted after being registered in AT-RADgate, there is no need to register them again.
- Enable AT-RADgate on the "System Management / Settings" page of Vista Manager EX
- Register AT-RADgate on the "Network Services / RADIUS" page of Vista Manager EX
- Set the Shared Secret on the "Network Services / RADIUS" page of Vista Manager EX
- Register the NAS Profile policy on the AT-RADgate Policy Management page
- Register the NAS policy on the AT-RADgate Policy Management page
NoteThis setting assumes the following configuration. It is assumed that the basic settings for each product have been completed.If you want to actually use Intelligent Edge Security, you need to operate it using Vista Manager EX after completing the above settings.

NAS and AT-RADgate information are below.
| NAS1 | |
|---|---|
| IP Address | 192.168.10.10/24 |
| Pre-Shared Key | secret |
| NAS2 | |
| IP Address | 192.168.10.20/24 |
| Pre-Shared Key | secret |
| AT-RADgate | |
| User Name | manager |
| Password | friend |
| IP Address | 192.168.10.100/24 |
Enable AT-RADgate on the "System Management / Settings" page of Vista Manager EX
In the optional features of the Vista Manager EX "System Management / Settings" page, set AT-RADgate to "Enabled."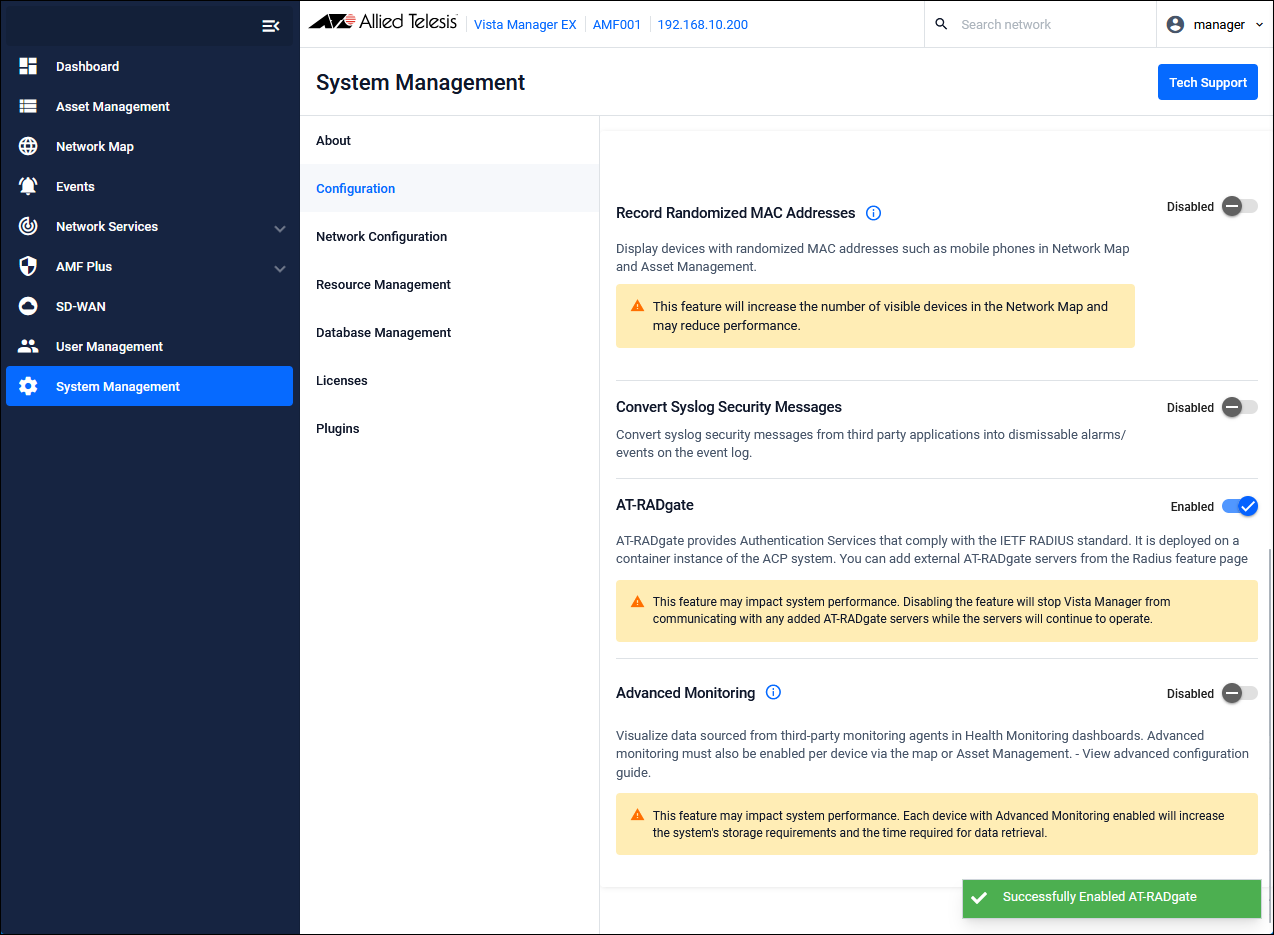
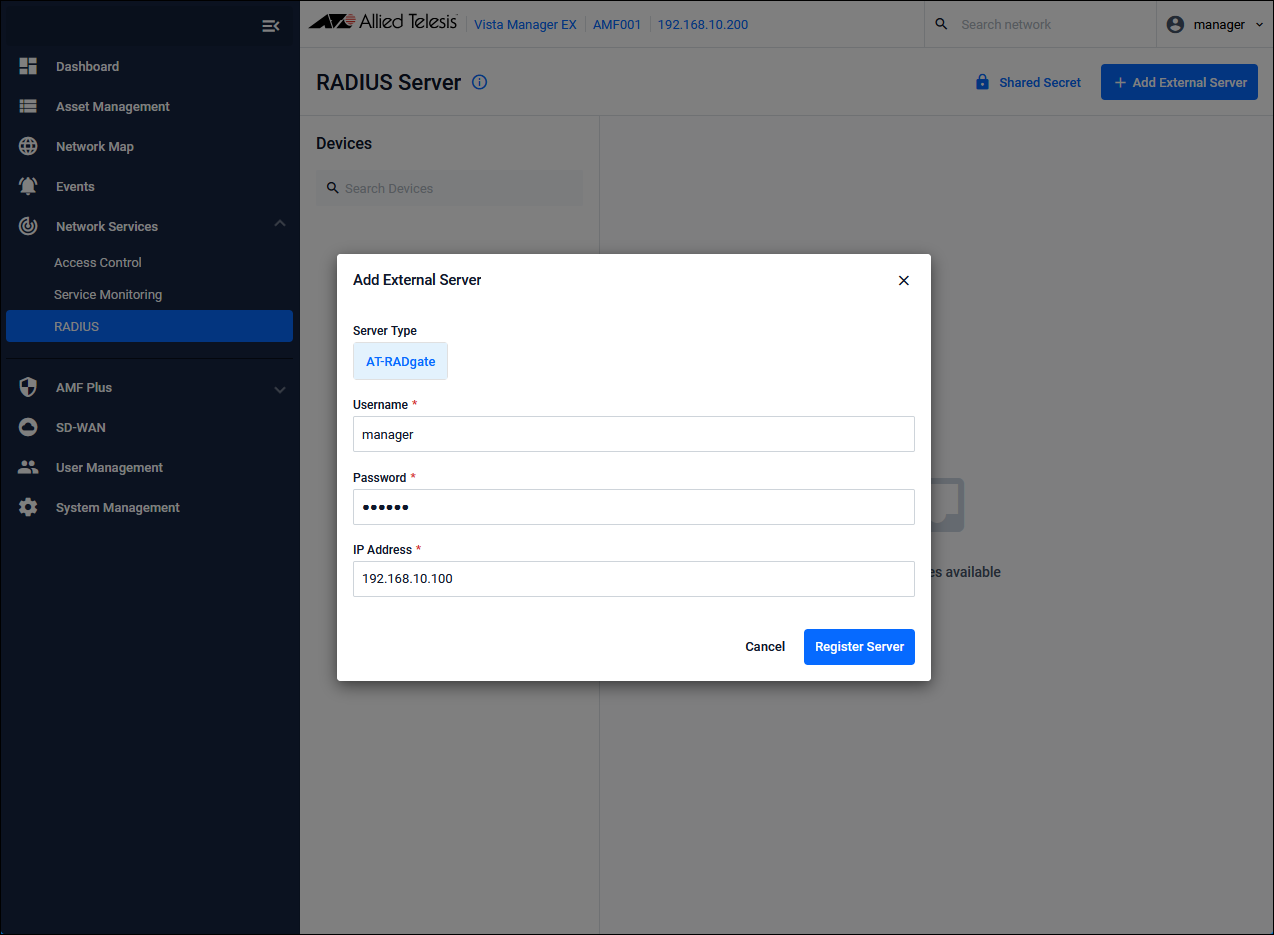
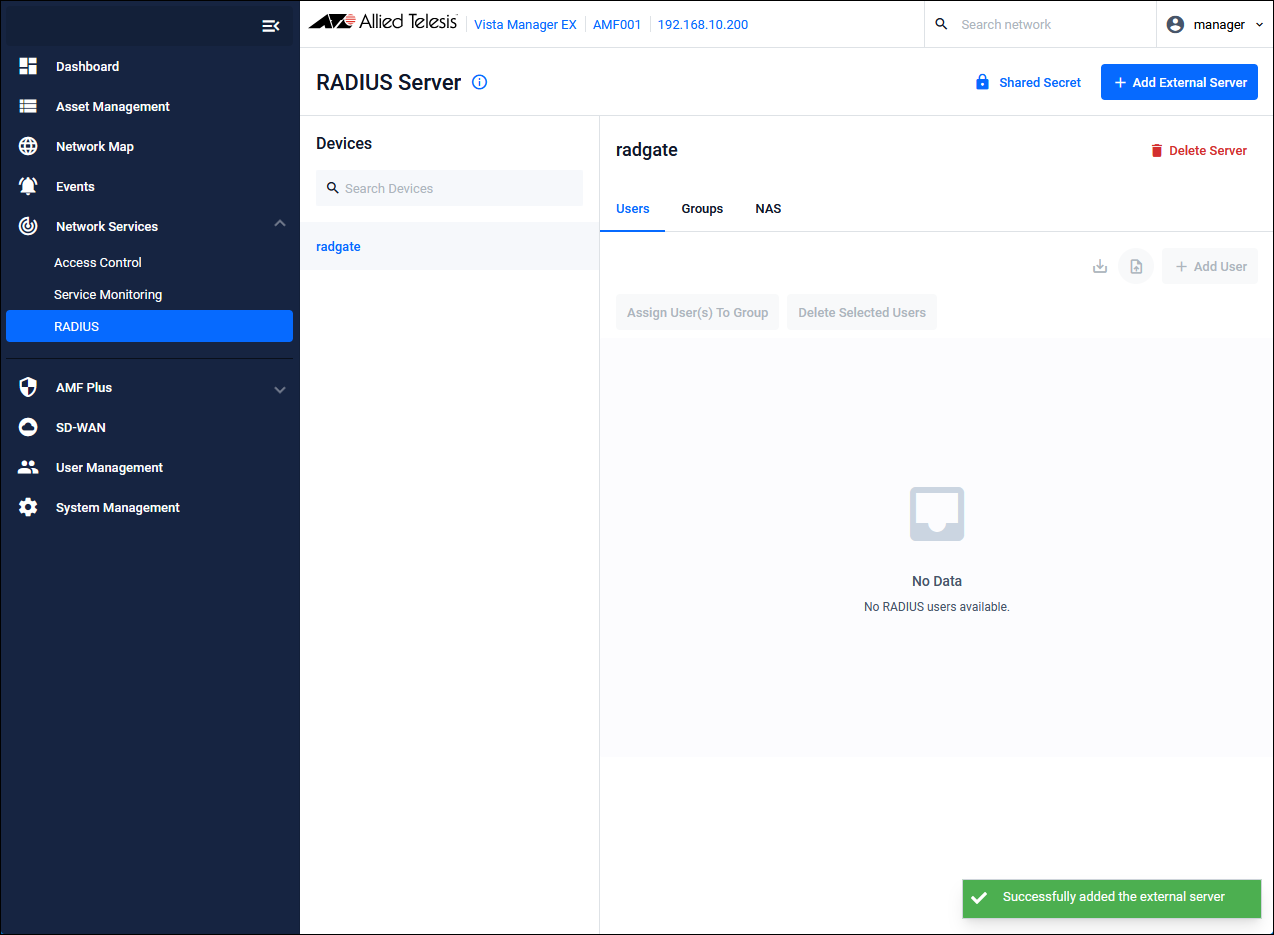
Register AT-RADgate on the "Network Services / RADIUS" page of Vista Manager EX
Clicking the "Add External Server" button on the "Network Services / RADIUS" page in Vista Manager EX displays the "Add External Server" dialog.Enter the following information and click the "Register Server" button.
| User Name | manager |
| Password | friend |
| IP Address | 192.168.10.100 |
Set the Shared Secret on the "Network Services / RADIUS" page of Vista Manager EX
Clicking the "Shared Secret" button on the "Network Services / RADIUS" page in Vista Manager EX displays the "Authentication Shared Secret" dialog.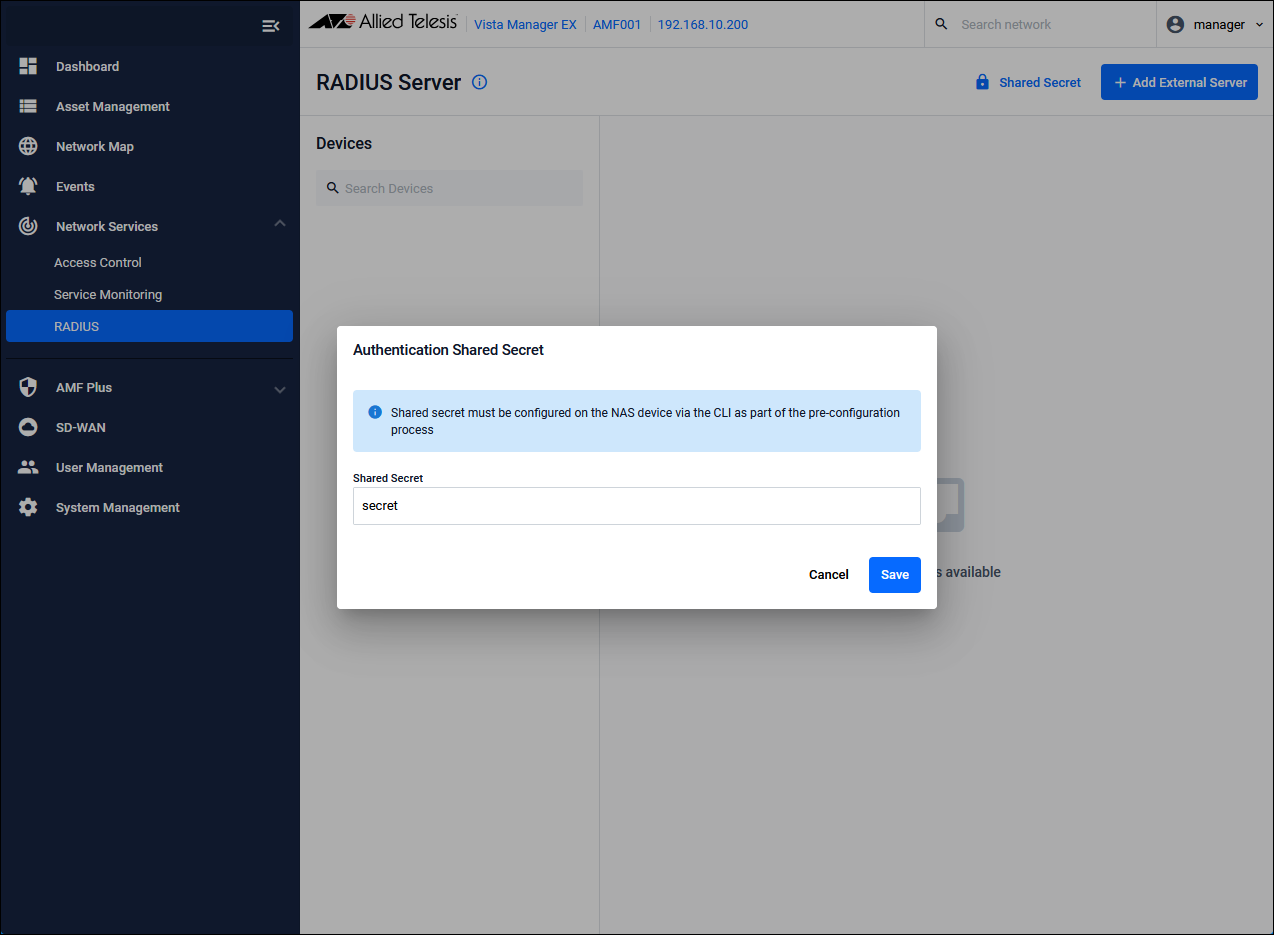
| Shared Secret | Pre-Shared Key (PSK). Set the “secret” that you set on NAS1 and NAS2. |
Registering NAS Profile
Click the "Add" button in the upper right corner of the Policy Management > NAS Profile page to display the Add NAS Profile dialog.| Name | NAS Profile name. Set "AlliedTelesis". |
| Enable device authentication. | Check the check box. |
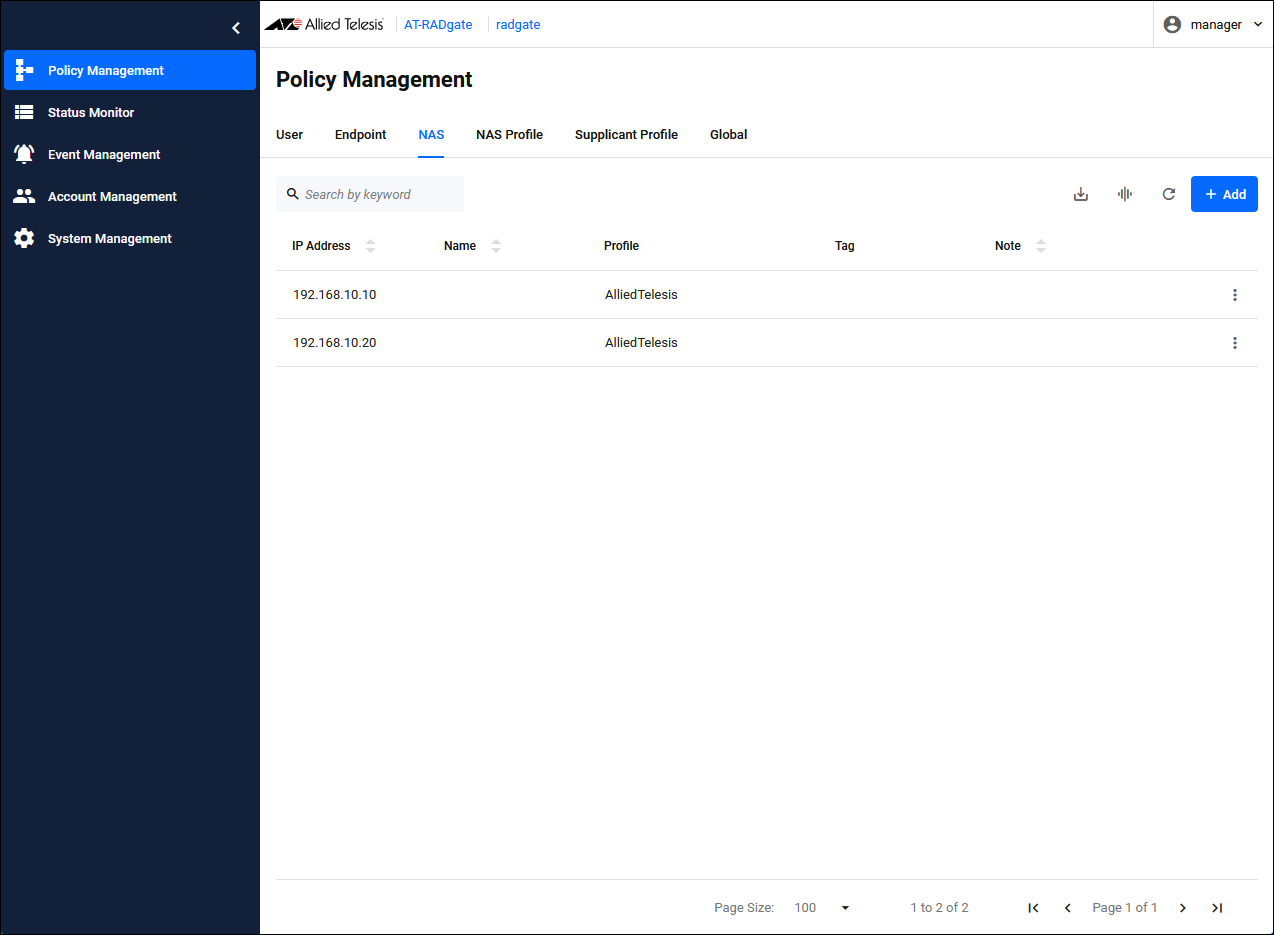
Registering NAS
Click the "Add" button in the upper right corner of the Policy Management > NAS page to display the Add NAS dialog.
| IPv4 Address | Set the IP Address of NAS1 to "192.168.10.10". |
| Pre-Shared Key | Pre-Shared Key (PSK). Set “secret” that you set on NAS1. |
| Profile | The NAS Profile to assign. Select the configured "AlliedTelesis". |
Configuration is complete.
The actual registration of supplicants is performed by operating the "Endpoint" tab on the "Asset Management" page of Vista Manager EX, or by using the "Users" and "Groups" on the "Network Services / RADIUS" page.
Since endpoint authentication is enabled in AT-RADgate, you can check the authentication status of the supplicant on the AT-RADgate Status Monitor > Endpoint page.
17 Jun 2025 09:28