Overview
The TQ6702 GEN2-R wireless AP router supports the AlliedWare Plus firmware with command line interface (CLI) similar to Allied Telesis switch and router products.
Configuration of wireless functions such as VAPs and security, as well as routing and firewall settings as a router, are done through the CLI or Web Graphical User Interface (Web GUI) of the wireless AP router itself. The AWC plug-in only checks wireless and VAP settings and monitors the wireless AP and Associated clients via floor maps.
This quick tour will introduce the process of setting up TQ6702 GEN2-R and registering it under the AWC plug-in management.
Components
Here is an example where another device on the Vista Manager EX management network already has access to the Internet.In this example, you will configure the basic settings for a terminal-based connection that is assigned a single fixed IP address on the management network.
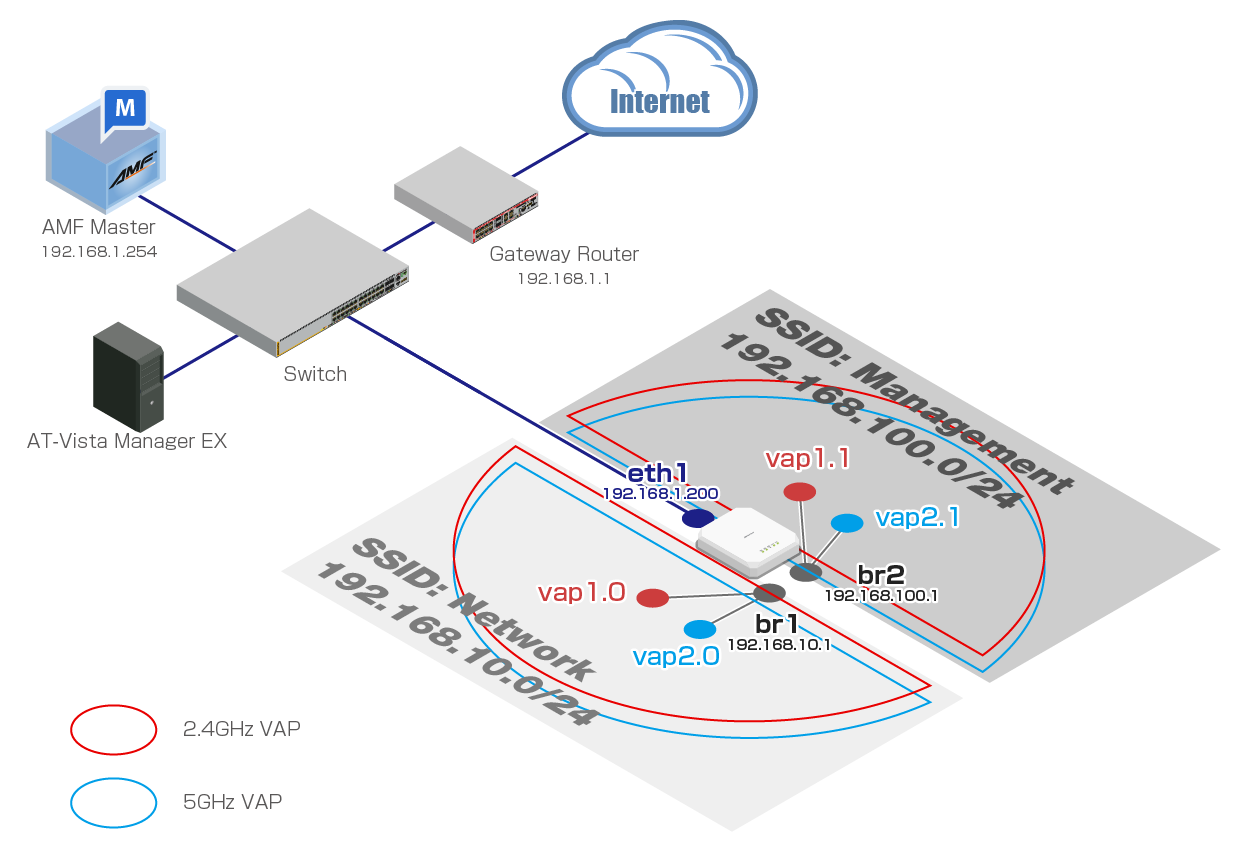
You will configure WPA Personal wireless security mode.
In this example, two VAPs with the same SSIDs are created, both in the 2.4GHz band and the 5GHz band, and four VAPs are grouped into two IP segments by SSIDs. The firewall will block wireless communication between the different segments and only allow communication from each segment to the Vista-managed AMF network, including Internet access.
Band steering is enabled between VAPs with the same SSID to encourage client association to less congested bands.
To deny client access to the AMF network and allow only communication to the Internet, additional firewall settings will be required.
NoteWhen registering the wireless AP router with the AWC Plug-in, use eth1 port for the connection to the AMF network. You cannot register the router via eth2 port.
NoteIf you wish to use the AWC calculation results of the wireless router, match the settings in the AP Profile with the settings in the CLI or Web GUI of the router itself. If you do not use the AWC calculation results, save the AP Profile with its default settings.
| VAP1 Interface | SSID | Security Mode | Security Key | WPA versions | |
|---|---|---|---|---|---|
| vap1.0 | Radio 1 (2.4GHz) VAP0 | Network | WPA Personal | passphrase1 | WPA2 WPA3 |
| vap1.1 | Radio 1 (2.4GHz) VAP1 | Management | WPA Personal | passphrase2 | WPA2 WPA3 |
| vap2.0 | Radio 2 (5GHz) VAP0 | Network | WPA Personal | passphrase1 | WPA2 WPA3 |
| vap2.1 | Radio 2 (5GHz) VAP1 | Management | WPA Personal | passphrase2 | WPA2 WPA3 |
| Information supplied from AMF Network Administrator | |
|---|---|
| IP Address / Net Mask | 192.168.1.200/24 |
| Default Gateway | 192.168.1.1 |
| AMF Configuration | |
| AMF Network Name | AMF001 |
| IP Address of the AMF Master | 192.168.1.254 |
| AMF Virtual Link ID set on the AMF Master | 1 |
| Bridge Configuration | |
| Bridge | Member |
| br1 | vap1.0 vap2.0 |
| br2 | vap1.1 vap2.1 |
| Basic Router Configuration | |
| Physical Interface to the Wired LAN | eth1 |
| IP Address of Wired LAN (eth1) Interface | 192.168.1.200/24 |
| IP Address of Wireless LAN (br1) | 192.168.10.1/24 |
| IP Address of Wireless LAN (br2) | 192.168.100.1/24 |
| DHCP Server Function | Enable |
| DHCP Server Configuration | |
| DHCP Pool pool10 | |
| Lease Time | 2 Hours |
| Target Subnet | 192.168.10.0/24 |
| Default Gateway | 192.168.10.1 |
| DNS Server | 192.168.10.1 |
| IP Address Range | 192.168.10.100 to 192.168.10.131 (32 Addresses) |
| DHCP Pool pool100 | |
| Lease Time | 2 Hours |
| Target Subnet | 192.168.100.0/24 |
| Default Gateway | 192.168.100.1 |
| DNS Server | 192.168.100.1 |
| IP Address Range | 192.168.100.100 to 192.168.100.131 (32 Addresses) |
Before configuring your device
Confirm and delete automatic configuration
This Quick Tour assumes that the wireless routers start in an unconfigured state (with factory settings only).Therefore, we recommend that you run the "erase startup-config" command and restart the device before beginning the configuration.
awplus# erase startup-config
The wireless AP, even without a startup configuration, may automatically configure itself when certain conditions are met. If this occurs, even if commands are entered according to the configuration example, the commands may result in an error or the intended operation as a whole may not be achieved.
To avoid this, we recommend that you do one of the following to start the setup
- Start without a network cable attached and connect the cable after finishing the startup sequence.
One of the conditions for automatic configuration to take place at startup is the link-up of a specific interface.
Startup with no network cable connected avoids this automatic configuration..
- Manually delete the automatic settings before the configuration.
If automatic settings have been applied, delete these settings manually before starting the configuration.
System Clock Setting
This product does not have a built-in real-time clock, so the time must be adjusted each time it is started up.When the wireless router is an AMF member, the system time of the AMF member is synchronized with the AMF controller or master.
11 Jul 2024 13:42