Floor Map Detail [Edit Area]
You can draw areas (rooms, etc.) with planar polygons, and name these areas such as "Meeting Room", "Lounge", and "Auditorium" on the floor map.
The defined areas will be displayed in each View of the floor map, and also shown in the Location Estimation popup information in the Wireless Client View.
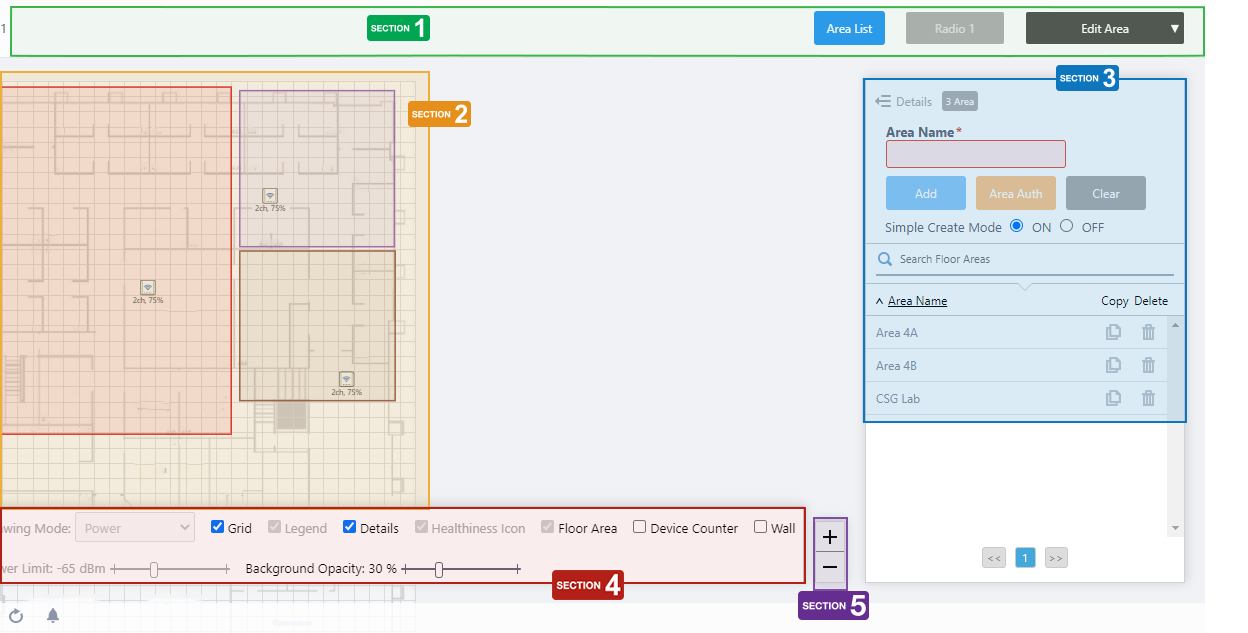
Section 1
| Item Name | Description |
|---|---|
| Management Group / Floor Map Group | The floor map name and the management group of the selected floor map will be displayed. |
| "Area List" button | Opens "Area List In This Floor" dialog box. 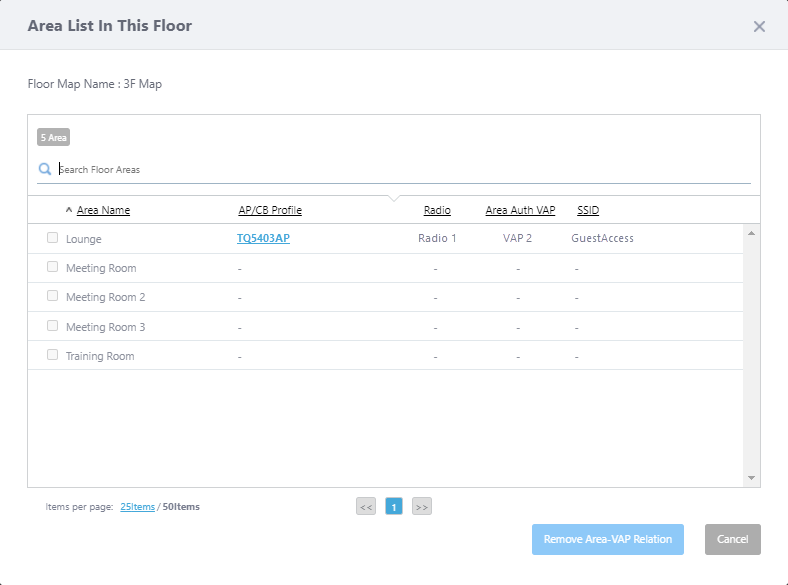 Lists all the areas created on this floor map, along with information of Area Authentication VAPs associated with each area.
|
| Radio dropdown menu | Lets you select a radio band to show on the map, from Radio 1, 2 or 3. |
| View Selection dropdown menu | Lets you change what information is displayed on the Floor Map Details screen.
|
| "Back to list" button | Click to return to the Floor Map List screen. |
Section 2
You can view and draw areas.
- Start by drawing an area on the map, as a polygon or rectangle. The colors of the areas are not configurable manually but are chosen randomly.
Enter an "Area Name" and click on the "Add" button to save the area you drew on the map.
- When you hover over an existing area, a popup balloon shows the area information.
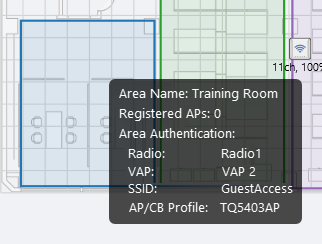
- Area Name:
Shows the area name configured.
- Registered AP count:
Shows the number of the APs placed inside the area.
- Area Authentication:
When the area authentications is configured on this area, displays the radio band, VAP name, SSID, and AP/CB Profile applied to the area.
When the area authentication is not set, shows as it is, "Not Set".
- Area Name:
- By clicking on an area, you can edit it.
- You can reshape it by using the drag-and-drop on each corner point.
Note
You can not add or delete corner points.
- Edit "Area Name" to change the area name.
- You can reshape it by using the drag-and-drop on each corner point.
NoteAreas must be drawn so that they do not overlap. For example, to create an area that surrounds another area, such as a corridor, divide the area into two or more areas.
If areas overlap, the Client Location Estimation display might become inaccurate.
Section 3
Shows the Area list.
| Item Name | Description |
|---|---|
| X Area | Shows the number of areas defined on the floor map. |
| Area Name | The area name displayed in the "Wireless Client View". |
| "Add" / "Save" button | Saves a newly created area or edited existing area. You can create a new area by drawing a polygon or a rectangle on the floor map, entering Area Name, and clicking on the "Add" button. Should be 1 to 100 characters in length, with alphabets, numbers and symbols (including spaces). |
| "Area Auth" button: | Opens "Edit Area-VAP Relation" dialog box to select the Area Authentication VAP you want to set available only in the area. The "Area Auth" button will not be enabled while you are just creating a new area, that is, the button will be enabled once you add and select an area. 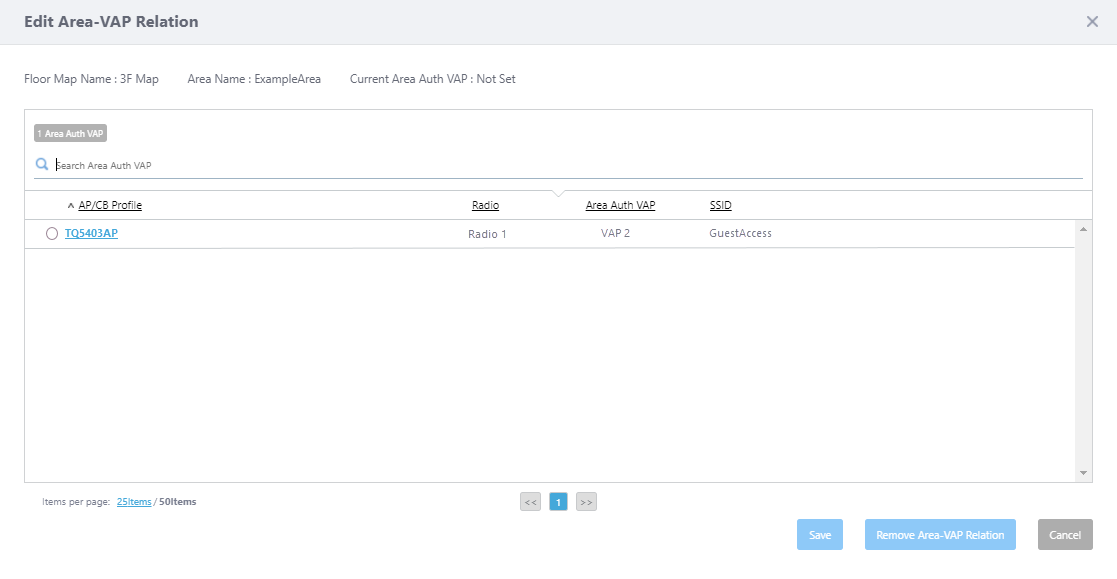 The Area Authentication VAP means the VAP whose "Area Authentication" option is enabled in AP Profile or CB Profile. By associating the area with the Area Authentication VAP, only wireless clients whose locations are estimated as in the area can be allowed to connect to the VAP. Only one Area Authentication VAP can be associated to a single area.
|
| "Clear" / "Cancel" button | Cancels changes before clicking the "Add" / "Save" button. |
| "Simple Create Mode" vs "Normal Create Mode" radio button | Switches the drawing mode of the area. Do not confuse with the Drawing Mode of Views such as Channel and Power, or Topology or Traffic. The default is "Simple Create Mode".
|
| Search Floor Areas | You can search for particular areas on the floor map. The Search field lets you enter a partial string to match. The screen displays entries with that string in the "Area Name" field. To remove the filter, delete the string from the Search field and press Enter. NoteThe search is case-sensitive. |
| Area Name | Shows the area name defined for display. In addition, a lock icon is displayed in the area name of the area associated with the Area Authentication VAP. |
| "Edit" button | Enters edit mode for the selected area. |
| "Copy" button | Duplicates the selected area. The Area Name of the duplicated area will be the original Area Name plus "_copy". If this name is already in use, a sequential number with brackets follows the suffix, such as "_copy(1)". The duplicated area polygon will be the same shape and will be placed at the top left of the map. Move and reshape it as needed. |
| "Delete" button | Deletes the selected area. |
Section 4

On the Edit Area screen, "Drawing Mode", "Legend", "Healthiness Icon", and "Power Limit" are irrelevant and disabled.
| Item Name | Description |
|---|---|
| Grid | Lets you enable or disable grid lines on the floor map. Checking this shows grid lines on the floor map. |
| Details | Toggles the visibility of Area List. Check to display. |
| Floor Area | If areas have been created on the floor map (using the Edit Area page), this lets you choose whether to display the areas. Check to display. |
| Device Counter | On the top left of an area, indicates the number of registered APs that are arranged in the area. |
| Wall | If walls have been created on the floor map (using the Edit Wall page), this lets you choose whether to display the walls. Check to display. |
| Opacity | Specify the opacity of the floor map background image. |
Section 5
Zoom In/Out buttons.
You can zoom in (+) or zoom out (-) of the floor map display. You can also use the mouse wheel scroll to zoom in or out.

11 Jul 2024 13:43