Administration
Collects MAC addresses information by AWC-SDF and permits the addresses to connect to the wireless AP.
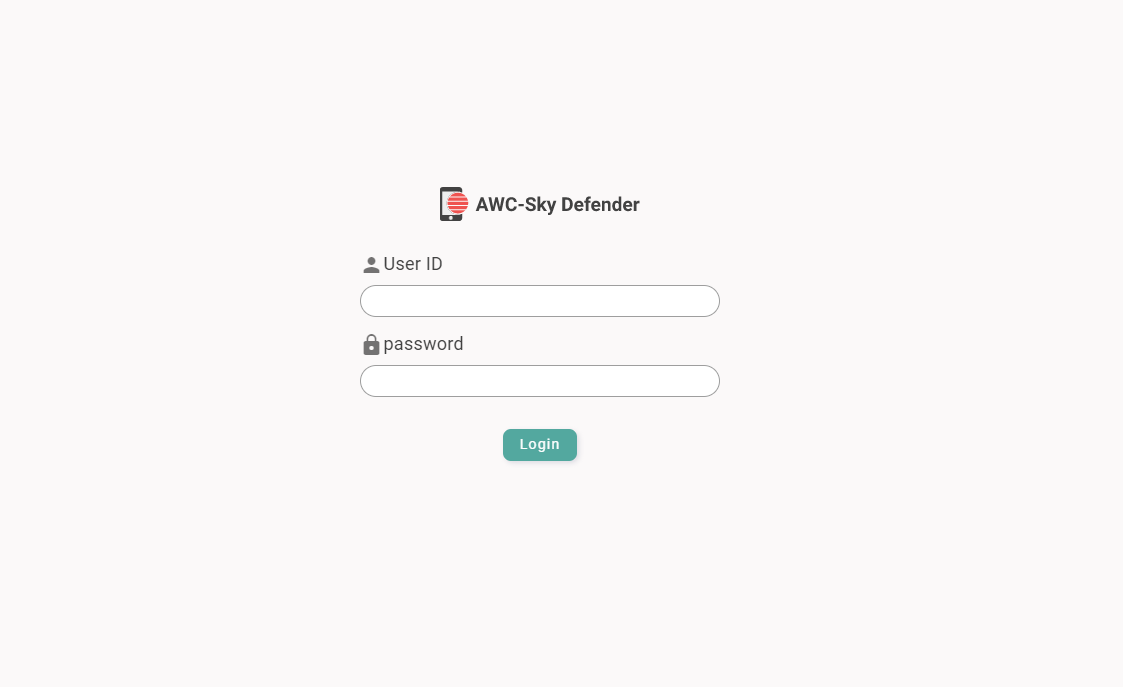
Login
| Item Name | Description |
|---|---|
| User ID | Enter the User ID of the AWC-SDF user. |
| Password | Enter the password for the user. |
| "Login" button | Log in to the AWC-SDF web administration page. After successful login, Dashboard screen will appear. |
Dashboard
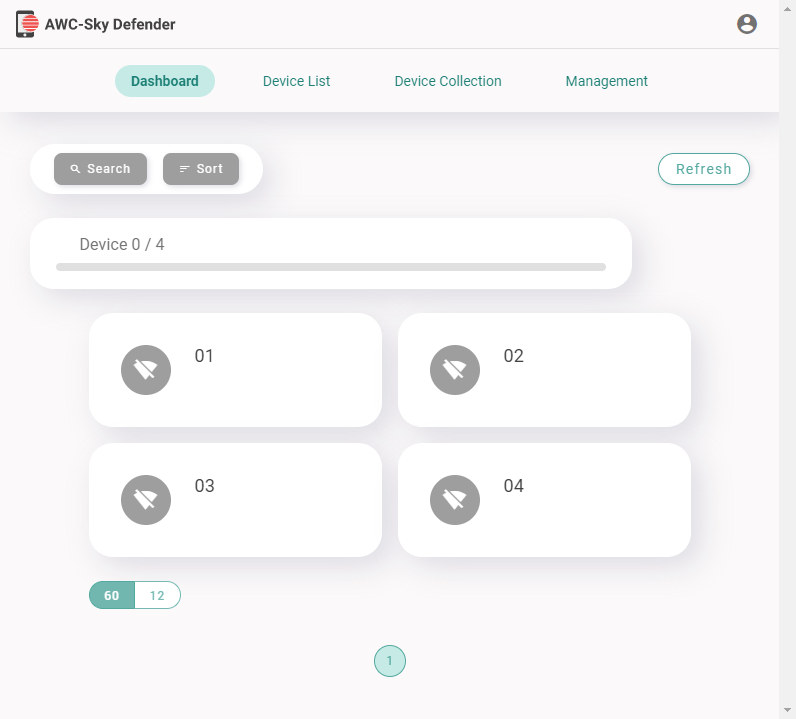
◼ Header
| Item Name | Description |
|---|---|
| User button | Displays the user ID of the current login session and "Logout" button.
|
| "Dashboard" menu | Displays Dashboard screen. |
| "Device List" menu | Displays Device List screen. |
| "Device Collection" menu | Displays Device Collection screen. |
| "Management" menu | Displays Management screen. |
◼ Permitted Device List
Displays a list of devices with its collected MAC addresses and allowed connections in a panel view.
| Item Name | Description |
|---|---|
| "Search" button | Display the Search popup.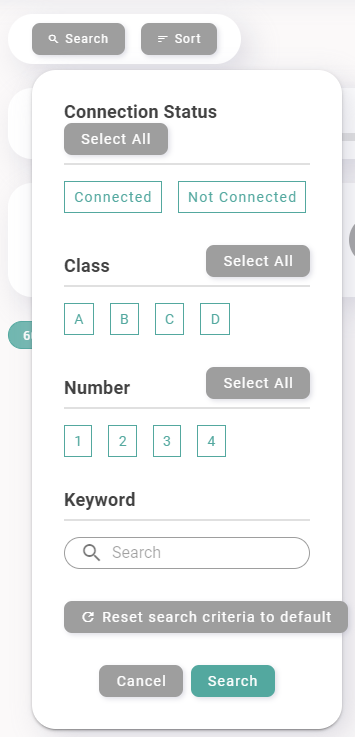
|
| "Sort" button | Display the Sort popup.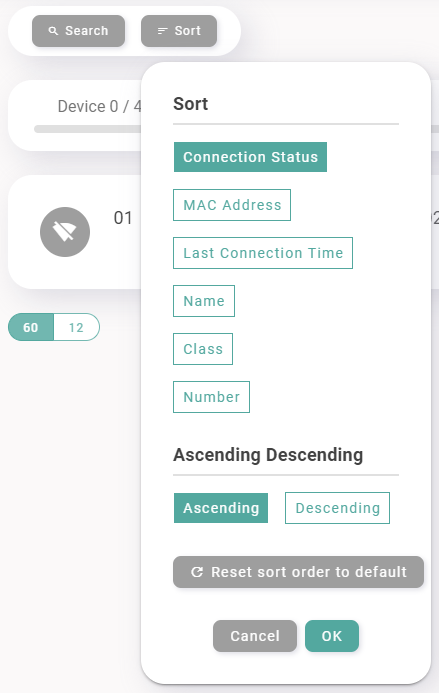
|
| "Refresh" button | Refresh the current status of the displayed devices. |
| Connected device display | Displays the number of devices that are currently connected out of the total number of devices allowed to connect. |
| Device panels | Display the connection status of the devices and the first item of information users have entered along with the MAC addresses of the devices you have allowed connection. Clicking on the panel will also display the connection status of the device, the various items of information the user have entered, and the MAC address in a dialog. |
| Items per page | You can select "60" or "12" for the number of devices to be displayed on one page. The default is "12". |
| Page Navigation | Switches the page of the device list being displayed. |
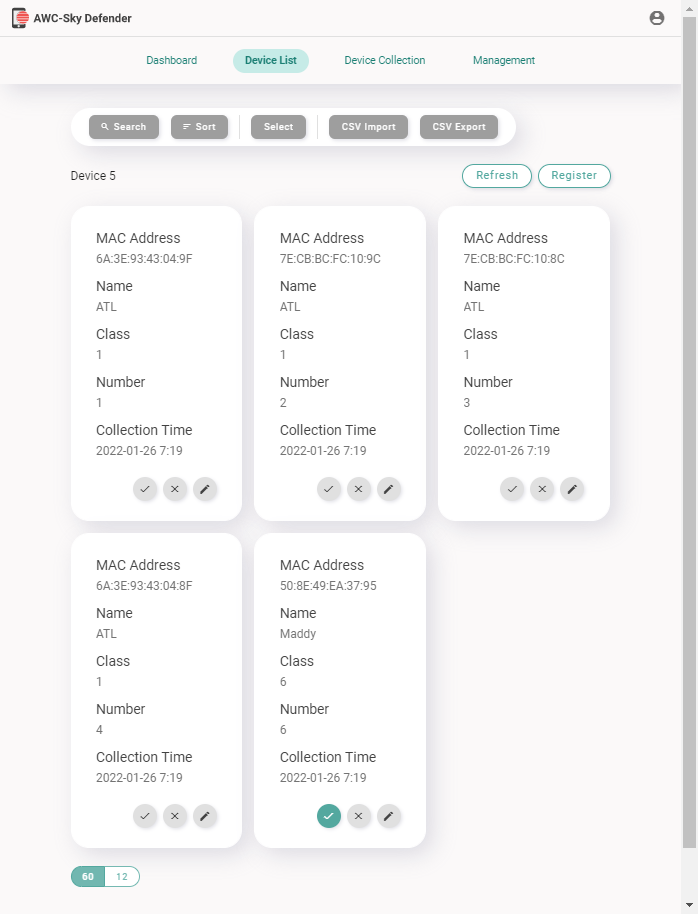
Device List
◼ Header
| Item Name | Description |
|---|---|
| User button | Displays the user ID of the current login session and "Logout" button.
|
| "Dashboard" menu | Displays Dashboard screen. |
| "Device List" menu | Displays Device List screen. |
| "Device Collection" menu | Displays Device Collection screen. |
| "Management" menu | Displays Management screen. |
◼ Collected Device List
Displays a list of devices of which MAC addresses have been collected in panel view.
You can check the information on this screen to allow or deny the connection for each MAC address, or edit the information at registration.
NoteThe entry registered in the device list cannot be deleted.
To delete specific device entries, output the registered devices to a CSV (comma-separated text) file, delete unnecessary devices on the CSV file, import the CSV file, and then reconfigure the connection allow/deny settings.
| Item Name | Description |
|---|---|
| "Search" button | Display the Search popup.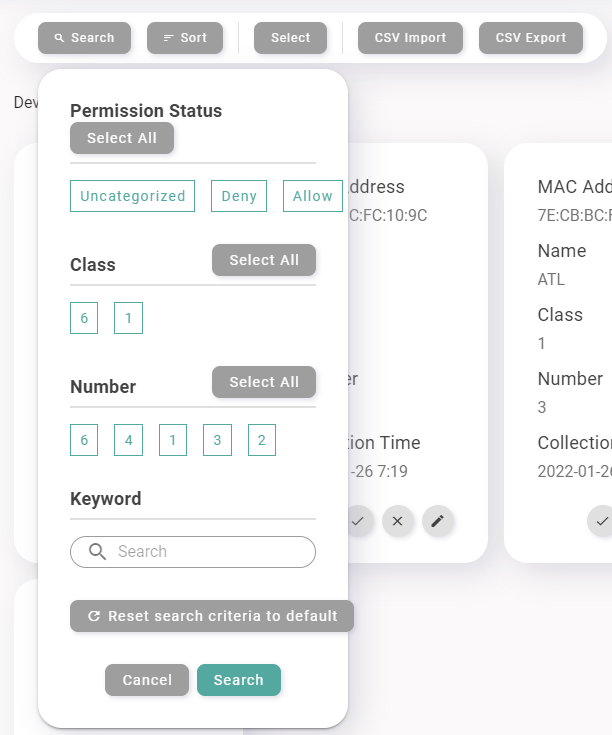
|
| "Sort" button | Display the Sort popup.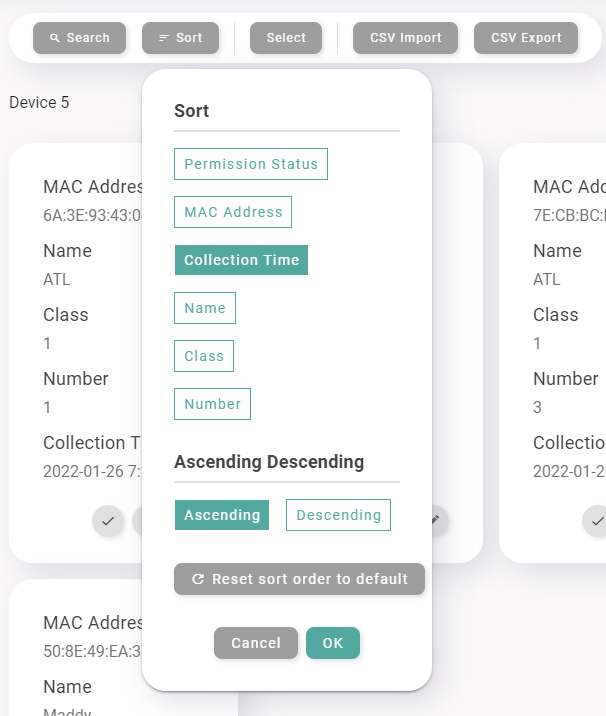
|
| "Select" button | Changes the connection permission settings from the currently selected devices at once. Click on it to open the Select submenu. 
|
| "CSV Import" button | Lets you import file in CSV (Comma Separated Text) format. Displays Select CSV File dialog box. NoteWhen you import a CSV file, the existing data will be deleted. |
| "Export as CSV file" button | Outputs the registered device information to a CSV (comma separated text) file. Outputs the MAC addresses and the information entered with the MAC addresses, separated by commas. The file name is in "devicelist_(user ID)-YYYYMMDDhhmmss.csv" format. |
| Device Number | Displays the number of registered devices in the form of "Device X". |
| "Refresh" button | Refresh the current status of the displayed devices. |
| "Register" button | Register the devices' connection permission status in the Vista Manager mini profile and in the MAC address filter allow list of the wireless APs under management. If the connection permission status of the device has been changed from the existing settings, a dot will appear on the "Register" button. NoteWhen registering to the wireless APs, the wireless communication will be interrupted. |
| Device panels | Displays the MAC address of the registered device, as well as the information entered with the MAC address, and the date and time of collection. Also, when you click on a panel, a green outline will appear on the panel and it will become selected. In selected state, it will be subject to batch Allow/Deny setting from the "Select" button at the top of the list. Click on the panel again to remove the outline and deselect it.
|
| Items per page | You can select "60" or "12" for the number of devices to be displayed on one page. The default is "12". |
| Page Navigation | Switches the page of the device list being displayed. |
Select CSV File
Reads a CSV (comma separated text) file and overwrites the existing data.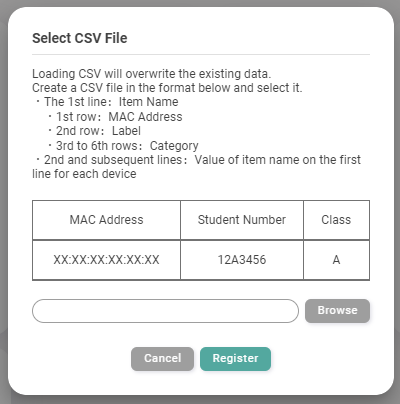
| Item Name | Description |
|---|---|
| "Select File" button | Displays the system's file selection dialog. The format of the CSV file that can be read is as follows:
|
| "Cancel" button | Abort the selection of the CSV file and close the dialog box. |
| "Save" button | Close the dialog box and overwrite the existing information with the information from the selected CSV file. |
Edit Device Information
Lets you edit the information of the registered device.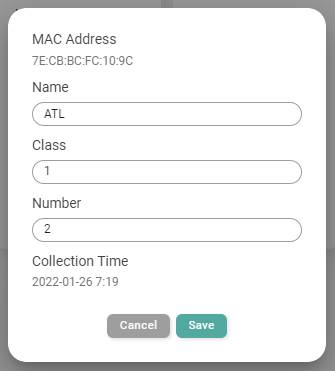
| Item Name | Description |
|---|---|
| MAC Address | Displays the registered MAC address. |
| Additional Information | You can edit the information registered along with the MAC address. |
| Collected Time | Displays the date and time when the MAC address was collected. |
| "Cancel" button | Quit editing the device information and close the dialog. |
| "Save" button | Save the changes to the device information and close the dialog. |
Device Collection
Lets you configure the collection items and appearance of the Device Collection page, and enable/disable the Device Collection mode.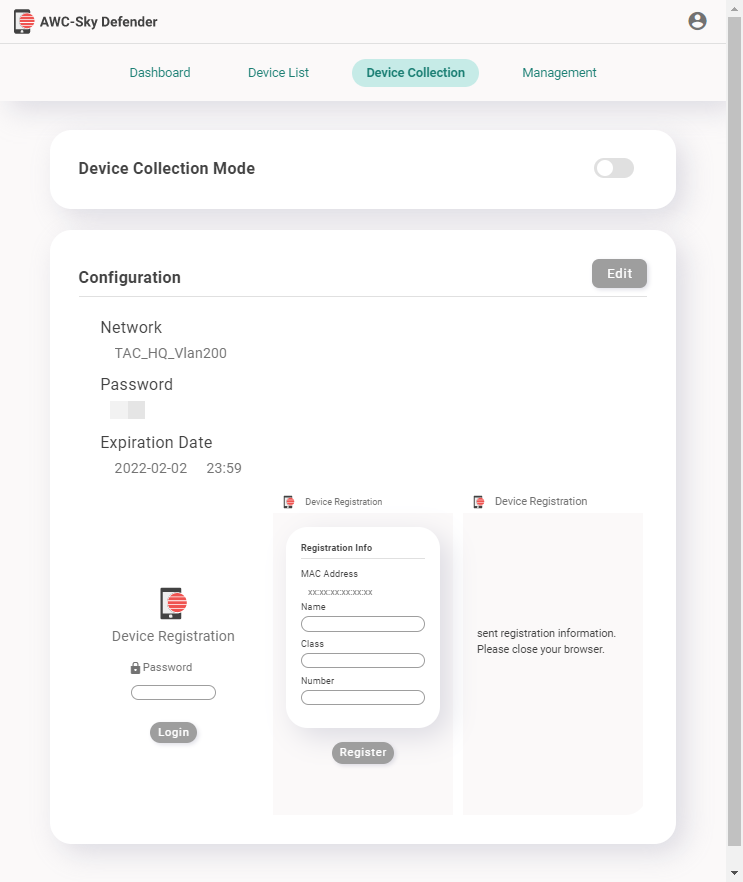
◼ Header
| Item Name | Description |
|---|---|
| User button | Displays the user ID of the current login session and "Logout" button.
|
| "Dashboard" menu | Displays Dashboard screen. |
| "Device List" menu | Displays Device List screen. |
| "Device Collection" menu | Displays Device Collection screen. |
| "Management" menu | Displays Management screen. |
◼ Device Collection Mode
Use the toggle switch to enable or disable the Device Collection mode.
When the Device Collection mode is enabled, wireless clients connected via the SSID of the Collection Network displayed in the "Network" field of the Configuration section will be connected to the captive portal for device collection (Device Collection page).
◼ Management
| Item Name | Description |
|---|---|
| "Edit" button | You can edit the Device Collection page from here. Switch to the Device Collection Page Configuration screen. |
| Network | Displays the SSID of Collection Network. |
| Password | Displays the shared password for logging into the Device Collection page. |
| Expiration date | Displays the expiration date of the device collection page. After this date and time, the device users will no longer be able to connect to the Device Collection page. |
| Preview | Displays a preview of the login screen, information registration screen, and registration completion screen of the currently configured Device Collection page. |
Device Collection Page Configuration
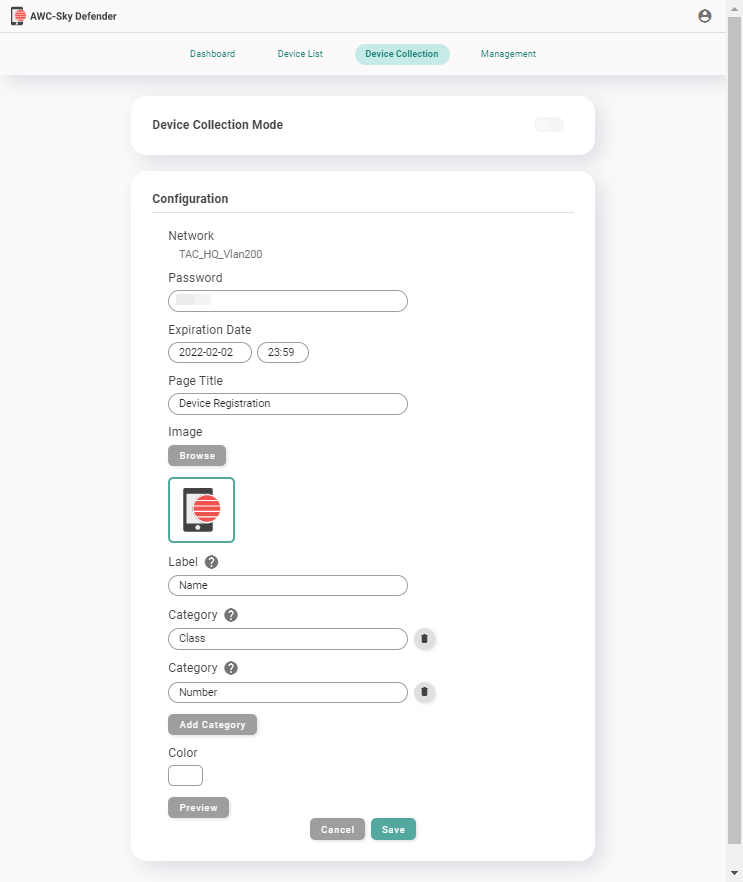
◼ Configuration
| Item Name | Description |
|---|---|
| Network | Displays the SSID of Collection Network. |
| Password | Set a shared password of four digits to log in to the Device Collection page. |
| Expiration date | Set the expiration date of the Device Collection page. After this date and time, the device users will no longer be able to connect to the Device Collection page. |
| Page Title | Set the page title to be displayed on the Device Collection page, up to 20 characters. The default is "Device Registration". |
| Image | Upload and select the icon of the page you want to display on the Device Collection page. The image formats that can be specified are JPEG (*.jpg, *.jpeg), PNG (*.png), and SVG (*.svg).
|
| Label | Enter the name of the information to be registered along with the MAC address of the device. The default is "Device Name". The name you set in this item will be displayed as a label for device identification in the device list of the Dashboard screen. It is recommended that you set up information that can easily identify the owner of the device. |
| Category | In addition to the label, you can enter the names of the information to be registered along with the MAC address of the device. You can add a maximum of four. |
| Delete (trashbin icon) | Delete the corresponding category entry field. |
| "Add Category" | Add a category field. |
| Color | Displays "Select Color" popup. You can select the background color of the Device Collection page out of 16 colors show in the popup. ◼ Select Color
|
| "Preview" button | Displays "Preview" dialog box. In the "Preview" dialog box, you can see a preview of the login screen, information registration screen, and registration completion screen of the device collection page. |
| "Cancel" button | Aborts changes to the settings on the Device Collection page. |
| "OK" button | Apply the configuration changes on the Device Collection page. |
Management
Manages the data and user settings of AWC-SDF.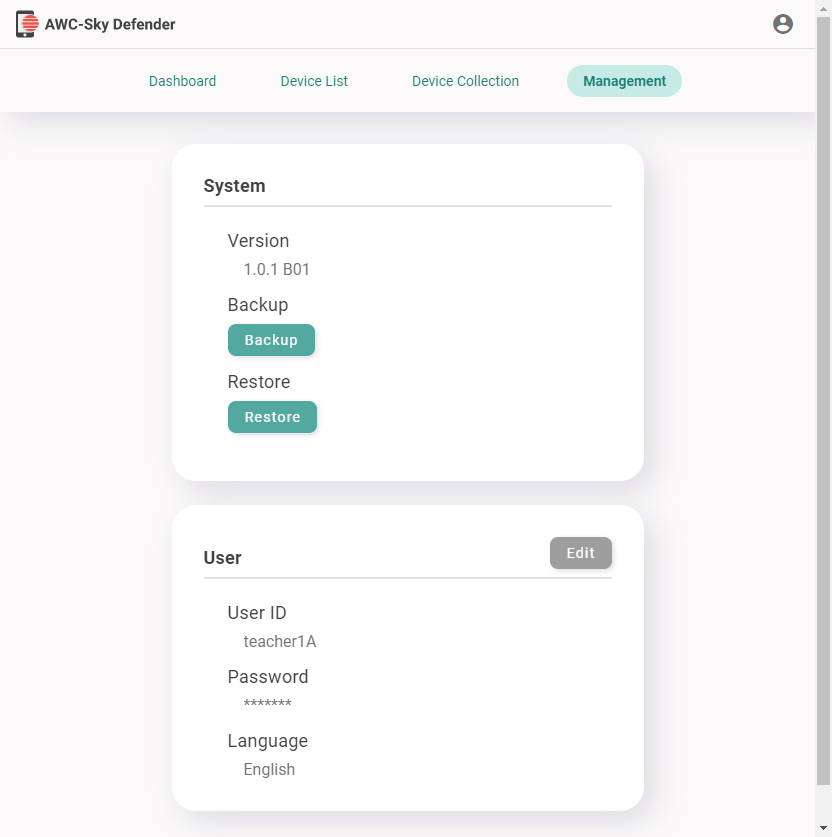
◼ System
You can check the version of AWC-SDF, backup and restore data.
| Item Name | Description |
|---|---|
| Version | Displays the version information of AWC-SDF. |
| Backup | By clicking the "Backup" button, you can get the backup file of AWC-SDF. The file name is in the format "config_atsmd-(user ID)-(version)_YYYYMMDDhhmmss.zip". NoteSince AWC-SDF address information is not saved in the backup data, if the AWC-SDF address is changed, the address must be manually changed again after reinstallation or restore. |
| Restore | By clicking the "Restore" button, you can upload the backup file and restore the contents of the backup file. |
◼ User
Displays and changes user passwords and screen language.
| Item Name | Description |
|---|---|
| "Edit" | Lets you change the user passwords and display language. |
| User ID | Displays the user ID. |
| Password | When a password has been set, "********" will be displayed instead. ◼ Edit mode Enter a Password with alphanumeric characters and symbols, and enter the same in Password (Confirm). |
| Language | Displays the Language used on the administration web interface. ◼ Edit mode Select the display language from "Japanese" or "English". The default is "Japanese". |
| "Cancel" button | Aborts changes on the user setting. This will be displayed only in the edit mode. |
| "OK" button | Apply the changes to the user settings. This will be displayed only in the edit mode. |
11 Jul 2024 13:43