Configure WDS Bridge
WDS (Wireless Distribution System) allows you to connect separate wired networks (LANs) with wireless bridges (APs). This is useful when a wired connection is not possible between the LANs.
Please note that WDS has the following limitations:
- AMF guest nodes cannot be part of a WDS connection.
- Automatic channel cannot be used for a WDS connection. It should be statically configured.
- Do not activate another VAP on the wireless interface that WDS is configured on.
- W52 and W53 channels cannot be used outdoors in Japan.
- Do not enable Captive Portal on the radio used for the WDS connection.
Let's assume that we are going to build the following network:
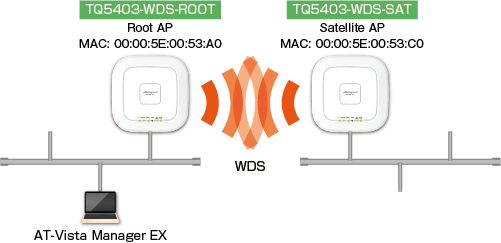
Configure Root AP
Let's start with the Root AP, which is connected to the same wired network as the AWC Plug-in.◼ Create AP Profile
Create an AP Profile for the Root AP.
This is a dummy profile, not intended to provide wireless service to clients.
Create a dummy SSID for VAP1 on Radio 1; see Configure AP Profiles. Disable "Radio Transmission" for Radio 2 and 3 because they will not be used.
When you create the dummy VAP, please note the following:
- Specify the same VLAN ID as used in WDS.
Here we set "1".
- Set the dummy VAP's SSID to "not for use".
This SSID is not to be used. An SSID for a WDS connection is going to be specified separately.
- Configure the dummy VAP's security in the same way as the WDS connection.
Here we assume that we are going to use WPA2 for the WDS connection. Configure the VAP as follows:
- Security: WPA Personal
- Security Key: (a value of your choice)
- WPA Version: WPA2
- Encryption Protocol: CCMP
- Management Frame Protection: Disabled
Note
Management Frame Protection cannot be used with WDS.
- Broadcast Key Refresh Interval: 0
- Security: WPA Personal
- Do not configure any additional VAPs (VAP2 etc). We are going to use the Root AP for WDS connection only.
◼ Add the Root AP
Add the Root AP to the AWC Plug-in's management database. Please refer to Manage AP Registration for more details.
Here we add it as "TQ5403-1F-WDS".
◼ Apply AP-Specific Configuration (AP Profile, Channel, and WDS)
Apply the AP Profile to the Root AP and configure its channel and WDS connection. Please refer to Configure AP-Specific Configuration for more details.
- Select "Wireless Configuration" > "AP Settings" from the AWC Plug-in menu.
The AP list screen will appear.
- Click "Details" (magnifying glass icon) on the right side of the Root AP ("TQ5403-1F-WDS") . The "Wireless AP Details" page will appear.
At this point, "AP Profile" in the "Configuration Information" section is shown as "Unconfigured".
- Click "Edit" in "Configuration Information" to open the "AP-specific Configuration" page.
- Select the dummy profile from the "AP Profile" dropdown list in the "System" section.
- Select a channel for use with the WDS connection in the "Radio Configuration" section.
Here we are going to use 3ch of Radio1.
Leave Radio 2 and 3 unchanged because we are going to disable their radio transmission capabilities.
- Select the "WDS Parent" radio button for "WDS Mode" in "Radio Configuration".
A new WDS configuration "WDS1" will be added to the "WDS Configuration" section.
- Enable "Wireless Transmission" in "WDS Configuration".
- Enter an SSID for the WDS connection.
Here we use "WDS_test".
- Select "Security".
Specify the same security options as the dummy VAP. Here we select "WPA Personal".
- Enter a security key for the WDS connection.
If you configure more than one Satellite AP for a Root AP, use the same security key on all the Satellite APs.
You can use any string as a key.
- Set "Management Frame Protection" to "Disable".
- Click "Save" at the top right.
The "Wireless AP Details" page will appear and the AP-specific configuration will be automatically applied to the Root AP.
Configure Satellite AP
Now that we have configured the Root AP, we need to configure a Satellite AP, which is the other end of the WDS connection.A Satellite AP cannot be managed by the AWC Plug-in until the WDS connection is complete. Therefore, you have to setup a Satellite AP's WDS configuration through its own management web interface.
For detailed explanation on configuring APs, refer to the "TQ series Reference Manual" on our website.
To configure a Satellite AP, perform the following steps:
◼ Login to Satellite AP
- Connect a Satellite AP and a PC to a PoE switch.
Note
When the AP is powered by an AC adapter, you can also directly connect the PC to the AP's LAN port. Refer to the AP's user manual for more details.
Note
TQ5403e and TQ6702e GEN2 cannot be powered by an AC adapter. It must be powered by PoE.
- Open your web browser on the PC and access the Satellite AP's IP address.
Note
You have to assign an IP address in the same subnet as the AP to the PC (e.g. 192.168.1.100/255.255.255.0).
Note
The AP's default IP address is "192.168.1.230" when no DHCP server is available on the network. When a DHCP server is available, the AP gets its address from the server.
- Login to the AP with an administrator's username and password.
Note
The TQ series' default administrator username and password is "manager" and "friend".
◼ Configure WDS SSID and Security
Configure WDS as follows:
Select "WPA Personal" on "VAP/Security" to use "WPA Personal" on WDS. The Satellite AP will be a dedicated WDS bridge and will not provide wireless service to clients.
- Open the "Configuration/VAP/Security" page.
- Click the "Radio1" > "VAP0" tab.
- Click the "Virtual Access Point" tab and click the "Mode" field.
- Select "WDS (Satellite)" from the drop-down list.
- Set the SSID of the VAP used by WDS (hereafter referred to as the WDS VAP) in the "SSID" setting field.
Here we use "WDS_test".
- Set the VLAN ID of the WDS VAP in the "VLAN ID" setting field.
Here we set "1".
- Click the "Security" tab and click the "Mode" field.
- Select "WPA Personal" from the drop-down list.
- Enter a security key for WDS VAP in the "Key" setting field.
You can use any string as a key.
- Click the "IEEE 802.11w (MFP)" setting field.
- Select "Disable" from the drop-down list.
- Click the "Save and Apply" button.
◼ Select Channel
- Click "Configure > Wireless LAN".
- Click the "Radio1" tab.
- Click the "Channel" field and specify the channel you configured as the one for WDS on the Root AP.
Here we specify "3".
- Click the "Status" field and select "Enable" from the drop-down list.
- Click the "Save and Apply" button.
◼ Add Satellite AP to AWC Plug-in's Database
Now that you have completed the configuration for the WDS bridges, you will be able to see the Satellite AP on the AWC Plug-in's management web interface.
To add the Satellite AP to the AWC Plug-in's management database, follow the steps described below:
NoteIf you add an AP that has been configured for WDS through its own management web interface, re-configure WDS on the "AP-specific configuration" page before applying an AP Profile to the AP.
If you applied an AP Profile to the AP before re-configuring WDS, the previous WDS configuration on the AP would become invalid and it would be impossible for you to manage the AP through the AWC Plug-in.
- On the PC used for configuring the Satellite AP, check the AP's IP address.
- Select "Wireless Configuration" > "AP Settings" from the AWC Plug-in menu.
The AP list screen will appear.
- Using the IP and MAC address ("00:00:5e:00:53:c0") of the Satellite AP, add the AP to the plug-in's management database. Please refer to Manage AP Registration for more details.
Here we add it as "TQ5403-WDS-SAT".
Clicking the "Add" button in the "Wireless AP Registration" dialog box will display the "Wireless AP Detail" screen.
- Select the dummy profile from the "AP Profile" dropdown list in the "System" section.
Note
Do not click the "Save" button on the AP-specific configuration page until you have completed the WDS configuration.
- Select a channel for use with the WDS connection in the "Radio Configuration" section.
Here we are going to use 3ch of Radio1.
Leave Radio 2 and 3 unchanged because we are going to disable their radio transmission capabilities.
- Select the "WDS Child" radio button for "WDS Mode" in "Radio Configuration".
A new WDS configuration "WDS1" will be added to the "WDS Configuration" section.
- Enable "Wireless Transmission" in "WDS Configuration".
- Enter an SSID for the WDS connection.
Here we use "WDS_test".
- Select "Security".
Specify the same security options as the dummy VAP. Here we select "WPA Personal".
- Enter a security key for the WDS connection.
If you configure more than one Satellite AP for a Root AP, use the same security key on all the Satellite APs.
You can use any string as a key.
- Set "Management Frame Protection" to "Disable".
- Click "Save" at the top right.
The "Wireless AP Details" page will appear and the AP-specific configuration will be automatically applied to the Root AP.
Note
Wait a minute before proceeding to the next step, because it takes some time to apply the configuration to the AP.
- Confirm that the satellite AP was successfully added to the AWC Plug-in's managed AP list.
Select "Wireless Configuration" > "AP Settings" from the AWC Plug-in menu.
You will see the satellite AP in the AP list.
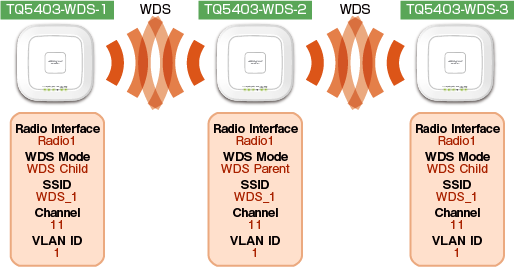
Cascading APs
TQ3403, TQm3403, TQ5403, TQ5403e, TQm5403, TQ6403 GEN2, TQm6403 GEN2, TQ6602, TQ6602 GEN2, TQm6602 GEN2, TQ6702, TQm6702 GEN2, TQ7403, and TQ7613 support cascading connection of up to 2 cascades using 3 APs.NoteThere are two ways of cascading WDS. One is to use the same WDS VAP on all three APs. Another is to use two radio bands and a separate VAP on each band.TQ1402 and TQm1402m only support 1-to-1 connection using 2 APs.
◼ Using a single, common WDS VAP on all three APs
In this configuration, configure the middle AP as a Root AP and configure the others as Satellite APs.
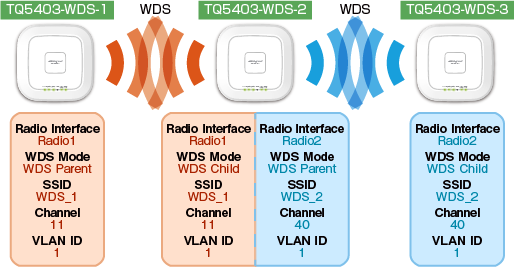
◼ Using a separate WDS VAP on each of two radio bands
In this configuration, configure two pairs of Root and Satellite APs for each of the two WDS VAPs.
The middle AP acts as Root AP for one VAP and Satellite AP for another.
10 Nov 2025 11:49