Configure AP Profiles
This section explains how to create, edit, and delete AP Profiles.
NoteFor TQ series APs, LLDP, Ethernet, and HTTP/HTTPS configuration is only possible from the AP's own management web interface. Please follow the steps described in Configure AP through Its Own Web Interface to perform that configuration.
For detailed explanation on configuring TQ series APs, refer to the "TQ series Reference Manual" on our website.
NoteAP Profile and AP-specific configuration created in the AWC Plug-in are not instantly applied to wireless APs. They will be applied to APs when:
- an AP is put under the AWC Plug-in's control
- a user manually applys configuration
- a scheduled task for applying configuration is run.
Create AP Profile
NoteTo monitor an AP, you have to assign an AP Profile to the AP which has been added to the AWC Plug-in's database.
- Select "Wireless Configuration" > "AP Profile" from the AWC Plug-in menu.
The AP Profile list screen will appear.
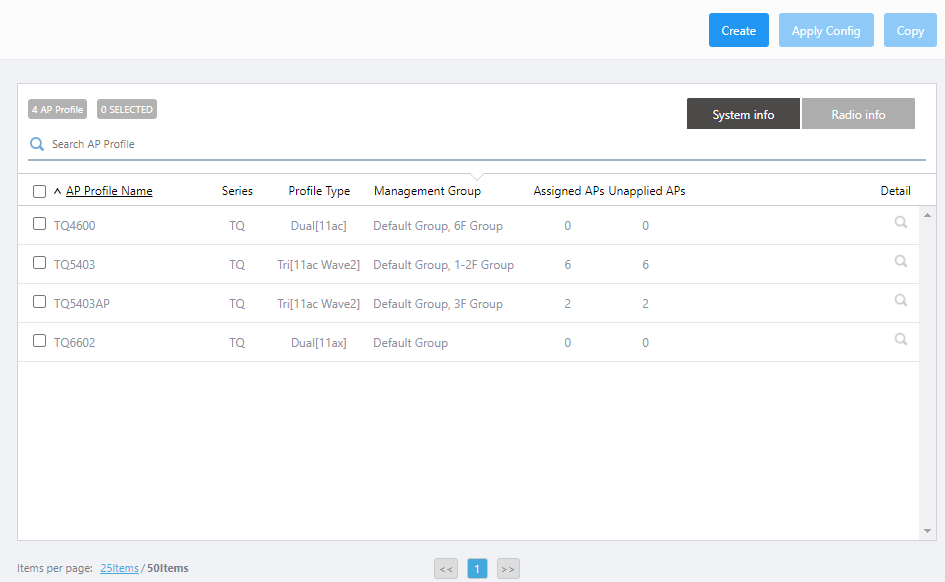
- Click "Create" at the top right corner.
- The "Select Country, AP Series and Model" dialog box will appear.
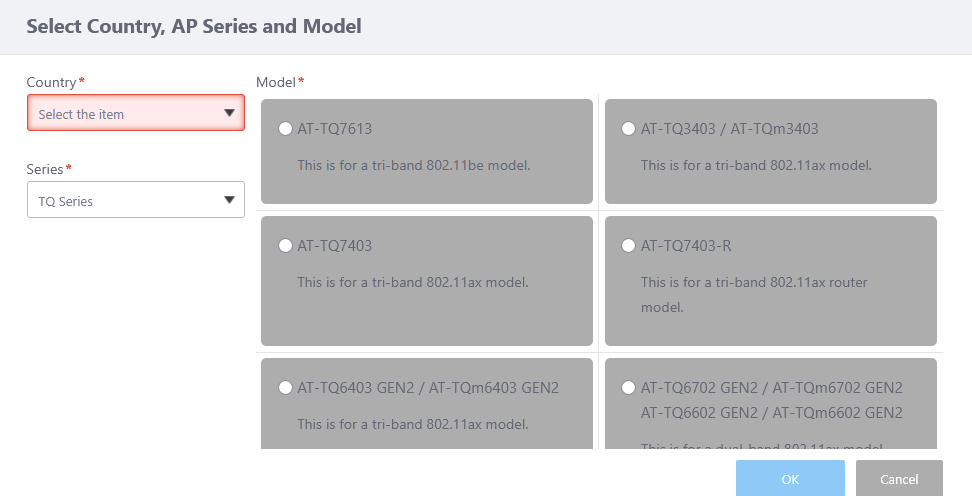
Table 1: "Select Country, AP Series and Model" dialog box Item Name Description Country Specify a country code for the AWC Plug-in's AP profile. It is used to properly configure APs for radio frequency regulation in the country.
When the country code is set in the "User Management" screen of Vista Manager EX, the preferred country code will be selected as the default.Series Select an AP series.
- TQ Series:
Select this to create an AP Profile for TQ series.
Note
The AWC Plug-in no longer supports the management of TQ2450, TQ3200, TQ3400, TQ3600, TQ4400, TQ4400e, and TQ4600 APs. The setting function for AT-TQ2450, AT-TQ3200, AT-TQ3400, AT-TQ3600, AT-TQ4400, and AT-TQ4600 as applicable models for AP Profiles is retained, but the function is for compatibility with the backup file of the previous version. New setup of these older models are not supported.
- TQ Series - SDN/OpenFlow
Note
The AWC Plug-in no longer supports the management of TQ series in SDN/OpenFlow mode or with the firmware that supports SDN/OpenFlow. Please note that the setting functions for these models of APs are retained for compatibility with the backup file of the previous version. New setup of these older models are not supported.
Models Select the AP Model to which the AP Profile will be applied.
- TQ series
- AT-TQ7613
- AT-TQ3403 / AT-TQm3403
- TQ7403
- AT-TQ7403-R
- AT-TQ6403 GEN2 / AT-TQm6403 GEN2
- AT-TQ6702 GEN2 / AT-TQm6702 GEN2 AT-TQ6602 GEN2 / AT-TQm6602 GEN2
- TQ6702e GEN2
- TQ6702 GEN2-R
- TQ6602
- AT-TQ5403 / AT-TQm5403
- TQ5403e
- AT-TQ1402 / AT-TQm1402
- AT-TQ4600 / AT-TQ4400 / AT-TQ4400e
- AT-TQ3600 / AT-TQ3400 / AT-TQ2450
- AT-TQ4400e (with External Antenna)
- AT-TQ3200
- AT-TQ7613
- TQ series (SDN/OpenFlow-capable firmware)
Note
The AWC lug-in no longer supports the management of TQ series in SDN/OpenFlow mode.
Location If the Model is "AT-TQ6702e GEN2" or "AT-TQ5403e", select Location ("Indoor" or "Outdoor") to place the Wireless APs. "OK" button Create an AP Profile of the selected model. "Cancel" button Stop adding an AP Profile. - TQ Series:
- Select a Country.
Note
An AP Profile with a country code other than "JP - Japan" cannot be applied to Japanese models of TQ series.
- Select an AP series to configure.
- Select a Model that matches the AP model's radio specifications.
- If you chose "AT-TQ6702e GEN2" or "AT-TQ5403e" in Step 6, in addition to the settings above, select "Location" from "Indoor" or "Outdoor". This is shown on the left side of the list.
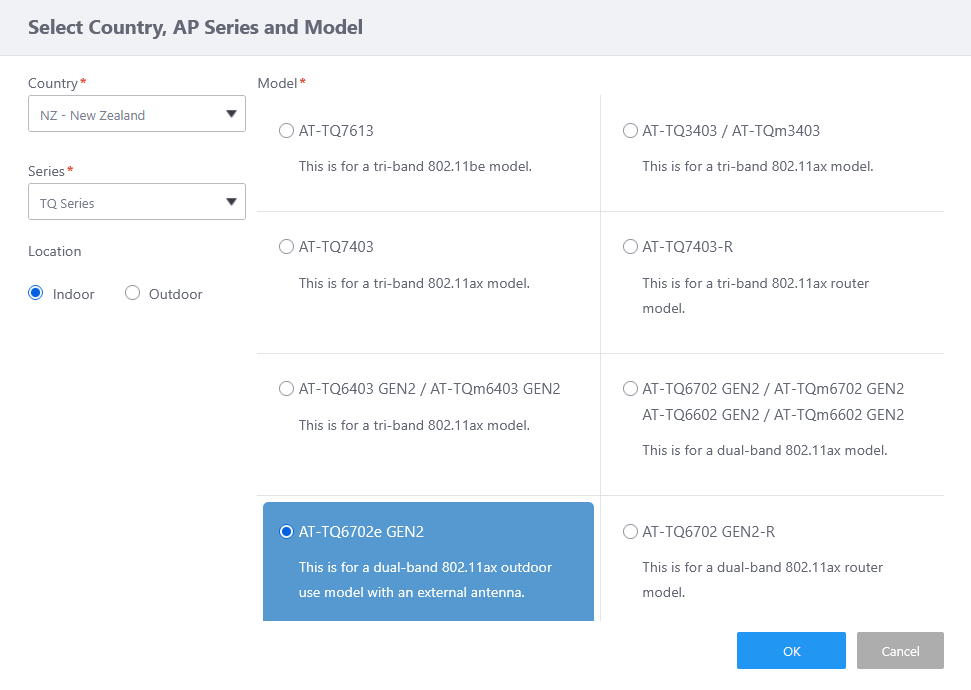
- Click "OK".
- The AP Profile configuration page will appear.
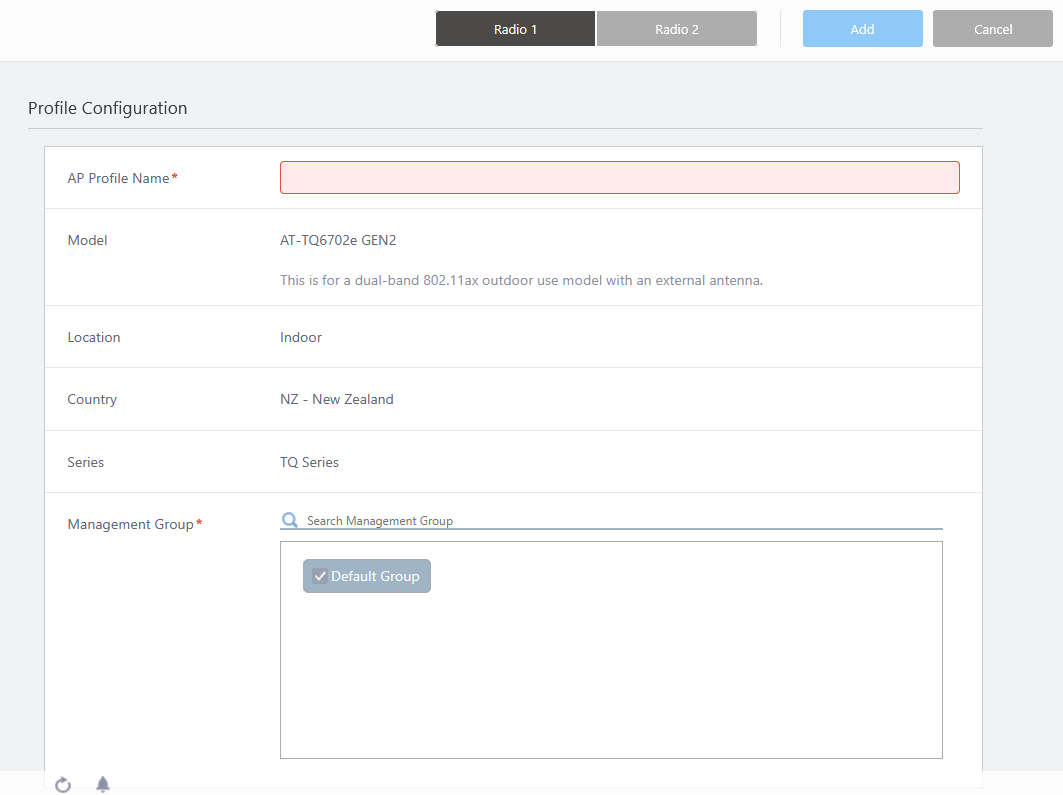
Configuration items of an AP Profile may vary depending on "Series" and "Model". The following image shows a sample AP Profile for "TQ Series" / "AT-TQ3403 / AT-TQm3403".
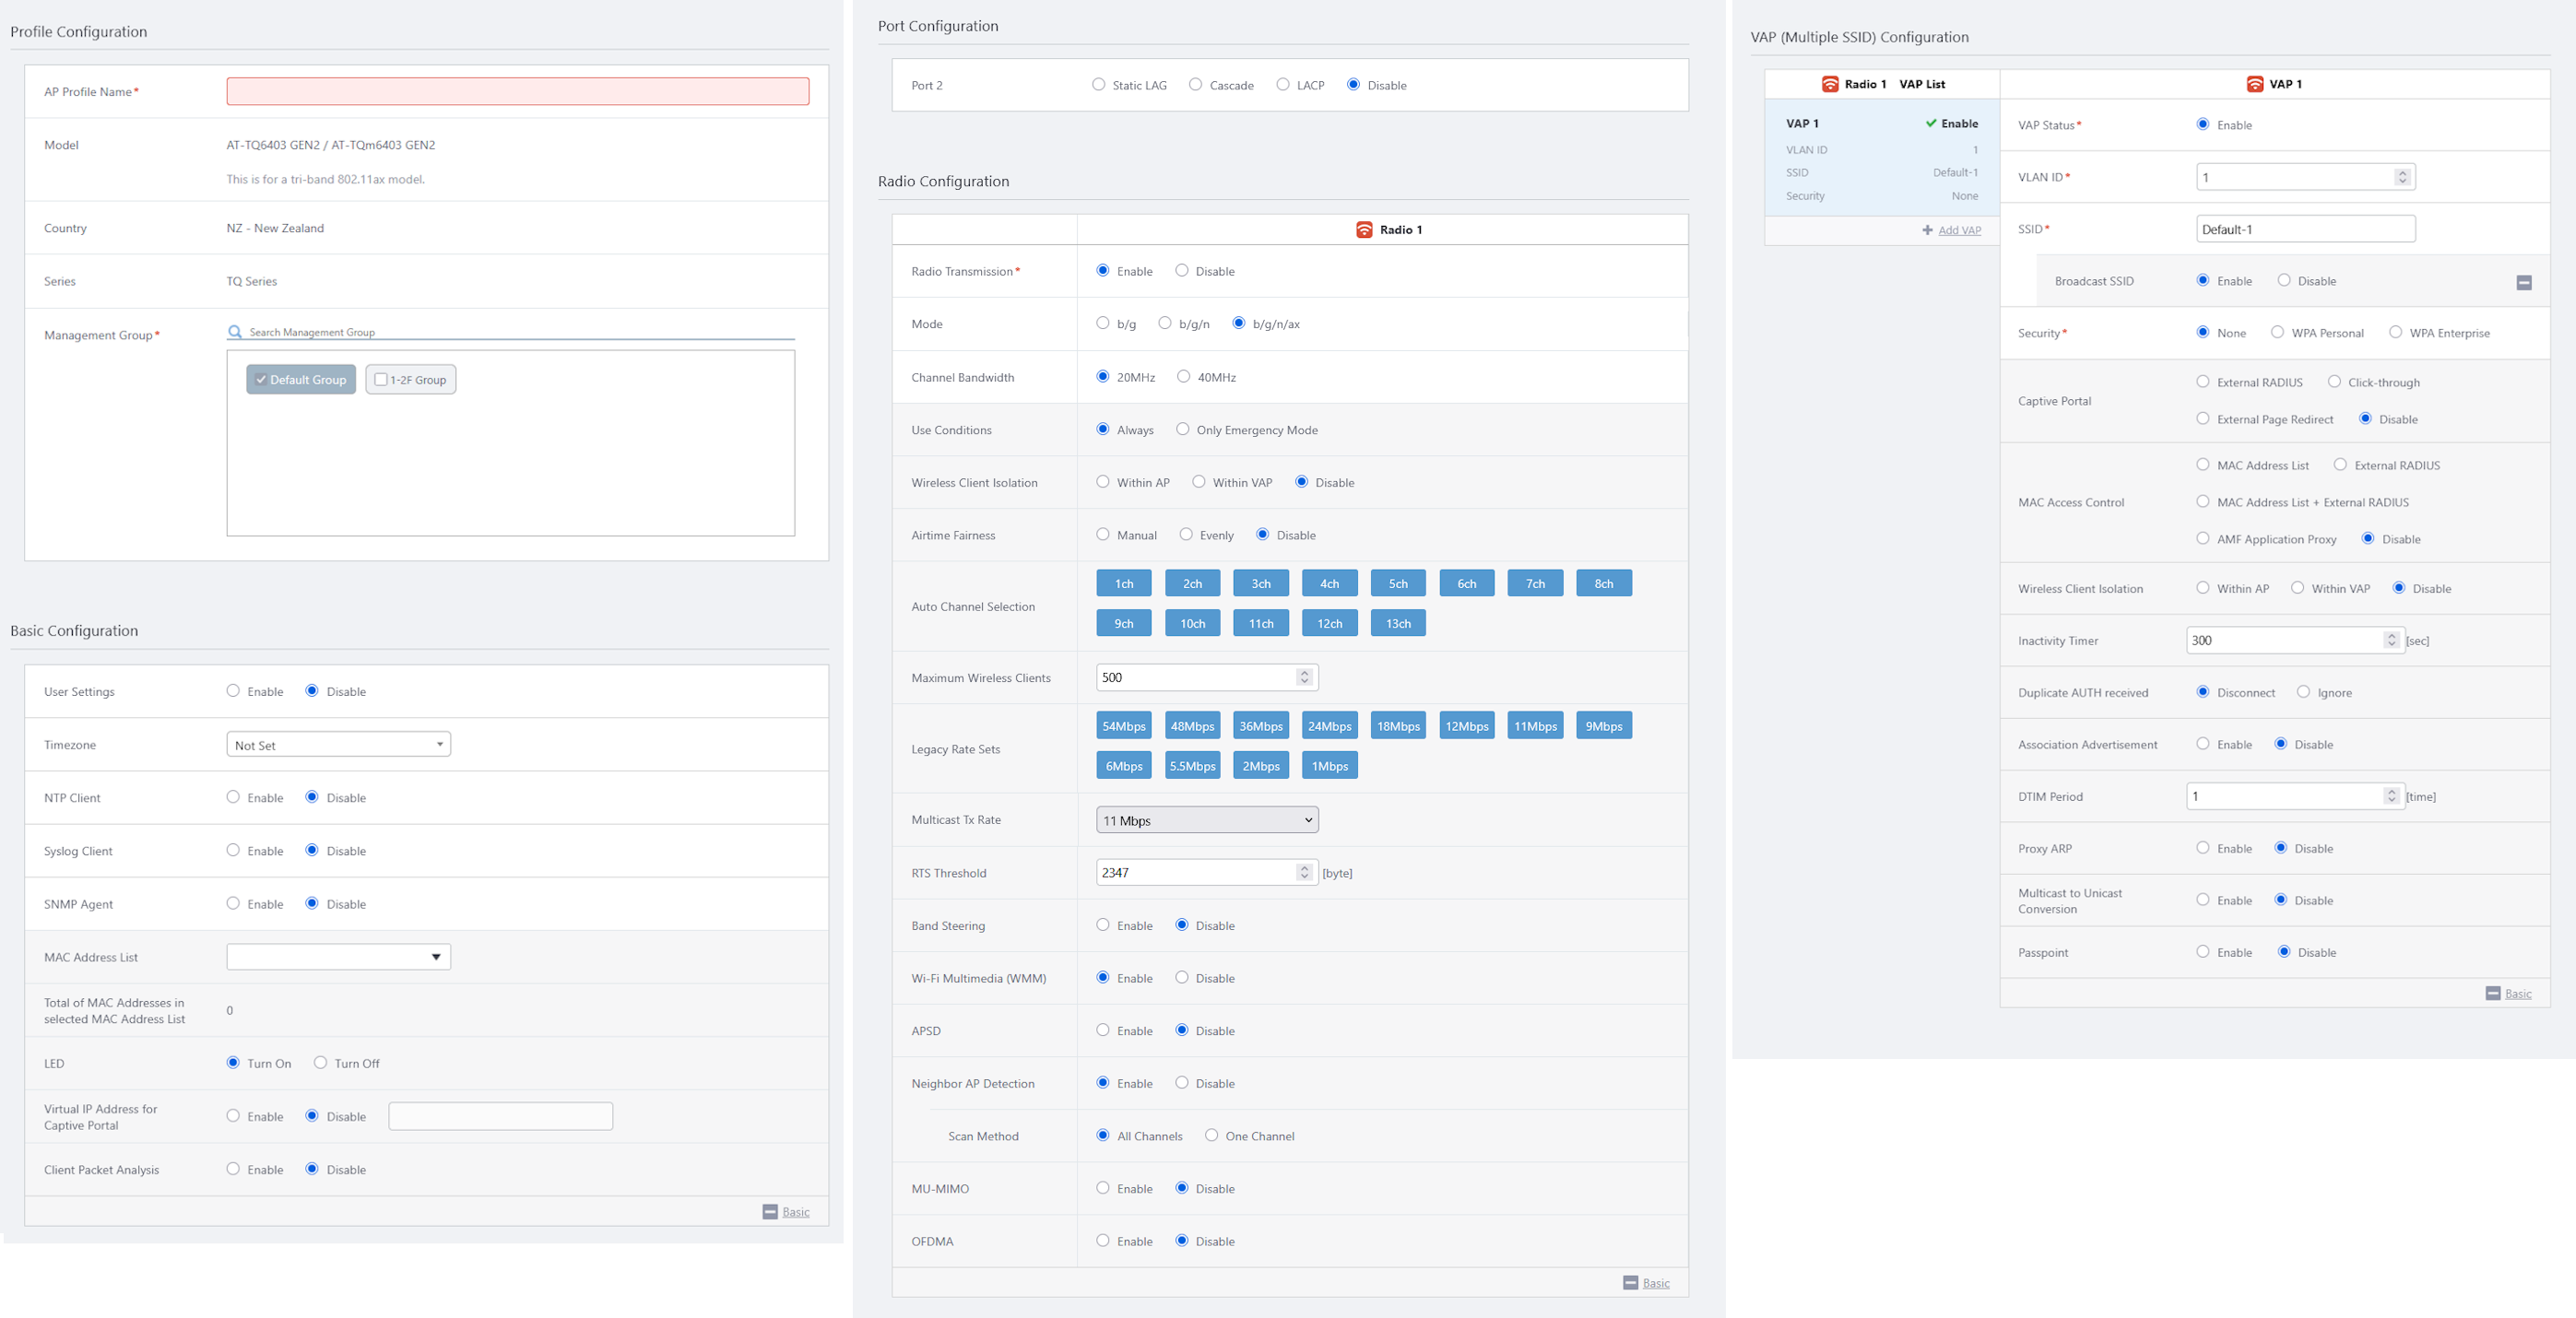
On the top right of the screen, you can switch radios, and save or cancel changes for the AP profile.
Table 2: AP Profile Item Name Description Top right of the screen "Radio 1" / "Radio 2" / "Radio 3" buttons Select a radio to configure in the "Radio Configuration" and "VAP (Multiple SSID) Configuration" sections.
The following buttons are displayed depending on the Model of the AP Profile.
- AT-TQ7613 / AT-TQ3403 / AT-TQm3403, AT-TQ7403, AT-TQ7403-R
- Radio 1: 2.4GHz
- Radio 2: 5GHz (W52/W53/W56)
- Radio3: 6GHz (UNII-5)
- Radio 1: 2.4GHz
- AT-TQ6403 GEN2 / AT-TQm6403 GEN2
- Radio 1: 2.4GHz
- Radio 2: 5GHz (W52/W53)
- Radio3: 6GHz (UNII-5)
- Radio 1: 2.4GHz
- AT-TQ5403 / AT-TQm5403, AT-TQ5403e
- Radio 1: 2.4GHz
- Radio 2: 5GHz (W52/W53)
- Radio 3: 5GHz (W56)
- Radio 1: 2.4GHz
- AT-TQ6702 GEN2 / AT-TQm6702 GEN2 AT-TQ6602 GEN2 / AT-TQm6602 GEN2, AT-TQ6702 GEN2-R, AT-TQ6602, AT-TQ1402 / AT-TQm1402
- Radio 1: 2.4GHz
- Radio 2: 5GHz (W52/W53/W56)
- Radio 1: 2.4GHz
- AT-TQ7613 / AT-TQ3403 / AT-TQm3403, AT-TQ7403, AT-TQ7403-R
- Configure items as required.
- Click the "Add" button on the top right of the screen.
Profile Configuration
Configure general parameters in the "Profile Configuration" section.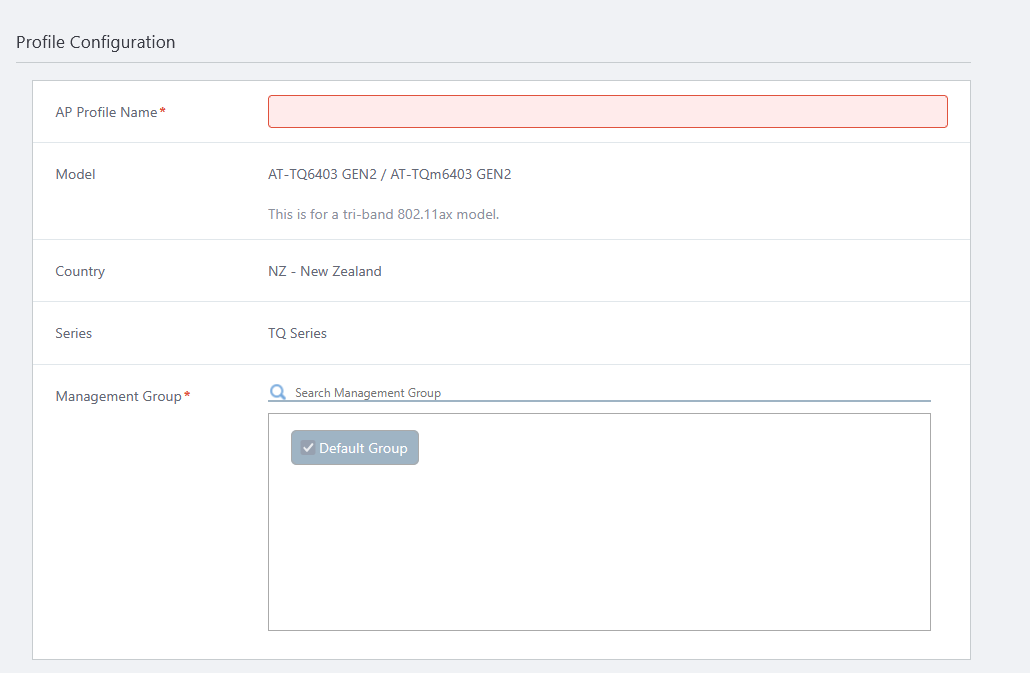
| Item Name | Description |
|---|---|
| AP Profile Name | Enter a name for the AP Profile. Should be 1 to 100 characters in length, with alphabets, numbers and symbols (including spaces). (required) |
| Models | Shows the Model of the AP Profile you selected in the earlier step. |
| Location | Shows the Location (indoor/outdoor) you selected in the earlier step (TQ5403e, and TQ6702e GEN2 only). |
| Antenna Model | NoteThis item is not supported. |
| Country | Shows the Country Code you selected in the earlier step. |
| Series | Shows the Series you selected in the earlier step. |
| Management Group | Select management groups. You cannot uncheck "Default Wireless Group". (required)
|
Basic Configuration
You can specify the AP's system settings in the "Basic Configuration" section.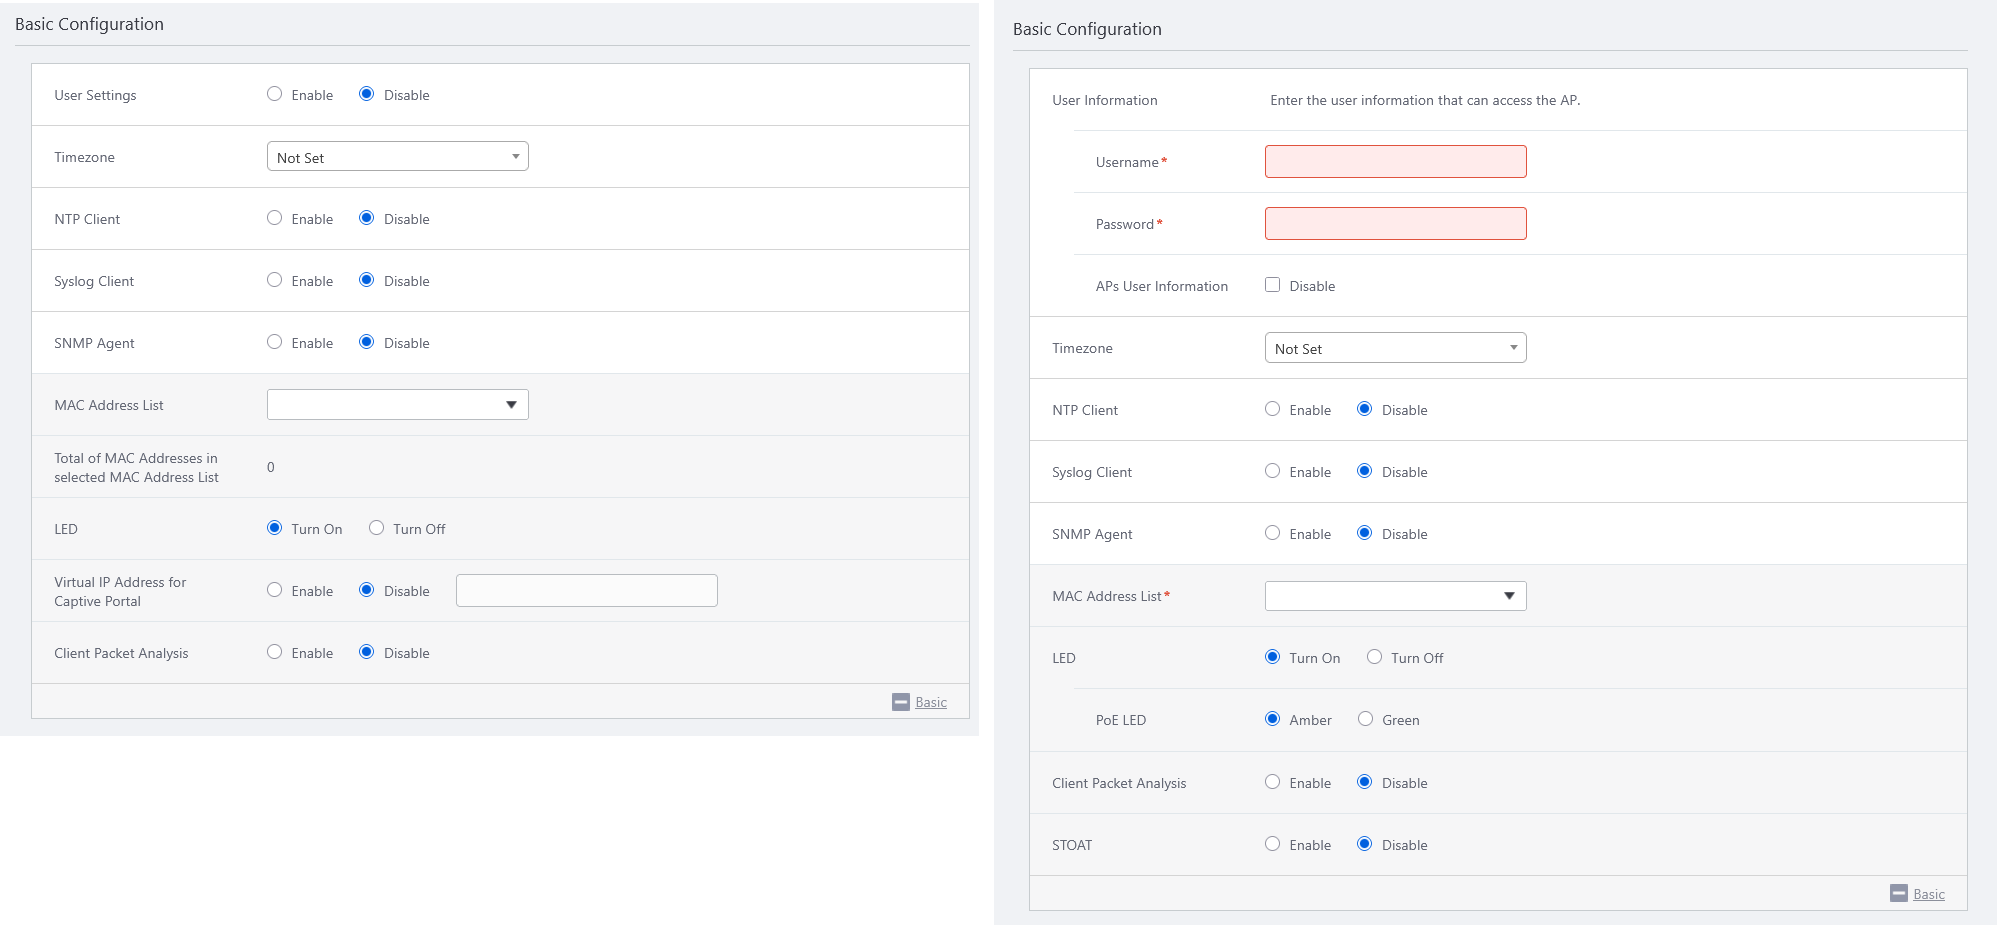
| Item Name | Description |
|---|---|
| User Settings or User Information |
Configure the user settings used to manage the AP. Depending on the AP model, either "User Settings", which are optional, or "User Settings", which must be set, will be displayed.
For more details, refer to Additional Options for User Information. |
| Timezone | Describe the timezone as a region name and a city name (e.g. "(UTC+09:00) Asia/Tokyo"). The default is "Not Set". You can also narrow down the options displayed in the drop-down list by entering a part of the timezone character string in the search field above the drop-down list. NoteSome timezones (e.g. "(UTC+09:00) Asia/Tokyo") don't support Daylight Saving Time. If you select one of the timezones, additional items described below will appear.
|
| NTP Client | Specify whether to use clock synchronization using an NTP (Network Time Protocol) server.
By selecting "Enable", the additional items described below will be displayed.
|
| Syslog Client | Specify whether to use the Syslog Client function. When enabled, AP log messages can be sent to a Syslog server. By selecting "Enable", the additional items described below will be displayed.
|
| SNMP Agent | Specify whether to use the SNMP Agent function. By selecting "Enable", the additional items described below will be displayed.
|
| MAC Address List | Select a MAC Address List (a whitelist or a blacklist). When you click the dropdown list, the "Select MAC Address List" dialog box will appear. 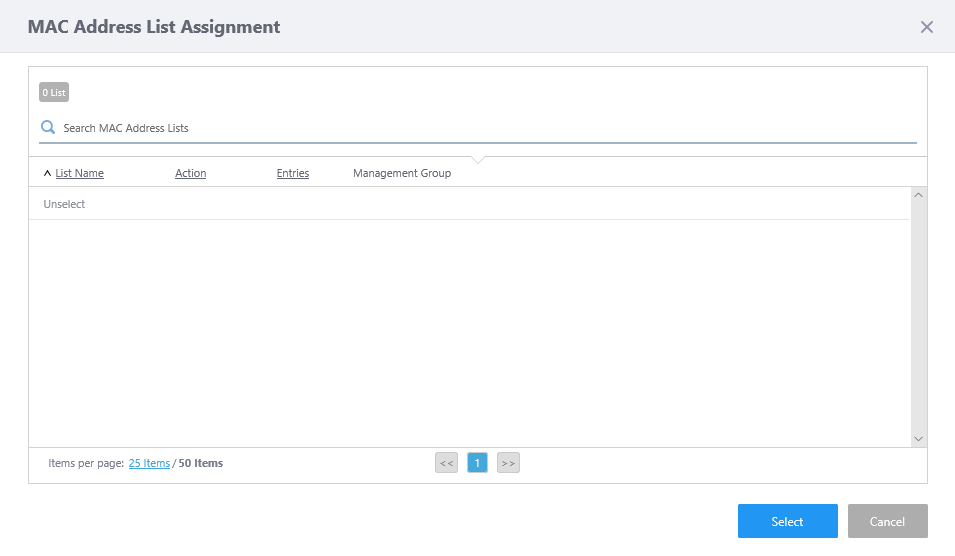 Refer to Operation Reference > Authentication > MAC Access Control > When Using the AWC Plug-in's MAC Address List for more details. Also, see Configure MAC Address Lists for instructions on how to create a MAC Address List. The operation of this function depends on the profile Model.
|
| Total of MAC Addresses in selected MAC Address List | Displays the total number of MAC address entries in the MAC Address List specified in the "Basic Configuration" and "MAC Access Control" in the "VAP (Multiple SSID) Configuration". The total number of MAC address entries in the configurable MAC address list is capped at 3072. If the same MAC address is duplicated in different MAC address lists, it is counted as one entry. It does not consider whether the action of a MAC address list with duplicate entries is allowed or blocked. NoteThis item is displayed when "AT-TQ7403", "AT-TQ6403 GEN2 / AT-TQm6403", "AT-TQ6702 GEN2 / AT-TQm6702 GEN2 AT-TQ6602 GEN2 / AT-TQm6602 GEN2", or "AT-TQ6702e GEN2" is selected as the Model. |
| LED | Specify whether to turn on the LED. Select "Turn On" to turn on the LED. Otherwise select "Turn Off". The default is "Turn On". When "AT-TQ6702 GEN2 / AT-TQm6702 GEN2 AT-TQ6602 GEN2 / AT-TQm6602 GEN2" or "AT-TQ6602" is selected as the Model, "PoE LED" will be additionally displayed when this item is set to "Turn On". For more details, refer to Additional option for LED. |
| USB | Specify whether to use the USB port. The default is "Disable". By selecting "Enable", the additional item "Save Log to USB Storage" will be displayed. For more details, refer to Additional option for USB. NoteThis setting is displayed when "AT-TQ7613" is selected as the Model. |
| Virtual IP Address for Captive Portal | Specify whether to use the virtual IP address on the captive portal, when Captive Portal is enabled. When enabled, you can specify the IP address to be used to display the captive portal. If disabled, the captive portal will be displayed using the IP address assigned to the wireless AP itself to which this AP profile has been applied. The default is "Disable". NoteThis item is displayed when "AT-TQ7613", "AT-TQ3403 / AT-TQm3403", "AT-TQ7403", "AT-TQ6403 GEN2 / AT-TQm6403 GEN2", "AT-TQ6702 GEN2 / AT-TQm6702 GEN2 AT-TQ6602 GEN2 / AT-TQm6602 GEN2", "AT-TQ6702e GEN2", "AT-TQ6602", "AT-TQ5403 / AT-TQm5403", or "AT-TQ5403e" is selected as the Model. |
| Client Packet Analysis | Analyzes wireless client communications, obtains the client's hostname and operating system, records the client's connection status in a detailed log, and displays this information as wireless client information. The following conditions must be met for effective use of Client Packet Analysis:
NoteThis item is displayed when "AT-TQ7403", "AT-TQ6403 GEN2 / AT-TQm6403", "AT-TQ6702 GEN2 / AT-TQm6702 GEN2 AT-TQ6602 GEN2 / AT-TQm6602 GEN2", or "AT-TQ6702e GEN2" is selected as the Model. NoteWhen this function is enabled, there are limitations on the management functions available in the Vista Manager EX. For more information, please see Overview > What is the AWC Plug-in > Client Connection History Management and Client Packet Analysis. NoteWhen you enable this feature, logs about the network connection will be displayed when the wireless client is connected. For more information on logging, see Screen Reference > Wireless Monitor > Log Management. |
| STOAT | Whether to use AMF Plus Device Discovery feature, a.k.a. STOAT (Standardized Topology Organizer and Transport). Using STOAT, information on wireless clients connected to this AP can be notified to the upstream AMF Plus device and reflected in the Vista Manager EX device list and endpoint list. By selecting "Enable", the additional items described below will be displayed.
NoteThis setting is displayed when "AT-TQ7403-R" or "AT-TQ6702 GEN2-R" is selected as the Model. |
Additional Options for User Settings
If "AT-TQ7613", "AT-TQ3403 / AT-TQm3403", "AT-TQ7403", "AT-TQ6403 GEN2 / AT-TQm6403 GEN2", "AT-TQ6702 GEN2 / AT-TQm6702 GEN2 AT-TQ6602 GEN2 / AT-TQm6602 GEN2", "AT-TQ6702e GEN2", "AT-TQ6602", "AT-TQ5403 / AT-TQm5403", "AT-TQ5403e", or "AT-TQ1402 / AT-TQm1402" is selected as the Model, you can overwrite the username and password to log in to the wireless AP's Web GUI.| Item Name | Description |
|---|---|
| Username | Specify the username used to log in to the AP's management web interface. This setting is mandatory when you change the login password. If both "Username" and "Password" are left blank, they will stay at their previous value or the default value. 1 to 12 characters in length, with letters and digits. Must begin with a letter. |
| Password | Specify the password used to login to the AP's management web interface. This setting is mandatory when you change "Username". If both "Username" and "Password" are left blank, they will stay at their previous value or the default value. Once the Password is set in the AP Profile and not being changed from that, the string "Configured" will be shown in this field. Should be 0 to 32 characters in length, with alphabets (case-sensitive), numbers and symbols (! # % ( ) + , - . / ; = ? @ [ \ ] ^ _ ` { | } ~ may be used). The password is case-sensitive. Each character in the password is represented by a bullet. |
| Password (Confirm) | Enter the same login password for confirmation. Each character in the password is represented by a bullet. |
| AP's User Settings | Can prevent changing the user settings per AP by AP-Specific Configuration. When "Disable" is checked, individual settings are disabled and the only user settings specified for the AP Profile are commonly set for all APs to which this AP Profile is applied. Unchecking the checkbox allows you the individual settings. By default, this option is not checked. |
Additional Options for User Information
If the Profile Model is "AT-TQ7403-R" or "AT-TQ6702 GEN2-R", you need to set an existing username and password for the AP to manage and configure from the AWC Plug-in.| Item Name | Description |
|---|---|
| Username | Specify the username used to log in to the AP's management web interface. This setting is mandatory when you change the login password. If both "Username" and "Password" are left blank, they will stay at their previous value or the default value. Should be 1 to 64 characters in length, with alphabets (case-sensitive), numbers and symbols (! " # $ % & ' ( ) * + , - . / : ; < = > @ [ \ ] ^ _ ` { | } ~ may be used). The password is case-sensitive. Note that the username must begin with an english character, or the available symbols listed above aside from a plus (+) symbol. |
| Password | Specify the password used to login to the AP's management web interface. Should be 1 to 32 characters in length, with alphabet characters (case-sensitive), numbers and symbols (! " # $ % & ' ( ) * + , - . / : ; < = > @ [ \ ] ^ _ ` { | } ~ may be used). The password is case-sensitive. Each character in the password is represented by a bullet. |
| APs User Settings | Can prevent changing the user information per AP by AP-Specific Configuration. When "Disable" is checked, individual settings are disabled and the only user information specified for the AP Profile are commonly set for all APs to which this AP Profile is applied. Unchecking the checkbox allows you the individual settings. By default, this option is not checked. |
Additional Options for Timezone
| Item Name | Description |
|---|---|
| Timezone Name | Specify a time zone name (time zone abbreviation: e.g., "JST" for Japan Standard Time) corresponding to the specified time zone with a string of 3 to 6 characters. |
| Daylight Saving Time | Enables or disables the daylight saving time settings. If you select "Enable", the following items are also displayed. The default is "Disable". |
| DST Start (24HR) | The menu pops up and lets you select the starting and ending date/time (week, day of the week, month, hour and minute) of DST. Only displayed when "Daylight Saving Time" is set to "Enable". |
| DST Start (24HR) | |
| DST Offset | Specify an offset (minutes) for Daylight Saving Time. The method of specifying the setting varies depending on the Model.
Only displayed when "Daylight Saving Time" is set to "Enable". |
Additional Options for NTP Client
| Item Name | Description |
|---|---|
| NTP Server IP Address / Hostname | Enter an IP address or a hostname (FQDN) of the NTP server to synchronize. (Example) ntp.your.domain.com, 12.34.56.78 NoteFQDN consists of labels (strings) and periods (.). |
| NTP Synchronization Interval | Specify a time between synchronizing the clock to the NTP server. It must be in the range of 1 to 9999 (minutes). The default is 10 minutes.NoteThis item is displayed when "AT-TQ7613", "AT-TQ3403 / AT-TQm3403", "AT-TQ7403", "AT-TQ6403 GEN2 / AT-TQm6403 GEN2", "AT-TQ6702 GEN2 / AT-TQm6702 GEN2 AT-TQ6602 GEN2 / AT-TQm6602 GEN2", "AT-TQ6702e GEN2", or "AT-TQ6602" is selected as the Model. NoteWhen you use the AWC function, do not use an interval larger than the default of 10 minutes. |
Additional Options for Syslog Client
| Item Name | Description |
|---|---|
| Syslog Server IP Address / Hostname | Specify the Syslog server to send log messages to.
|
| Port Number | Specify a listening port number on the Syslog Server. The default is 514.NoteThis item is displayed when "AT-TQ7613", "AT-TQ3403 / AT-TQm3403", "AT-TQ7403", "AT-TQ6403 GEN2 / AT-TQm6403", "AT-TQ6702 GEN2 / AT-TQm6702 GEN2 AT-TQ6602 GEN2 / AT-TQm6602 GEN2", "AT-TQ6702e GEN2", "AT-TQ6602", "AT-TQ5403 / AT-TQm5403", "AT-TQ5403e", or "AT-TQ1402 / AT-TQm1402" is selected as the Model. |
| Severity | Select the lowest log severity that will be sent to the Syslog Server. The default is "7: Debug". Severity is a value in the range of 0 to 7; the lower the number, the greater the importance.
|
Additional Options for SNMP Agent
| Item Name | Description |
|---|---|
| Version | Select the SNMP version to be used from "v1/v2c" or "v3". The default is "v1/v2c".NoteThis item is displayed when "AT-TQ7613", "AT-TQ3403 / AT-TQm3403", "AT-TQ7403", "AT-TQ7403-R", "AT-TQ6403 GEN2 / AT-TQm6403 GEN2", "AT-TQ6702 GEN2 / AT-TQm6702 GEN2 AT-TQ6602 GEN2 / AT-TQm6602 GEN2", "AT-TQ6702e GEN2", "AT-TQ6702 GEN2-R", "AT-TQ6602", "AT-TQ5403 / AT-TQm5403", or "AT-TQ5403e" is selected as the Model. |
| Read Only Community Name | Enter the read-only SNMP community name. Should be 1 to 256 characters in length, with alphabets, numbers, and symbols (space ! # $ % ( ) * + , - . /)NoteThis item is displayed if you select "AT-TQ7613", "AT-TQ3403 / AT-TQm3403", "AT-TQ7403", "AT-TQ6403 GEN2 / AT-TQm6403 GEN2", "AT-TQ6702 GEN2 / AT-TQm6702 GEN2 AT-TQ6602 GEN2 / AT-TQm6602 GEN2", "AT-TQ6702e GEN2", "AT-TQ6602", "AT-TQ5403 / AT-TQm5403", or "AT-TQ5403e" as the Model, and specified "v1/v2c" as the SNMP Version; or if you select "AT-TQ1402 / AT-TQm1402" for the Model. |
| Read Only Community Name / Community name for traps | Specify the trap SNMP community name, which is used for both reading SNMP MIB trees sending SNMP trap messages. Should be 1 to 20 characters in length, with alphabets (case-sensitive), numbers and symbols (! # % & ' ( ) * + , - . / : ; < = > @ [ ] ^ _ ` { | } ~ may be used). The string is case-sensitive. The default is "public". NoteThis setting is displayed only when "AT-TQ7403-R" or "AT-TQ6702 GEN2-R" is selected as the Model, and "v1/v2c" is specified for the SNMP Agent Version. |
| Port Number | Enter the UDP port that the SNMP agent listens on. The default is 161.NoteThis item is displayed when "AT-TQ7613", "AT-TQ3403 / AT-TQm3403", "AT-TQ7403", "AT-TQ6403 GEN2 / AT-TQm6403", "AT-TQ6702 GEN2 / AT-TQm6702 GEN2 AT-TQ6602 GEN2 / AT-TQm6602 GEN2", "AT-TQ6702e GEN2", "AT-TQ6602", "AT-TQ5403 / AT-TQm5403", "AT-TQ5403e", or "AT-TQ1402 / AT-TQm1402" is selected as the Model. NoteIf the AP is managed by the SNMP plug-in and the port number has not been changed in the SNMP Plug-in Settings Utility, there is no need to change the settings in this item. |
| Full Name | Enter the SNMPv3 username.
NoteThis is displayed when "v3" is specified for the SNMP Agent Version. |
| Password | Enter the SNMPv3 authentication password.
NoteThis item is displayed when "AT-TQ7613", "AT-TQ3403 / AT-TQm3403", "AT-TQ7403", "AT-TQ7403-R", "AT-TQ6403 GEN2 / AT-TQm6403 GEN2", "AT-TQ6702 GEN2 / AT-TQm6702 GEN2 AT-TQ6602 GEN2 / AT-TQm6602 GEN2", "AT-TQ6702e GEN2", "AT-TQ6702 GEN2-R", "AT-TQ6602", "AT-TQ5403 / AT-TQm5403", or "AT-TQ5403e" is selected as the Model, and "v3" is specified for the SNMP Agent Version. |
| Restrict the source of SNMP requests | Enable this to accept SNMP requests only from specific source addresses.NoteThis item is displayed if you select "AT-TQ7613", "AT-TQ3403 / AT-TQm3403", "AT-TQ7403", "AT-TQ6403 GEN2 / AT-TQm6403 GEN2", "AT-TQ6702 GEN2 / AT-TQm6702 GEN2 AT-TQ6602 GEN2 / AT-TQm6602 GEN2", "AT-TQ6702e GEN2", "AT-TQ6602", "AT-TQ5403 / AT-TQm5403", or "AT-TQ5403e" as the Model, and specified "v1/v2c" as the SNMP Version; or if you select "AT-TQ1402 / AT-TQm1402" for the Model. |
| Only allow from the designated hosts or subnets | Enter the IP address or hostname (FQDN) of the SNMP manager. (Example) snmpmgr.your.domain.com, 12.34.56.78 This is displayed when "Restrict the source of SNMP requests" is enabled. Only one host can be set for this field. NoteFQDN consists of labels (strings) and periods (.). NoteThis item is displayed if you select "AT-TQ7613", "AT-TQ3403 / AT-TQm3403", "AT-TQ7403", "AT-TQ6403 GEN2 / AT-TQm6403 GEN2", "AT-TQ6702 GEN2 / AT-TQm6702 GEN2 AT-TQ6602 GEN2 / AT-TQm6602 GEN2", "AT-TQ6702e GEN2", "AT-TQ6602", "AT-TQ5403 / AT-TQm5403", or "AT-TQ5403e" as the Model, and specified "v1/v2c" as the SNMP Version; or if you select "AT-TQ1402 / AT-TQm1402" for the Model. |
| Community name for traps | Specify the trap SNMP community name. Should be 1 to 256 characters in length, with alphabets, numbers, and symbols (space ! # $ % ( ) * + , - . /) The string is case-sensitive. The default is "public". NoteThis item is displayed if you select "AT-TQ7613", "AT-TQ3403 / AT-TQm3403", "AT-TQ7403", "AT-TQ6403 GEN2 / AT-TQm6403 GEN2", "AT-TQ6702 GEN2 / AT-TQm6702 GEN2 AT-TQ6602 GEN2 / AT-TQm6602 GEN2", "AT-TQ6702e GEN2", "AT-TQ6602", "AT-TQ5403 / AT-TQm5403", or "AT-TQ5403e" as the Model, and specified "v1/v2c" as the SNMP Version; or if you select "AT-TQ1402 / AT-TQm1402" for the Model. |
| Trap types | Select the SNMP Trap types to generate. You can specify the following SNMP messages:
|
| Trap Host IP Address/Hostname or Trap Host IP Address |
Specify IP addresses to which SNMP traps will be sent. The available format varies depending on the selected Model.
|
Additional Options for LED Configuration
NoteTQ6602 firmware version 7.0.1-3.1 or later; or TQ6602 GEN2, TQ6702 GEN2 firmware version 8.0.2-0.1 or later is required.
| Item Name | Description |
|---|---|
| PoE LED | Select the color of the PoE LED when receiving PoE power, ether "Amber" or "Green". The default is "Amber". |
Additional Options for USB
| Item Name | Description |
|---|---|
| Save Log to USB Storage | Soecify whether to save log files to USB storage. The default is "Disable". |
Additional Options for STOAT
| Item Name | Description |
|---|---|
| STOAT Destination | Select from "Enable" or "Disable" whether to specify the STOAT collector to notify detected device information. The default is "Disable". NoteWhen the STOAT Destination is set to "Enable", additional options "IP Address/Hostname" and "Key" will be displayed.This version does not support the STOAT collector function in the AT-TQR series. This only works as a STOAT source, so the STOAT destination must be set to Enable" |
| IP Address/Hostname | Enter the IP address or hostname (FQDN) of the STOAT collector. This setting is displayed when STOAT Destination is set to "Enable". |
| Key | Enter the STOAT collector's authentication key using 8 to 80 alphanumeric characters, numbers, and symbols (not including spaces and slashes (/)). This setting is displayed when STOAT Destination is set to "Enable". |
LAN Configuration
In Port Configuration, you can configure the items relating to the operation of the LAN1 and LAN2 ports.NoteThis item is displayed when "AT-TQ7613", "AT-TQ7403", "AT-TQ6403 GEN2 / AT-TQm6403 GEN2", "AT-TQ6702 GEN2 / AT-TQm6702 GEN2 AT-TQ6602 GEN2 / AT-TQm6602 GEN2", or "AT-TQ5403 / AT-TQm5403" is selected as the Model.

| Item Name | Description |
|---|---|
| LAN 2 Port | Specifies TQ5403/6403 GEN2/6602 GEN2/6702 GEN2/7403/7613 and TQm5403/6403 GEN2/6602 GEN2/6702 GEN2's LAN1 and LAN2 ports behavior, such as link aggregation or cascading.
|
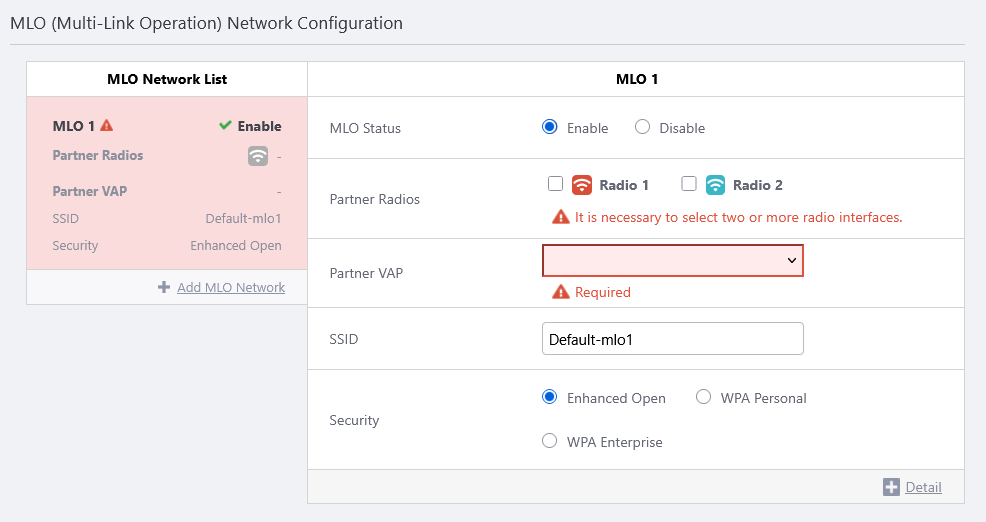
MLO (Multi-Link Operation) Network Configuration
MLO is a technology defined in IEEE 802.11be (Wi-Fi 7) that improves throughput and reduces latency by simultaneously utilizing links across multiple wireless bands.In MLO (Multi-Link Operation) network settings, you can create an MLO network with common network settings applied across multiple bands.
| Item Name | Description |
|---|---|
| MLO Network List | Shows a list of configured MLO Networks. This includes the status, radio band, VAP number, SSID and security setting of the MLO Network. |
| + Add MLO Network | Creates a new MLO Network. The MLO Networks will be automatically numbered, starting from 1. You can add up to 8 MLO Networks. NoteIt is recommended to use 5 or less VAPs per radio band in total, including both multi-channel and blanket VAPs, and MLO Networks. |
| MLO Status | Enables or disables the MLO Network.
The default is "Enable". |
| Radio | Select two or more radio bands to use for this MLO network, from Radio 1 to 3. |
| VAP | Specify a VAP Number. (mandatory) You can configure any of VAP 5 to 8 on AT-TQ7613. If the VAP number created in the VAP (Multi-SSID) Configuration overlaps with one used in the MLO network, the settings from the MLO network will take precedence. |
| SSID | Specify an SSID (network name) to use on the MLO Network. Enter a name between 1 to 32 alphanumeric characters. The default is "Default-mloX" (where X is a MLO Network number) (required) |
| Security | Select a security mechanism to use. The available options are "Enhanced Open", "WPA Personal", and "WPA Enterprise". The default is "Enhanced Open".
For more details, refer to MLO Additional Options for Security. |
Additional Options for MLO Security
◼ Enhanced Open Configuration
Selecting "Enhanced Open" for Security will show the following additional items:
| Item Name | Description |
|---|---|
| OWE | Uses Opportunistic Wireless Encryption (OWE) protocol for encryption. After open authentication, data between the wireless client and the AP is encrypted with 128-bit CCMP/AES encryption. Only "Enable" can be selected. |
| Management Frame Protection | Protects IEEE 802.11 management frames. Only "Required" can be selected. |
◼ WPA Personal Configuration
Selecting "WPA Personal" for Security will show you the following additional items:
| Item Name | Description |
|---|---|
| Security Key (WPA-PSK) | Specify an encryption key for the VAP. The key should contain 8 to 63 alphanumeric and symbol characters. The key is case-sensitive. |
| WPA Versions | Select the WPA version(s) to use. Fixed to "WPA3". |
| WPA3 Personal Compatibility Mode | Specify whether WPA3 compatibility mode is used. WPA3 Compatibility Mode prioritizes WPA3 connections and uses WPA2-equivalent authentication for unsupported devices. Fixed to "Disable". |
| Encryption Protocol | Select the encryption protocol to use. Fixed to "CCMP + GCMP". |
| Management Frame Protection | Specify whether to protect management frames from eavesdropping and forging. Fixed to "Required". |
| Beacon Protection | Specify whether to protect beacon frames. When enabled, part of the beacon is encrypted, allowing wireless clients to verify that the beacon originates from a legitimate AP. Fixed to "Enable". |
| Broadcast Key Refresh Rate | Specify an interval at which to refresh the broadcast key that is sent to clients on the VAP. Specify an interval between 0 and 86400 (seconds). A value of 0 means that the key is never refreshed. The default is 0. |
◼ WPA Enterprise Configuration
Selecting "WPA Enterprise" for Security will show you the following additional items:
| Item Name | Description |
|---|---|
| RADIUS Server Primary IP Address | Enter the IP address of the primary RADIUS server. (required) |
| RADIUS Server Primary Secret | Enter the password to connect to the primary RADIUS server with 128 or less alphanumeric and symbol characters (including spaces). (required) |
| RADIUS Server Secondary IP Address | Enter the IP address of the secondary RADIUS server. Leave it blank if you are not using a secondary RADIUS server. |
| RADIUS Server Secondary Secret | Enter the password to connect to the secondary RADIUS server with 128 or less alphanumeric and symbol characters (including spaces). Leave it blank if you are not using a secondary RADIUS server. |
| Port Number | Enter a port number between 1 and 65535 on which the primary and secondary RADIUS server is listening. The default is 1812. |
| Pre-authentication | When enabled and a client is about to roam, the source (current) AP forwards the client's pre-authentication information to the destination AP. The default is "Enable". This reduces the time required for authentication of roaming clients. |
| WPA Versions | Select the WPA version(s) to use. Fixed to "WPA3". |
| Encryption Protocol | Select the encryption protocol to use. You can select either "CCMP + GCMP" or "GCMP (bit mode)". |
| Management Frame Protection | Specify whether to protect management frames from eavesdropping and forging. Fixed to "Required". |
| Broadcast Key Refresh Rate | Specify an interval at which to refresh the broadcast key that is sent to clients on the VAP. Specify an interval between 0 and 86400 (seconds). A value of 0 means that the key is never refreshed. The default is 0. |
| Session Key Refresh Rate | Specify an interval at which to refresh the unicast session key that is sent to clients on the VAP. Specify an interval between 0 and 86400 (seconds). A value of 0 means that the key is never refreshed. The default is 0. Because keys are generated for every session, there is little need to refresh the key, given that a strong encryption algorithm such as CCMP is used in "WPA Enterprise". A shorter interval may decrease the AP's performance. |
| Session Key Refresh Action | Select the action to be taken when the session key is updated, from "Reauthentication" or "Disconnection". The default is "Reauthentication". |
| Verify RADIUS packets | Specify whether RADIUS packet verification is performed.
|
| RADIUS Accounting | Specify whether to use RADIUS accounting server to record the resources (such as connection time) used by each user. Select "Enable" to perform accounting. Otherwise select "Disable". The default is "Disable". |
| RADIUS Accounting Port Number | Specify a port number on which the RADIUS accounting server is listening. This is valid only when RADIUS Accounting is enabled. The default is 1813. |
| RADIUS Timeout | Specify the timeout period for a RADIUS Access-Request message with a value from 1 to 29 (unit: second). If no response is received after the packet is sent to the RADIUS server beyond the value of this setting, the access request is retransmitted or treated as an authentication failure. In this case, the total time for the transmission sequence of the specified number of times (first time + retransmission count) to the primary RADIUS server and secondary RADIUS server is set to 29 seconds or less. For example, the calculation is as follows:
|
| RADIUS Retransmit | Specify the number of retransmissions of Access-Request messages to the RADIUS server with a value from 0 to 8 (unit: times). Together with the first transmission, a maximum of this setting plus one authentication request will be made to the RADIUS server. If primary and secondary RADIUS servers are configured, the primary RADIUS server will be sent this configuration plus one authentication request, and then the secondary RADIUS server will be sent this configuration plus one authentication request in the same manner. If there is no response to any of these authentication requests, it is treated as an authentication failure. The default is 1 (time). This means that up to two authentication requests will be made to the primary/secondary RADIUS servers, respectively. |
| Retry Interval for Primary | Specify the time from 0 to 600 (in seconds) to return to the primary RADIUS server again after communication to the primary RADIUS server fails and the authentication destination falls back to the secondary RADIUS server. The default is 0 (seconds). |
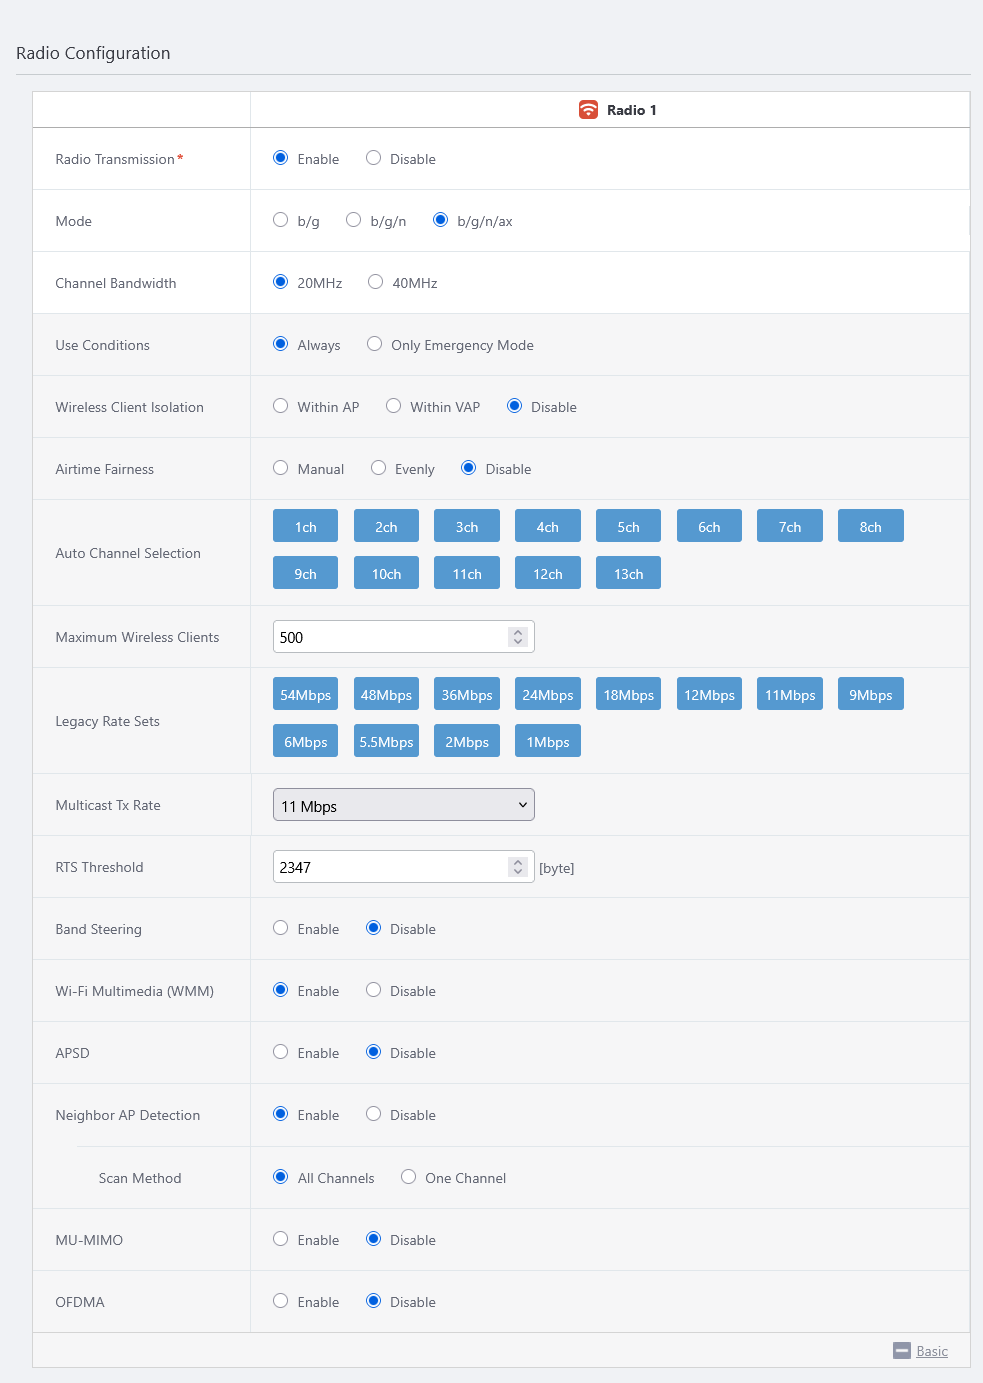
Wireless Configuration
You can specify configuration parameters for radio waves in the "Radio Configuration" section.Depending on the selected "Model", you can switch radios by clicking the "Radio 1", "Radio 2" and "Radio 3" buttons at the top right of the screen.
NoteOnly the Radio 1/2/3 buttons available on the model will be displayed at the top of the screen.
| Item Name | Description | ||||||||||||||||||||
|---|---|---|---|---|---|---|---|---|---|---|---|---|---|---|---|---|---|---|---|---|---|
| Radio Transmission | Specify whether to transmit/receive in the selected frequency band. Select "Enable" to use the radio. Otherwise select "Disable" (mandatory) The default is "Enable" for all radio frequencies. However, depending on the Country and Model selected, there may be cases where "Enable" cannot be selected due to legal restrictions. (For example: "JP-Japan" as Country, "Tri [11ac Wave2] with External Antenna" as Profile Type, and "Outdoor" as Location, Radio 2 (W52 / W53) only has the option "Disable"). When the MLO network is enabled, Wireless Client Isolation is automatically disabled. NoteIf you disable all radios on an AP Profile, it is possible to apply the profile to APs of other Profile Types, this profile will not be valid. Make sure you apply an appropriate AP Profile to APs. |
||||||||||||||||||||
| Band | NoteThis item is not supported. |
||||||||||||||||||||
| Mode | Select a mode (protocol) to use on the Radio band. Available modes vary depending on the selected Model.
NoteTo use IEEE 802.11n, IEEE 802.11ac, IEEE 802.11ax or IEEE 802.11be, "Wi-Fi Multimedia (WMM)" must be enabled. NoteWhen using IEEE 802.11be, you must configure the VAP security and WPA version using one of the following modes. |
||||||||||||||||||||
| Bandwidth | Specify the Bandwidth to use. In IEEE 802.11be (TQ7613), IEEE 802.11ax (TQ3403, TQ6403 GEN2, TQ6602, TQ6602 GEN2, TQ6702 GEN2, TQ6702 GEN2-R, TQ6702e GEN2, TQ7403, TQm3403, TQm6403 GEN2, TQm6602 GEN2, TQm6702 GEN2), IEEE 802.11ac, and IEEE 802.11n modes, multiple adjacent channels can be combined to use the spectrum as a wider bandwidth channel.
"40MHz", "80MHz", "80+80MHz", "160MHz", and "320MHz" give you higher traffic rates, but exhaust the number of available channels because they use two, four, or eight channels. |
||||||||||||||||||||
| Use Conditions | Specify when to use the wireless feature. Select "Always" to always use the wireless feature. Select "Only Emergency Mode" to use the radio band only in emergency mode. The default is "Always". Refer to Enable Emergency Mode for more details. NoteEmergency Mode cannot be used with channel blanket. You cannot use a channel blanket as an emergency Wi-Fi network. |
||||||||||||||||||||
| Wireless Client Isolation | Specifies whether all VAPs in the relevant radio band are allowed to communicate with other connected wireless clients. The operation of this function depends on the Model.
|
||||||||||||||||||||
| Airtime Fairness | Specify whether to give each client an equal amount of airtime regardless of its speed. Available options vary depending on the selected Model.
|
||||||||||||||||||||
| Auto Channel Selection | Specify the channels to use. All channels are selected by default. When the Channel Bandwidth "80MHz" or "160MHz" is selected on the 5GHz/6GHz radio band (Radio 2 or 3), you can enable or disable the four or eight adjacent channels as a group, for example "36ch/40ch/44ch/48ch". At least one group must be enabled for Auto Channel Selection when "80MHz" or "160MHz" is selected for Channel Bandwidth. When the Model is set to "AT-TQ7613", the wireless band to "Radio 3", and the bandwidth to "320 MHz", select either "1ch - 61ch", "33ch - 93ch", or both. If the Model is set to "AT-TQ7613", "AT-TQ3403 / AT-TQm3403" or "AT-TQ7403", the "Preferred Scanning Channel" button is also displayed for Radio 3. Clicking on the "Priority Scan Channels" button causes the adjacent channel bands, including the PSCs, to be selected according to the selected bandwidth in use. NoteThe Preferred Scanning Channels (PSCs) refer to the channel on which the wireless client performs a preferred active scan to detect wireless APs on the 6 GHz band. |
||||||||||||||||||||
| Maximum Wireless Clients | Specify the maximum number of clients that can connect to the APs. The number of wireless clients that can connect to the AP counts for each wireless band (Wireless 1 to Wireless 3). When 0 is specified for a radio, no wireless client can connect to APs on the radio.
|
||||||||||||||||||||
| Legacy Rate Sets | Specify valid rates to use when IEEE 802.11b/g or IEEE 802.11a is being used. Select required rates that must be supported on wireless stations (client or other APs) to be allowed to connect to the APs. When a station does not support one or more rates in this list, the station is not allowed to connect. Check the rates to select. All supported rates are selected by default.
|
||||||||||||||||||||
| Multicast Tx Rate | Specify a selection method for IEEE 802.3 multicast/broadcast rate. Available options vary depending on the selected Models.
|
||||||||||||||||||||
| RTS Threshold | Specify the threshold for sending RTS (Request to Send) packets for IEEE 802.11b/g/a as a value from 0 to 2347. When a packet to send is larger than the specifed size, RTS is transmitted before the packet is sent. Specifying "2347" disables RTS transmission. The default is 2347 (do not transmit RTS). If you set the RTS threshold to a lower value, RTS packets are transmitted more frequently. It consumes more bandwidth and reduces throughput, but may alleviate collision and interference in a crowded network. Therefore we do not recommend changing the RTS threshold under normal circumstances. When using IEEE 802.11n or 802.11ac, RTS packets are transmitted regardless of the RTS Threshold setting. NoteIf you select "AT-TQ5403 / AT-TQm5403", "AT-TQ5403e" or "AT-TQ1402 / AT-TQm1402" as the Model, and "IEEE 802.11a/n/ac" as the Mode in Radio Configuration, RTS packets are not sent to wireless clients connected by IEEE 802.11a. This setting is ignored. |
||||||||||||||||||||
| Band Steering | Specify whether to use Band Steering.
The default is "Disable". This item is displayed only for "Radio 1" (2.4GHz). To use this feature, make sure you enable two or more bands (Radio 1, 2 and 3) and configure a VAP with the same SSID and security for each radio. When the MLO network is enabled, Band Steering is automatically disabled. NoteBand Steering cannot be used with channel blanket. Disable Band Steering on the AP Profile for APs using channel blanket. |
||||||||||||||||||||
| Wi-Fi Multimedia (WMM) | Specify whether to use Wi-Fi Multimedia (WMM). When enabled, WMM information is included in the AP beacon. This shortens the frame transmission interval for video/audio streaming and VoIP traffic and therefore keeps communication quality high. The default is "Enable". NoteThis item is displayed when "AT-TQ7613", "AT-TQ3403 / AT-TQm3403", "AT-TQ7403", "AT-TQ6403 GEN2 / AT-TQm6403", "AT-TQ6702 GEN2 / AT-TQm6702 GEN2 AT-TQ6602 GEN2 / AT-TQm6602 GEN2", "AT-TQ6702e GEN2", "AT-TQ6602", "AT-TQ5403 / AT-TQm5403", "AT-TQ5403e", or "AT-TQ1402 / AT-TQm1402" is selected as the Model. NoteTo use IEEE 802.11n IEEE 802.11ac or IEEE 802.11ax, this must be enabled. |
||||||||||||||||||||
| APSD | Specify whether to use APSD (Automatic Power Save Delivery). Enabling APSD can lower power consumption of mobile devices (VoIP) and therefore increase the battery life. The mobile device should also support APSD (U-APSD). The default setting varies depending on the selected Model.
NoteThis item is displayed when "AT-TQ613", "AT-TQ3403 / AT-TQm3403", "AT-TQ6702 GEN2 / AT-TQm6702 GEN2 AT-TQ6602 GEN2 / AT-TQm6602 GEN2", "AT-TQ6602", "AT-TQ5403 / AT-TQm5403", "AT-TQ5403e", or "AT-TQ1402 / AT-TQm1402" is selected as the Model. |
||||||||||||||||||||
| Neighbor AP Detection | Specify whether to detect Neighbor APs. When enabled, it scans in-use and other channels of the radio band for Wireless IDS / IPS and AWC Calculation. In this case, the channel currently being used is periodically stopped, so the performance of the wireless network service slightly decreases. When disabled, detection does not work. In this case, Wireless IDS / IPS may not work properly, or the effect of surrounding unmanaged APs may not be correctly reflected in the AWC Calculation. The default is "Enable". Also, if the Model is "AR-TQ7613", "AT-TQ3403 / AT-TQm3403", "AT-TQ7403", "AT-TQ6403 GEN2 / AT-TQm6403 GEN2", "AT-TQ6702 GEN2 / AT-TQm6702 GEN2 AT-TQ6602 GEN2 / AT-TQm6602 GEN2", or "AT-TQ6702e GEN2", a Scan Method can be specified when Neighbor AP Detection is enabled. For more details, refer to Additional Options for Neighbor AP Detection.
NoteIf Neighbor AP Detection is supported on the management web interface of the AP system and set to "Enable" in the AWC Plug-in management, the Neighbor AP Detection setting will remain as "Enable". This is supported on TQ5403, TQ5403e and TQm5403 with firmware version 5.3.1 or later, TQ1402 and TQm1402 with firmware version 6.0.0-0.2 or later, and TQ6602 with firmware version 7.0.0 or later. NoteWhen neighbor APs are detected on TQ6602 GEN2/6702 GEN2 and TQm6602 GEN2/6702 GEN2, packet loss or communication delay shorter than 3 seconds (firmware version 8.0.3-0.1 or later) or 10 seconds (firmware version 8.0.2-x.x or earlier) may occur repeatedly up to 4 times, for approximately 20 seconds total. In environments where temporary performance degradation is unacceptable, disable neighbor AP detection in the AP profile for Model "AT-TQ6702 GEN2 / AT-TQm6702 GEN2 AT-TQ6602 GEN2 / AT-TQm6602 GEN2". |
||||||||||||||||||||
| MU-MIMO | Select whether to Enable or Disable MU-MIMO (Multi-user MIMO). MU-MIMO allows multiple wireless clients to communicate simultaneously (upwards and downwards), thus increasing the communication speed. The default is "Disable". NoteThis item is displayed when selected "AT-TQ7613", "AT-TQ7403", "AT-TQ7403-R", "AT-TQ6403 GEN2 / AT-TQm6403 GEN2", "AT-TQ6702 GEN2 / AT-TQm6702 GEN2 AT-TQ6602 GEN2 / AT-TQm6602 GEN2", "AT-TQ6702e GEN2", "AT-TQ6702 GEN2-R", or "AT-TQ6602" as the Model, and the options including "ac" or "ax" as the Mode in Radio Configuration section. |
||||||||||||||||||||
| OFDMA | Select whether to Enable or Disable OFDMA (Orthogonal Frequency Division Multiple Access). OFDMA allows multiple wireless clients to communicate simultaneously by dividing the channel into multiple RUs (resource units). The default is "Disable". NoteThis item is displayed when selected "AT-TQ7613", "AT-TQ3403 / AT-TQm3403", "AT-TQ7403", "AT-TQ7403-R", "AT-TQ6403 GEN2 / AT-TQm6403 GEN2", "AT-TQ6702 GEN2 / AT-TQm6702 GEN2 AT-TQ6602 GEN2 / AT-TQm6602 GEN2", "AT-TQ6702e GEN2", "AT-TQ6702 GEN2-R", or "AT-TQ6022 as the Model, and the options including "ax" as the Mode in Radio Configuration section. |
||||||||||||||||||||
| Zero wait DFS | Select whether to use Zero wait DFS. When Zero Wait DFS is set to "Enabled", the system constantly monitors candidate channels to change to when it detects a waveform from a weather radar, and immediately switches to the candidate channel once radar is detected, in order to avoid interference. The default is "Disable". NoteThis setting is displayed when selected "AT-TQ6702 GEN2 / AT-TQ6602 GEN2 / AT-TQ6702e GEN2", "AT-TQ6702e GEN2", or "AT-TQ6702 GEN2-R" as AP Model, and Radio Band as "Radio 2". Other Models will not show this setting. |
||||||||||||||||||||
| Spatial Streams | Select the number of spatial streams to use, either 4 or 8. The default is "8 Streams".NoteThis setting appears only when AP Model is selected as "AT-TQ6702 GEN2 / AT-TQm6702 GEN2 AT-TQ6602 GEN2 / AT-TQm6602 GEN2" and Radio Band as "Radio 2". Other Models will not show this setting. |
||||||||||||||||||||
Additional Options for Neighbor AP Detection
| Item Name | Description |
|---|---|
| Scan Method | Specify the target(s) to be scanned when Neighbor AP Detection is enabled.
If "One Channel" is selected, set additional options; Scan Interval, Scan Duration, and Scan Data Keep Time. |
| Scan Interval | Specify the scan interval with a value from 30 to 120 (unit: seconds). The default is 60 (seconds). This is displayed when "One Channel" is specified for Scan Method of the Neighbor AP Detection. |
| Scan Duration | Specify the scan duration with a value from 10 to 2000 (unit: milliseconds). The default is 50 (milliseconds). This is displayed when "One Channel" is specified for Scan Method of the Neighbor AP Detection. |
| Scan Data Keep Time | Specify the retention time of the scan data with a value from 1000 to 7200 (unit: seconds). The default is 3600 (seconds). This is displayed when "One Channel" is specified for Scan Method of the Neighbor AP Detection. |
VAP (Multiple SSID) Configuration
Configure VAPs in the "VAP (Multiple SSID) Configuration" section.Depending on the selected Model, you can switch radios to create VAPs by clicking the "Radio 1", "Radio 2" and "Radio 3" buttons at the top right of the screen.
NoteOnly the Radio 1/2/3 buttons available on the model will be displayed at the top of the screen.

| Item Name | Description |
|---|---|
| VAP List | Shows a list of configured VAPs (Virtual Access Points). Here you can view the status, VLAN ID, SSID, and security settings for each VAP. |
| + Add VAP | Creates a new VAP. The VAPs will be automatically numbered, starting from 1. The number of VAPs that can be created depends on the Model you select.
NoteIt is recommended to use 5 or less VAPs per radio band in total, including both multi-channel and blanket VAPs. |
| VAP Status | Enables or disables the VAP.
For other VAPs, all three options, "Enable", "Disable", and "Emergency" are displayed. The default is "Enable". NoteEmergency Mode cannot be used with channel blanket. You cannot use a channel blanket as an emergency Wi-Fi network. |
| VLAN ID | Specify a VLAN ID (between 1 and 4094) to use on the VAP (required)NoteThis item is displayed when "AT-TQ7613", "AT-TQ3403 / AT-TQm3403", "AT-TQ7403", "AT-TQ6403 GEN2 / AT-TQm6403", "AT-TQ6702 GEN2 / AT-TQm6702 GEN2 AT-TQ6602 GEN2 / AT-TQm6602 GEN2", "AT-TQ6702e GEN2", "AT-TQ6602", "AT-TQ5403 / AT-TQm5403", "AT-TQ5403e", or "AT-TQ1402 / AT-TQm1402" is selected as the Model. NoteSpecify a VLAN ID that is different from the AP's management VLAN. When the AP is detected as a guest device, a parent AMF device is configured to collect the guest device information automatically ("dynamic discovery"), and wireless clients get their IP addresses via DHCP. |
| SSID | Specify an SSID (network name) to use on the VAP. The SSID is mapped to the VLAN ID. Enter a name between 1 to 32 alphanumeric characters. The default is "Default-X" (where X is a VAP number) (required) |
| Broadcast SSID | Specify whether to broadcast the SSID on the VAP.
NoteAn "ANY" connection is a connection where a wireless client tries to connect to an AP by specifying a wildcard or null as the SSID. Even when an "ANY" connection is allowed, clients cannot connect to APs without knowing the correct security key. |
| Security | Select a security mechanism to use. The available options are "None", "Static WEP", "Enhanced Open", "Enhanced Open Transition Mode", "WPA Personal", "WPA Enterprise", and "OSEN". The default is "None".
If you select one of the options other than "None", additional setting items will be displayed according to the respective security method. For more details, refer to Additional Options for Security. NoteFor the model "AT-TQ7613", when a mode including IEEE 802.11be is selected, the security setting must be either "Enhanced Open", "WPA Personal", or "WPA Enterprise". VAPs that do not meet the security requirements of Wi-Fi 7 operate using IEEE 802.11ax. |
| Captive Portal | Specify whether to use Captive Portal on the VAP. Captive Portal displays an authentication page before granting web access. When either option is selected, wireless clients connected to the corresponding VAP will be directed to a page (Captive Portal) that contains text such as licensing and authentication dialogs when they attempt to access any web page with a Web browser. Wireless APs that have applied the AP profile will allow or deny wireless clients according to the options specified in this item. Once successfully authenticated, wireless clients can continue to communicate through the VAP until a certain amount of time has elapsed.
If you select "External RADIUS", "Click-through", or "External Page Redirect", the following additional items are displayed: For more details, refer to Additional Options for Captive Portal. Note"External Page Redirect" is displayed when "AT-TQ7613", "AT-TQ3403 / AT-TQm3403", "AT-TQ7403", "AT-TQ7403-R", "AT-TQ6403 GEN2 / AT-TQm6403 GEN2", "AT-TQ6702 GEN2 / AT-TQm6702 GEN2 AT-TQ6602 GEN2 / AT-TQm6602 GEN2", "AT-TQ6702e GEN2", "AT-TQ6702 GEN2-R", "AT-TQ6602", "AT-TQ5403 / AT-TQm5403", or "AT-TQ5403e" is selected as the Model. NoteYou can not enable Captive Portal on the radio used for the WDS connection. |
| MAC Access Control | Select the MAC Access Control method to apply to the relevant VAPs.
When you select either "External RADIUS", "MAC Address List", or "MAC Address List + External RADIUS", additional items are also displayed. For more details, refer to Additional Options for MAC Access Control. Note"MAC Address List" and "MAC Address List + External RADIUS" are only available when any of MAC Address List is selected in the "Basic Configuration" section. Note"MAC Address List + External RADIUS" is displayed when "AT-TQ7613", "AT-TQ3403 / AT-TQm3403", "AT-TQ7403", "AT-TQ7403-R", "AT-TQ6403 GEN2 / AT-TQm6403 GEN2", "AT-TQ6702 GEN2 / AT-TQm6702 GEN2 AT-TQ6602 GEN2 / AT-TQm6602 GEN2", "AT-TQ6702e GEN2", "AT-TQ6702 GEN2-R", "AT-TQ5403 / AT-TQm5403", or "AT-TQ5403e" is selected as the Model. Note"AMF Application Proxy" is displayed when "AT-TQ7613", "AT-TQ3403 / AT-TQm3403", "AT-TQ7403", "AT-TQ7403-R", "AT-TQ6403 GEN2 / AT-TQm6403 GEN2", "AT-TQ6702 GEN2 / AT-TQm6702 GEN2 AT-TQ6602 GEN2 / AT-TQm6602 GEN2", "AT-TQ6702e GEN2", "AT-TQ6702 GEN2-R", "AT-TQ6602", "AT-TQ5403 / AT-TQm5403", or "AT-TQ5403e" is selected as the Model. |
| Area Authentication | Specify whether to use the Area Authentication function. When "Enable" is selected, the AWC Plug-in will make use of the Location Estimation function to find the wireless clients estimated to be in the specific area on the floor map and allow only these clients to connect to this VAP. Specify the area to permit the clients to connect to in the Floor Map Detail [Edit Area] screen in Floor Map menu separately. NoteThis item is displayed when "AT-TQ5403 / AT-TQm5403", "AT-TQ5403e", or "AT-TQ1402 / AT-TQm1402" is selected as the Model. Take note that "AT-TQ1402 / AT-TQm1402" does not support the Area Authentication in this version. NoteTo use the Area Authentication on a VAP defined in a AP Profile, the following conditions must be met: NoteArea Authentication cannot be used in combination with MAC Access Control. |
| Fast Roaming | Specify whether to use Fast Roaming of wireless clients. The default is "Disable". By selecting "Enable", the additional items described below will be displayed.
NoteThis item is displayed when "WPA Personal", "WPA Enterprise", or "OSEN" is selected for "Security" of the VAP. |
| Wireless Client Isolation | Specify whether to block communication between wireless clients connected to the same VAP. The choices for this item vary depending on the Model and "Radio Configuration" settings.
NoteThis item is displayed when "AT-TQ7613", "AT-TQ3403 / AT-TQm3403", "AT-TQ7403", "AT-TQ7403-R", "AT-TQ6403 GEN2 / AT-TQm6403 GEN2", "AT-TQ6702 GEN2 / AT-TQm6702 GEN2 AT-TQ6602 GEN2 / AT-TQm6602 GEN2", "AT-TQ6702e GEN2", "AT-TQ6702 GEN2-R", "AT-TQ5403 / AT-TQm5403", or "AT-TQ5403e" is selected as the Model. |
| Inactivity Timer | Specify the time, between 5 and 65535 seconds, after which a client will be disconnected if it disappears without disassociating from an AP. It should also be specified in multiples of 15. If you specify a value that is not a multiple of 15, it will be converted to the nearest multiple greater than the specified value. The default is 300 (seconds). NoteThis feature cannot be used with the OpenFlow feature. Use the default setting. NoteIf you select "AT-TQ6602" for the Model, the setting of this item in any VAP will take effect on the VAPs in the same radio band. NoteIf you select "AT-TQ1402 / AT-TQm1402" for the Model, this setting is not supported for Radio 1. Use the default setting. |
| Duplicate AUTH received | Select how to process connection requests from clients that have maintained a connection. If you select "Disconnect", it disconnects the previous connection and then accepts the new connection. If you select "Ignore", it connects as normal, without disconnecting. The default is "Disconnect". NoteThis item is displayed when "AT-TQ7613", "AT-TQ3403 / AT-TQm3403", "AT-TQ7403", "AT-TQ7403-R", "AT-TQ6403 GEN2 / AT-TQm6403 GEN2", "AT-TQ6702 GEN2 / AT-TQm6702 GEN2 AT-TQ6602 GEN2 / AT-TQm6602 GEN2", "AT-TQ6702e GEN2", "AT-TQ6702 GEN2-R", "AT-TQ5403 / AT-TQm5403", "AT-TQ5403e", or "AT-TQ1402 / AT-TQm1402" is selected as the Model. NoteThis feature cannot be used with the OpenFlow feature. Use the default setting. NoteWhen "Management Frame Protection" is set to "Enable", "Disconnect" is used regardless of this item's setting. |
| Association Advertisement | Specify whether to use Association Advertisement. When enabled, a notification broadcast frame is sent to the network configured in Control VLAN when a Wireless Client connects to the AP. The AP that receives this frame updates its wireless client connection information. The default is "Disable". NoteTo make this function take effect, APs on the same subnet must have "Roaming Notification" set to "Enable" for each other. |
| DTIM Period | Specify how frequently to insert a DTIM (Delivery Traffic Indication Map) in the AP's beacons (every 1 to 5 beacons).NoteThe default is 1. The value of 1 means that a DTIM is inserted in every beacon.This item is displayed when "AT-TQ7613", "AT-TQ3403 / AT-TQm3403", "AT-TQ7403", "AT-TQ7403-R", "AT-TQ6403 GEN2 / AT-TQm6403 GEN2", "AT-TQ6702 GEN2 / AT-TQm6702 GEN2 AT-TQ6602 GEN2 / AT-TQm6602 GEN2", "AT-TQ6702e GEN2", "AT-TQ6702 GEN2-R", "AT-TQ6602", "AT-TQ5403 / AT-TQm5403", or "AT-TQ5403e" is selected as the Model. For example, if you set the DTIM interval to 2, one in two beacons has a DTIM inserted (i.e. a beacon with a DTIM and one without a DTIM are transmitted in turn). When a wireless client operates in power-saving mode, DTIM notifies the client that there is a packet to send to the client. The AP will send the packet to the client once the client is ready to communicate. Increasing the DTIM interval reduces power consumption but also makes communication less responsive. |
| Proxy ARP | Specify whether to use Proxy ARP.
NoteThis item is displayed when "AT-TQ7613", "AT-TQ3403 / AT-TQm3403", "AT-TQ7403", "AT-TQ7403-R", "AT-TQ6403 GEN2 / AT-TQm6403 GEN2", "AT-TQ6702 GEN2 / AT-TQm6702 GEN2 AT-TQ6602 GEN2 / AT-TQm6602 GEN2", "AT-TQ6702e GEN2", "AT-TQ6702 GEN2-R", "AT-TQ6602", "AT-TQ5403 / AT-TQm5403", or "AT-TQ5403e" is selected as the Model. |
| Multicast to Unicast Conversion | Specify whether to convert multicast packets to unicast packets. The default is "Disable". When "Enabled" is selected, broadcast/multicast packets sent to associated wireless clients are converted to the unicast address of each client and sent, preventing packets from being sent to non-target clients. NoteEnabling this function may result in reduced throughput. NoteThis item is displayed when "AT-TQ7613", "AT-TQ3403 / AT-TQm3403", "AT-TQ7403", "AT-TQ7403-R", "AT-TQ6403 GEN2 / AT-TQm6403 GEN2", "AT-TQ6702 GEN2 / AT-TQm6702 GEN2 AT-TQ6602 GEN2 / AT-TQm6602 GEN2", "AT-TQ6702e GEN2", or "AT-TQ6702 GEN2-R" is selected as the Model. |
| Pre-allocated Airtime Percentage | When the Airtime Fairness in the Radio Configuration is set to "Manual", you can set the communication time (airtime) to be assigned in priority to this VAP.NoteThis item is displayed when selected "AT-TQ7613", "AT-TQ3403 / AT-TQm3403", "AT-TQ7403", "AT-TQ7403-R", "AT-TQ6403 GEN2 / AT-TQm6403 GEN2", "AT-TQ6702 GEN2 / AT-TQm6702 GEN2 AT-TQ6602 GEN2 / AT-TQm6602 GEN2", "AT-TQ6702e GEN2", or "AT-TQ6702 GEN2-R" as the Model, and "Manual" as the Airtime Fairness in Radio Configuration section. |
| Collect Unassociated Client List | Specifies whether or not to obtain a list of unregistered endpoints that have failed to authenticate to the RADIUS server in IES (Intelligent Edge Security). The default is "Disable". Select "Enable" to allow or deny connections for unregistered endpoints on Vista Manager EX. NoteThis setting is displayed when "AT-TQ7403-R" or "AT-TQ6702 GEN2-R" is selected as the Model. |
| Passpoint | Specify whether to use Passpoint (Hotspot 2.0). Passpoint is a feature developed by the Wi-Fi Alliance to create a seamless network. By using a wireless client that implements Passpoint, users can automatically sign up and roam within Passpoint-enabled networks without the hassle of having to sign up for each network. Users can also automatically connect to the network when they enter a Passpoint-enabled area. By selecting "Enable", the additional items for Passpoint described below will be displayed. For more details, refer to Additional Options for Passpoint. NoteTo enable Passpoint, WPA Enterprise must be used as security mode. When enabling this item, confirmation dialog will appear asking if you allow to change the security mode to WPA Enterprise to continue Passpoint setting. NoteThis item is displayed when "AT-TQ7613", "AT-TQ3403 / AT-TQm3403", "AT-TQ7403", "AT-TQ7403-R", "AT-TQ6403 GEN2 / AT-TQm6403 GEN2", "AT-TQ6702 GEN2 / AT-TQm6702 GEN2 AT-TQ6602 GEN2 / AT-TQm6602 GEN2", "AT-TQ6702e GEN2", "AT-TQ6702 GEN2-R", "AT-TQ5403 / AT-TQm5403", or "AT-TQ5403e" is selected as the Model. |
Additional Options for Security
◼ Static WEP ConfigurationSelecting "Static WEP" for Security will show you the following additional items:
| Item Name | Description |
|---|---|
| Key Length | Select the WEP key length. The default is 128bit.
|
| Key Type | Select a generation method for the WEP key. The default is "Hex".
|
| Key Index | Specify a key to use. The default is 1. |
| Security Key (WEP Key) | Enter a WEP key (in hex) or a seed of a key (in ASCII) according to the selected "Key Length" and "Key Type". You have to enter the same WEP key as the one specified by "Key Index" on the wireless client. |
| WEP Authentication Method | "Open System" is the recommended option here. The default is "Open System". It is recommended to use the default "Open System" for security.
|
◼ Enhanced Open Configuration
Selecting "Enhanced Open" for Security will show the following additional items:
| Item Name | Description |
|---|---|
| OWE | Uses Opportunistic Wireless Encryption (OWE) protocol for encryption. After open authentication, data between the wireless client and the AP is encrypted with 128-bit CCMP/AES encryption. Only "Enable" can be selected. |
| Management Frame Protection | Protects IEEE 802.11 management frames. Only "Required" can be selected. |
◼ Enhanced Open Transition Mode Configuration
Selecting "Enhanced Open Transition Mode" for Security will show the following additional items:
| Item Name | Description |
|---|---|
| OWE | Uses Opportunistic Wireless Encryption (OWE) protocol for encryption. After open authentication, data between the wireless client and the AP is encrypted with 128-bit CCMP/AES encryption. Only "Disable" is set for VAP1 and "Enable" is set for VAP2. |
| Management Frame Protection | Protects IEEE 802.11 management frames. It appears only in VAP2 and cannot be selected other than "Required". |
◼ WPA Personal Configuration
Selecting "WPA Personal" for Security will show you the following additional items:
| Item Name | Description | |||||||||||||||||||||
|---|---|---|---|---|---|---|---|---|---|---|---|---|---|---|---|---|---|---|---|---|---|---|
| Security Key (WPA-PSK) | Specify an encryption key for the VAP. The key should contain 8 to 63 alphanumeric and symbol characters. The key is case-sensitive. | |||||||||||||||||||||
| WPA Versions | Select the WPA version(s) to use. Select both for a mixed environment. In that case, the security level of the wireless network is the same as the older version. Available options vary depending on the selected Model.
NoteFor the model "AT-TQ7613", when a mode including IEEE 802.11be is selected, the WPA Version must be either "WPA3", or "WPA3 / WPA2". VAPs that do not meet the security requirements of Wi-Fi 7 operate using IEEE 802.11ax. |
|||||||||||||||||||||
| Encryption Protocol | Select the encryption protocol to use. Available options vary depending on the selected Model and WPA Version(s).
|
|||||||||||||||||||||
| Management Frame Protection | Specify whether to protect management frames from eavesdropping and forging. Available options vary depending on the selected Model.
|
|||||||||||||||||||||
| Broadcast Key Refresh Rate | Specify an interval at which to refresh the broadcast key that is sent to clients on the VAP. Specify an interval between 0 and 86400 (seconds). A value of 0 means that the key is never refreshed. The default is 0. |
◼ WPA Enterprise Configuration
Selecting "WPA Enterprise" for Security will show you the following additional items:
| Item Name | Description | |||||||||||||||||||||||||
|---|---|---|---|---|---|---|---|---|---|---|---|---|---|---|---|---|---|---|---|---|---|---|---|---|---|---|
| RADIUS Server Primary IP Address | Enter the IP address of the primary RADIUS server. (mandatory) If "AT-TQ7403-R" or "AT-TQ6702 GEN2-R" is selected as the Profile Type, the loopback address (127.0.0.1) can be specified by checking the "Use Local RADIUS Server" checkbox. |
|||||||||||||||||||||||||
| RADIUS Server Primary Secret | Enter the password to connect to the primary RADIUS server with 128 or less alphanumeric and symbol characters (including spaces). (required) | |||||||||||||||||||||||||
| RADIUS Server Secondary IP Address | Enter the IP address of the secondary RADIUS server. Leave it blank if you are not using a secondary RADIUS server. If "AT-TQ7403-R" or "AT-TQ6702 GEN2-R" is selected as the Profile Type, the loopback address (127.0.0.1) can be specified by checking the "Use Local RADIUS Server" checkbox. |
|||||||||||||||||||||||||
| RADIUS Server Secondary Secret | Enter the password to connect to the secondary RADIUS server with 128 or less alphanumeric and symbol characters (including spaces). Leave it blank if you are not using a secondary RADIUS server. | |||||||||||||||||||||||||
| Port Number | Enter a port number between 1 and 65535 on which the primary and secondary RADIUS server is listening. The default is 1812. | |||||||||||||||||||||||||
| Pre-authentication | When enabled and a client is about to roam, the source (current) AP forwards the client's pre-authentication information to the destination AP. The default is "Enable". This reduces the time required for authentication of roaming clients.NoteThis setting is displayed when Model other than "AT-TQ6602" is selected. NoteIf "AT-TQ7613", "AT-TQ3403 / AT-TQm3403", "AT-TQ7403", "AT-TQ6403 GEN2 / AT-TQm6403 GEN2", "AT-TQ6702 GEN2 / AT-TQm6702 GEN2 AT-TQ6602 GEN2 / AT-TQm6602 GEN2", "AT-TQ6702e GEN2", "AT-TQ5403 / AT-TQm5403", or "AT-TQ1402 / AT-TQm1402" is selected as the Model, this item can be set only for the VAP 1 on each radio band. When you select "Enable", this function is valid for all VAP. |
|||||||||||||||||||||||||
| WPA Versions | Select the WPA version(s) to use. Select both for a mixed environment. In that case, the security level of the wireless network is the same as the older version. Available options vary depending on the selected Model.
NoteFor the model "AT-TQ7613", when a mode including IEEE 802.11be is selected, the WPA Version must be either "WPA3", or "WPA3 / WPA2". VAPs that do not meet the security requirements of Wi-Fi 7 operate using IEEE 802.11ax. |
|||||||||||||||||||||||||
| Encryption Protocol | Select the encryption protocol to use. Available options vary depending on the selected Model and WPA Version(s).
|
|||||||||||||||||||||||||
| Management Frame Protection | Specify whether to protect management frames from eavesdropping and forging. Available options vary depending on the selected Model.
|
|||||||||||||||||||||||||
| Broadcast Key Refresh Rate | Specify an interval at which to refresh the broadcast key that is sent to clients on the VAP. Specify an interval between 0 and 86400 (seconds). A value of 0 means that the key is never refreshed. The default is 0. | |||||||||||||||||||||||||
| Session Key Refresh Rate | Specify an interval at which to refresh the unicast session key that is sent to clients on the VAP. Specify an interval between 0 and 86400 (seconds). A value of 0 means that the key is never refreshed. The default is 0. Because keys are generated for every session, there is little need to refresh the key, given that a strong encryption algorithm such as CCMP is used in "WPA Enterprise". A shorter interval may decrease the AP's performance. |
|||||||||||||||||||||||||
| Session Key Refresh Action | Select the action to be taken when the session key is updated, from "Reauthentication" or "Disconnection". The default is "Reauthentication". |
|||||||||||||||||||||||||
| Verify RADIUS packets | Specify whether RADIUS packet verification is performed.
NoteThis item is displayed when "AT-TQ7613", "AT-TQ3403 / AT-TQm3403", "AT-TQ7403", "AT-TQ7403-R", "AT-TQ6403 GEN2 / AT-TQm6403 GEN2", "AT-TQ6702 GEN2 / AT-TQm6702 GEN2 AT-TQ6602 GEN2 / AT-TQm6602 GEN2", "AT-TQ6702e GEN2", "AT-TQ6702 GEN2-R", "AT-TQ5403 / AT-TQm5403", or "AT-TQ5403e" is selected as the Model. TQ1402 and TQm1402 have this setting item, but are not supported. |
|||||||||||||||||||||||||
| RADIUS Accounting | Specify whether to use RADIUS accounting server to record the resources (such as connection time) used by each user. Select "Enable" to perform accounting. Otherwise select "Disable". The default is "Disable". | |||||||||||||||||||||||||
| RADIUS Accounting Port Number | Specify a port number on which the RADIUS accounting server is listening. This is valid only when RADIUS Accounting is enabled. The default is 1813. | |||||||||||||||||||||||||
| RADIUS Timeout | Specify the timeout period for a RADIUS Access-Request message with a value from 1 to 29 (unit: second). If no response is received after the packet is sent to the RADIUS server beyond the value of this setting, the access request is retransmitted or treated as an authentication failure. In this case, the total time for the transmission sequence of the specified number of times (first time + retransmission count) to the primary RADIUS server and secondary RADIUS server is set to 29 seconds or less. For example, the calculation is as follows:
NoteThis item is displayed when "TQ7613", "AT-TQ3403 / AT-TQm3403", "AT-TQ7403", "AT-TQ6403 GEN2 / AT-TQm6403 GEN2", "AT-TQ6702 GEN2 / AT-TQm6702 GEN2 AT-TQ6602 GEN2 / AT-TQm6602 GEN2", or "AT-TQ6702e GEN2" is selected as the Model. |
|||||||||||||||||||||||||
| RADIUS Retransmit | Specify the number of retransmissions of Access-Request messages to the RADIUS server with a value from 0 to 8 (unit: times). Together with the first transmission, a maximum of this setting plus one authentication request will be made to the RADIUS server. If primary and secondary RADIUS servers are configured, the primary RADIUS server will be sent this configuration plus one authentication request, and then the secondary RADIUS server will be sent this configuration plus one authentication request in the same manner. If there is no response to any of these authentication requests, it is treated as an authentication failure. The default is 1 (time). This means that up to two authentication requests will be made to the primary/secondary RADIUS servers, respectively. NoteThis item is displayed when "TQ7613", "AT-TQ3403 / AT-TQm3403", "AT-TQ7403", "AT-TQ6403 GEN2 / AT-TQm6403 GEN2", "AT-TQ6702 GEN2 / AT-TQm6702 GEN2 AT-TQ6602 GEN2 / AT-TQm6602 GEN2", or "AT-TQ6702e GEN2" is selected as the Model. |
|||||||||||||||||||||||||
| Retry Interval for Primary | Specify the time from 0 to 600 (in seconds) to return to the primary RADIUS server again after communication to the primary RADIUS server fails and the authentication destination falls back to the secondary RADIUS server.NoteThis item is displayed when "TQ7613", "AT-TQ3403 / AT-TQm3403", "AT-TQ7403", "AT-TQ6403 GEN2 / AT-TQm6403 GEN2", "AT-TQ6702 GEN2 / AT-TQm6702 GEN2 AT-TQ6602 GEN2 / AT-TQm6602 GEN2", or "AT-TQ6702e GEN2" is selected as the Model. |
|||||||||||||||||||||||||
| Dynamic VLAN | When enabled, the VLAN included in a RADIUS response is assigned to the user. When disabled, the VLAN configured for the VAP is always applied to the user regardless of the VLAN information in a RADIUS response. The default setting varies depending on the selected Model.
|
◼ OSEN Configuration
Selecting "OSEN" for Security will show you the following additional items:
| Item Name | Description |
|---|---|
| RADIUS Server Primary IP Address | Enter the IP address of the primary RADIUS server. (required) |
| RADIUS Server Primary Secret | Enter the password to connect to the primary RADIUS server with 128 or less alphanumeric and symbol characters (including spaces). (required) |
| RADIUS Server Secondary IP Address | Enter the IP address of the secondary RADIUS server. Leave it blank if you are not using a secondary RADIUS server. |
| RADIUS Server Secondary Secret | Enter the password to connect to the secondary RADIUS server with 128 or less alphanumeric and symbol characters (including spaces). Leave it blank if you are not using a secondary RADIUS server. |
| Port Number | Enter a port number between 1 and 65535 on which the primary and secondary RADIUS server is listening. The default is 1812. |
| Pre-authentication | When enabled and a client is about to roam, the source (current) AP forwards the client's pre-authentication information to the destination AP. The default is "Enable". This reduces the time required for authentication of roaming clients.NoteThis can be configured only on VAP1 of each radio. When you select "Enable", this function is valid for all VAP. |
| WPA Versions | Select the WPA version(s) to use. Radio 2: You can select "WPA3" only, "WPA2" only, or both "WPA" and "WPA2". You cannot select both "WPA3" and "WPA2", or both "WPA3" and "WPA". Additionally, "WPA" can be selected only together with "WPA2". The default is "WPA2". Select both for a mixed environment. In that case, the security level of the wireless network is the same as WPA. NoteWPA is based on a draft of IEEE 802.11i while WPA2 is based on the final version of IEEE 802.11i and therefore meets all mandatory items required by the standard. |
| Encryption Protocol | You can select "CCMP" only, or both "TKIP" and "CCMP". The default is "CCMP". Although "TKIP" uses RC4 as WEP does, TKIP uses a separate encryption key for each client and changes the key after using it for some time. "CCMP" uses the standard encryption algorithm approved by the US Secretary of Commerce. This standard has a strong algorithm. NoteAccording to the WPA standard, TKIP is mandatory while CCMP is optional. Our products implement both algorithms. NoteIf the WPA version includes "WPA3", only "CCMP" can be selected. "TKIP" is not displayed. NoteIf the WPA version is set to "WPA2", or both "WPA2" and "WPA", "TKIP" can be selected as necessary. |
| Management Frame Protection | Specify whether to protect management frames from eavesdropping and forging. The following configuration can be set depending on the choice of WPA version.
NoteIf the Model is set to "AT-TQ6702 GEN2 / AT-TQm6702 GEN2 AT-TQ6602 GEN2 / AT-TQm6602 GEN2", and the WPA version is set to "WPA2" solely, please do not set to "Required". |
| Broadcast Key Refresh Rate | Specify an interval at which to refresh the broadcast key that is sent to clients on the VAP. Specify an interval between 0 and 86400 (seconds). A value of 0 means that the key is never refreshed. The default is 0. |
| Dynamic VLAN | When enabled, the VLAN included in a RADIUS response is assigned to the user. When disabled, the VLAN configured for the VAP is always applied to the user regardless of the VLAN information in a RADIUS response. The default is "Enable". |
Additional Options for Captive Portal
◼ External RADIUS ConfigurationIf you select "External RADIUS" for Captive Portal, configure the following items:
| Item Name | Description |
|---|---|
| Authentication Page Proxy | Specify whether to use an external authentication page or not.
|
| RADIUS Server Primary IP Address | Enter the IP address of the primary RADIUS server. (mandatory) If "AT-TQ7403-R" or "AT-TQ6702 GEN2-R" is selected as the Profile Type, the loopback address (127.0.0.1) can be specified by checking the "Use Local RADIUS Server" checkbox. |
| RADIUS Server Primary Secret | Enter the password to connect to the primary RADIUS server with 128 or less alphanumeric and symbol characters (including spaces). (required) |
| RADIUS Server Secondary IP Address | Enter the IP address of the secondary RADIUS server. Leave it blank if you are not using a secondary RADIUS server. If "AT-TQ7403-R" or "AT-TQ6702 GEN2-R" is selected as the Profile Type, the loopback address (127.0.0.1) can be specified by checking the "Use Local RADIUS Server" checkbox. |
| RADIUS Server Secondary Secret | Enter the password to connect to the secondary RADIUS server with 128 or less alphanumeric and symbol characters (including spaces). Leave it blank if you are not using a secondary RADIUS server. |
| RADIUS Server Port Number | Enter a port number between 1 and 65535 on which the primary and secondary RADIUS server is listening to. The default is 1812. |
| Verify RADIUS packets | Specify whether RADIUS packet verification is performed.
NoteThis item is displayed when "AT-TQ7613", "AT-TQ3403 / AT-TQm3403", "AT-TQ7403", "AT-TQ7403-R", "AT-TQ6403 GEN2 / AT-TQm6403 GEN2", "AT-TQ6702 GEN2 / AT-TQm6702 GEN2 AT-TQ6602 GEN2 / AT-TQm6602 GEN2", "AT-TQ6702e GEN2", "AT-TQ6702 GEN2-R", "AT-TQ5403 / AT-TQm5403", or "AT-TQ5403e" is selected as the Model. TQ1402 and TQm1402 have this setting item, but are not supported. |
| RADIUS Accounting | Specify whether to use the RADIUS Accounting.
NoteThis item is displayed when "AT-TQ7613", "AT-TQ3403 / AT-TQm3403", "AT-TQ7403", "AT-TQ7403-R", "AT-TQ6403 GEN2 / AT-TQm6403 GEN2", "AT-TQ6702 GEN2 / AT-TQm6702 GEN2 AT-TQ6602 GEN2 / AT-TQm6602 GEN2", "AT-TQ6702e GEN2", "AT-TQ6702 GEN2-R", "AT-TQ602", "AT-TQ5403 / AT-TQm5403", "AT-TQ5403e", or "AT-TQ1402 / AT-TQm1402" is selected as the Model. |
| Redirect type (after user is authenticated) | Specify a page to be shown after the user passes web authentication.
|
| Walled Garden | Shows the number of entries on the page that use the Walled Garden feature. The Walled Garden feature allows you to specify which pages can be viewed by users who have not yet completed the authentication. If trying to view a page other than specified, the Captive Portal page will appear again. Clicking on this will bring up the "Walled Garden List" dialog box.
NoteThis item is displayed when "AT-TQ7613", "AT-TQ3403 / AT-TQm3403", "AT-TQ7403", "AT-TQ7403-R", "AT-TQ6403 GEN2 / AT-TQm6403 GEN2", "AT-TQ6702 GEN2 / AT-TQm6702 GEN2 AT-TQ6602 GEN2 / AT-TQm6602 GEN2", "AT-TQ6702e GEN2", "AT-TQ6702 GEN2-R", "AT-TQ6602", "AT-TQ5403 / AT-TQm5403", or "AT-TQ5403e" is selected as the Model. |
| DNS Proxy for Walled Garden | Specifies whether DNS proxying is performed in the walled garden.
NoteThis setting is displayed when "AT-TQ7403", "AT-TQ6702 GEN2 / AT-TQ6602 GEN2 / AT-TQ6702e GEN2" or "AT-TQ6702 GEN2-R" is selected as Model. |
| Virtual IP Address for Captive Portal | Shows the setting you made on the "Virtual IP Address for Captive Portal" in "Basic Configuration" section. By clicking on the link icon, you can jump to the section.NoteThis item is displayed when "AT-TQ7613", "AT-TQ3403 / AT-TQm3403", "AT-TQ7403", "AT-TQ6403 GEN2 / AT-TQm6403 GEN2", "AT-TQ6702 GEN2 / AT-TQm6702 GEN2 AT-TQ6602 GEN2 / AT-TQm6602 GEN2", "AT-TQ6702e GEN2", "AT-TQ6602", "AT-TQ5403 / AT-TQm5403", or "AT-TQ5403e" is selected as the Model. |
| Session Timeout | Specify the client's authentication session timeout; between 0 and 86400 (seconds). After the client is successfully authenticated, the session will be automatically terminated when the time set for timeout elapses. The default is 3600. |
| Session Timeout Action | Select the action to be taken when the session is timed out, from "Reauthentication" or "Disconnection". The default is "Reauthentication". |
◼ Click-through Configuration
If you select "Click-through" for Captive Portal, configure the following items:
| Item Name | Description |
|---|---|
| Authentication Page Proxy | Specify whether to use an external authentication page or not.
NoteThis item is displayed when "AT-TQ7613", "AT-TQ3403 / AT-TQm3403", "AT-TQ7403", "AT-TQ7403-R", "AT-TQ6403 GEN2 / AT-TQm6403 GEN2", "AT-TQ6702 GEN2 / AT-TQm6702 GEN2 AT-TQ6602 GEN2 / AT-TQm6602 GEN2", "AT-TQ6702e GEN2", "AT-TQ6702 GEN2-R", "AT-TQ602", "AT-TQ5403 / AT-TQm5403", "AT-TQ5403e", or "AT-TQ1402 / AT-TQm1402" is selected as the Model. |
| Redirect type (after user is authenticated) | Specify a page to be shown after the user passes web authentication.
|
| Walled Garden | Shows the number of entries on the page that use the Walled Garden feature. The Walled Garden feature allows you to specify which pages can be viewed by users who have not yet completed the authentication. If trying to view a page other than specified, the Captive Portal page will appear again. Clicking on this will bring up the "Walled Garden List" dialog box.
NoteThis item is displayed when "AT-TQ7613", "AT-TQ3403 / AT-TQm3403", "AT-TQ7403", "AT-TQ7403-R", "AT-TQ6403 GEN2 / AT-TQm6403 GEN2", "AT-TQ6702 GEN2 / AT-TQm6702 GEN2 AT-TQ6602 GEN2 / AT-TQm6602 GEN2", "AT-TQ6702e GEN2", "AT-TQ6702 GEN2-R", "AT-TQ6602", "AT-TQ5403 / AT-TQm5403", or "AT-TQ5403e" is selected as the Model. |
| DNS Proxy for Walled Garden | Specifies whether DNS proxying is performed in the walled garden.
NoteThis setting is displayed when "AT-TQ7403", "AT-TQ6702 GEN2 / AT-TQ6602 GEN2 / AT-TQ6702e GEN2" or "AT-TQ6702 GEN2-R" is selected as Model. |
| Virtual IP Address for Captive Portal | Shows the setting you made on the "Virtual IP Address for Captive Portal" in "Basic Configuration" section. By clicking on the link icon, you can jump to the section.NoteThis item is displayed when "AT-TQ7613", "AT-TQ3403 / AT-TQm3403", "AT-TQ7403", "AT-TQ6403 GEN2 / AT-TQm6403 GEN2", "AT-TQ6702 GEN2 / AT-TQm6702 GEN2 AT-TQ6602 GEN2 / AT-TQm6602 GEN2", "AT-TQ6702e GEN2", "AT-TQ6602", "AT-TQ5403 / AT-TQm5403", or "AT-TQ5403e" is selected as the Model. |
| Session Timeout | Specify the client's authentication session timeout; between 0 and 86400 (seconds). After the client is successfully authenticated, the session will be automatically terminated when the time set for timeout elapses. The default is 3600. |
| Session Timeout Action | Select the action to be taken when the session is timed out, from "Reauthentication" or "Disconnection". The default is "Reauthentication". |
◼ External Page Redirect Configuration
If you have selected "External Page Redirect" on the Captive Portal, you will need to configure the following items.
| Item Name | Description |
|---|---|
| External Page URL | Enter the URL to which the APs redirect the users with 1 to 128 alphanumeric characters. The default is empty. |
| RADIUS Server Primary IP Address | Enter the IP address of the primary RADIUS server. (mandatory) If "AT-TQ7403-R" or "AT-TQ6702 GEN2-R" is selected as the Profile Type, the loopback address (127.0.0.1) can be specified by checking the "Use Local RADIUS Server" checkbox. |
| RADIUS Server Primary Secret | Enter the password to connect to the primary RADIUS server with 128 or less alphanumeric and symbol characters. (mandatory) If "AT-TQ7403-R" or "AT-TQ6702 GEN2-R" is selected as the Profile Type, the loopback address (127.0.0.1) can be specified by checking the "Use Local RADIUS Server" checkbox. |
| RADIUS Server Secondary IP Address | Enter the IP address of the secondary RADIUS server. Leave it blank if you are not using a secondary RADIUS server. |
| RADIUS Server Secondary Secret | Enter the password to connect to the secondary RADIUS server with 128 or less alphanumeric and symbol characters. Leave it blank if you are not using a secondary RADIUS server. |
| RADIUS Server Port Number | Enter a port number between 1 and 65535 on which the primary and secondary RADIUS server is listening to. The default is 1812. |
| Verify RADIUS packets | Specify whether RADIUS packet verification is performed.
NoteThis item is displayed when "AT-TQ7613", "AT-TQ3403 / AT-TQm3403", "AT-TQ7403", "AT-TQ7403-R", "AT-TQ6403 GEN2 / AT-TQm6403 GEN2", "AT-TQ6702 GEN2 / AT-TQm6702 GEN2 AT-TQ6602 GEN2 / AT-TQm6602 GEN2", "AT-TQ6702e GEN2", "AT-TQ6702 GEN2-R", "AT-TQ5403 / AT-TQm5403", or "AT-TQ5403e" is selected as the Model. TQ1402 and TQm1402 have this setting item, but are not supported. |
| RADIUS Accounting | Specify whether to use the RADIUS Accounting.
|
| Redirect type (after user is authenticated) | Specify a page to be shown after the user passes web authentication.
|
| Walled Garden | Shows the number of entries on the page that use the Walled Garden feature. The Walled Garden feature allows you to specify which pages can be viewed by users who have not yet completed the authentication. If trying to view a page other than specified, the Captive Portal page will appear again. Clicking on this will bring up the "Walled Garden List" dialog box.
NoteThis item is displayed when "AT-TQ7613", "AT-TQ3403 / AT-TQm3403", "AT-TQ7403", "AT-TQ7403-R", "AT-TQ6403 GEN2 / AT-TQm6403 GEN2", "AT-TQ6702 GEN2 / AT-TQm6702 GEN2 AT-TQ6602 GEN2 / AT-TQm6602 GEN2", "AT-TQ6702e GEN2", "AT-TQ6702 GEN2-R", "AT-TQ6602", "AT-TQ5403 / AT-TQm5403", or "AT-TQ5403e" is selected as the Model. |
| DNS Proxy for Walled Garden | Specifies whether DNS proxying is performed in the walled garden.
NoteThis setting is displayed when "AT-TQ7403", "AT-TQ6702 GEN2 / AT-TQ6602 GEN2 / AT-TQ6702e GEN2" or "AT-TQ6702 GEN2-R" is selected as Model. |
| Virtual IP Address for Captive Portal | Shows the setting you made on the "Virtual IP Address for Captive Portal" in "Basic Configuration" section. By clicking on the link icon, you can jump to the section.NoteThis item is displayed when "AT-TQ7613", "AT-TQ3403 / AT-TQm3403", "AT-TQ7403", "AT-TQ6403 GEN2 / AT-TQm6403 GEN2", "AT-TQ6702 GEN2 / AT-TQm6702 GEN2 AT-TQ6602 GEN2 / AT-TQm6602 GEN2", "AT-TQ6702e GEN2", "AT-TQ6602", "AT-TQ5403 / AT-TQm5403", or "AT-TQ5403e" is selected as the Model. |
| Session Timeout | Specify the client's authentication session timeout; between 0 and 86400 (seconds). After the client is successfully authenticated, the session will be automatically terminated when the time set for timeout elapses. The default is 3600. |
| Session Timeout Action | Select the action to be taken when the session is timed out, from "Reauthentication" or "Disconnection". The default is "Reauthentication". |
Additional Options for MAC Access Control
◼ When "MAC Address List" or "MAC Address List + External RADIUS" is selected| Item Name | Description |
|---|---|
| Selected List | Select a MAC Address List (a whitelist or a blacklist). The operation of this function depends on the profile Model.
|
| Two-step auth with Captive Portal | When any authentication method except "None" is selected for Captive Portal, the authentication will be performed in two steps: Captive Portal and MAC Access Control.
NoteThis item is displayed when "AT-TQ7613", "AT-TQ3403 / AT-TQm3403", "AT-TQ7403", "AT-TQ6403 GEN2 / AT-TQm6403 GEN2", "AT-TQ6702 GEN2 / AT-TQm6702 GEN2 AT-TQ6602 GEN2 / AT-TQm6602 GEN2", "AT-TQ6702e GEN2", "AT-TQ5403 / AT-TQm5403", or "AT-TQ5403e" is selected as the Model. |
◼ When "External RADIUS" or "MAC Address List + External RADIUS" is selected
| Item Name | Description |
|---|---|
| RADIUS Server Primary IP Address | Enter the IP address of the primary RADIUS server. (mandatory) If "AT-TQ7403-R" or "AT-TQ6702 GEN2-R" is selected as the Profile Type, the loopback address (127.0.0.1) can be specified by checking the "Use Local RADIUS Server" checkbox. |
| RADIUS Server Primary Secret | Enter the password to connect to the primary RADIUS server with 128 or less alphanumeric and symbol characters. |
| RADIUS Server Secondary IP Address | Enter the IP address of the secondary RADIUS server. Leave it blank if you are not using a secondary RADIUS server. If "AT-TQ7403-R" or "AT-TQ6702 GEN2-R" is selected as the Profile Type, the loopback address (127.0.0.1) can be specified by checking the "Use Local RADIUS Server" checkbox. |
| RADIUS Server Secondary Secret | Enter the password to connect to the secondary RADIUS server with 128 or less alphanumeric and symbol characters. Leave it blank if you are not using a secondary RADIUS server. |
| Port Number | Enter a port number between 1 and 65535 on which the primary and secondary RADIUS server is listening to. The default is 1812. |
| Verify RADIUS packets | Specify whether RADIUS packet verification is performed.
NoteThis item is displayed when "AT-TQ7613", "AT-TQ3403 / AT-TQm3403", "AT-TQ7403", "AT-TQ7403-R", "AT-TQ6403 GEN2 / AT-TQm6403 GEN2", "AT-TQ6702 GEN2 / AT-TQm6702 GEN2 AT-TQ6602 GEN2 / AT-TQm6602 GEN2", "AT-TQ6702e GEN2", "AT-TQ6702 GEN2-R", "AT-TQ5403 / AT-TQm5403", or "AT-TQ5403e" is selected as the Model. TQ1402 and TQm1402 have this setting item, but are not supported. |
| RADIUS Timeout | Specify the timeout period for a RADIUS Access-Request message with a value from 1 to 29 (unit: second). If no response is received after the packet is sent to the RADIUS server beyond the value of this setting, the access request is retransmitted or treated as an authentication failure. In this case, the total time for the transmission sequence of the specified number of times (first time + retransmission count) to the primary RADIUS server and secondary RADIUS server is set to 29 seconds or less. For example, the calculation is as follows:
NoteThis item is displayed when "TQ7613", "AT-TQ3403 / AT-TQm3403", "AT-TQ7403", "AT-TQ6403 GEN2 / AT-TQm6403 GEN2", "AT-TQ6702 GEN2 / AT-TQm6702 GEN2 AT-TQ6602 GEN2 / AT-TQm6602 GEN2", or "AT-TQ6702e GEN2" is selected as the Model. |
| RADIUS Retransmit | Specify the number of retransmissions of Access-Request messages to the RADIUS server with a value from 0 to 8 (unit: times). Together with the first transmission, a maximum of this setting plus one authentication request will be made to the RADIUS server. If primary and secondary RADIUS servers are configured, the primary RADIUS server will be sent this configuration plus one authentication request, and then the secondary RADIUS server will be sent this configuration plus one authentication request in the same manner. If there is no response to any of these authentication requests, it is treated as an authentication failure. The default is 1 (time). This means that up to two authentication requests will be made to the primary/secondary RADIUS servers, respectively. NoteThis item is displayed when "TQ7613", "AT-TQ3403 / AT-TQm3403", "AT-TQ7403", "AT-TQ6403 GEN2 / AT-TQm6403 GEN2", "AT-TQ6702 GEN2 / AT-TQm6702 GEN2 AT-TQ6602 GEN2 / AT-TQm6602 GEN2", or "AT-TQ6702e GEN2" is selected as the Model. |
| Retry Interval for Primary | Specify the time from 0 to 600 (in seconds) to return to the primary RADIUS server again after communication to the primary RADIUS server fails and the authentication destination falls back to the secondary RADIUS server.NoteThis item is displayed when "TQ7613", "AT-TQ3403 / AT-TQm3403", "AT-TQ7403", "AT-TQ6403 GEN2 / AT-TQm6403 GEN2", "AT-TQ6702 GEN2 / AT-TQm6702 GEN2 AT-TQ6602 GEN2 / AT-TQm6602 GEN2", or "AT-TQ6702e GEN2" is selected as the Model. |
| User-Name Format Separator | A client's MAC address is sent to the RADIUS server as a User-Name attribute. Specify an octet delimiter to use in a User-Name attribute from "Hyphen", "Colon" and "None". The default is "Hyphen". |
| User-Name Format Letter Case | Specify which case to use in a User-Name attribute from "Upper" and "Lower". The default is "Lower". |
| User-Password Format | Specify what is used for a User-Password attribute when a client MAC address is sent to the RADIUS server for authentication. The default is "User Name".
|
| User-Password Format Password | Specify a fixed password string which is used when "User-Password Format Type" is set to "Fixed Password". |
| Dynamic VLAN | When enabled, the VLAN included in a RADIUS response is assigned to the user. When disabled, the VLAN configured for the VAP is always applied to the user regardless of the VLAN information in a RADIUS response. The default is "Enable". NoteThis item is displayed when "AT-TQ7403", "AT-TQ7403-R", "AT-TQ6403 GEN2 / AT-TQm6403 GEN2", "AT-TQ6702 GEN2 / AT-TQm6702 GEN2 AT-TQ6602 GEN2 / AT-TQm6602 GEN2", "AT-TQ6702e GEN2", or "AT-TQ6702 GEN2-R" is selected as the Model. |
| Two-step auth with Captive Portal | When any authentication method except "None" is selected for Captive Portal, the authentication will be performed in two steps: Captive Portal and MAC Access Control.
NoteThis item is displayed when "AT-TQ7613", "AT-TQ3403 / AT-TQm3403", "AT-TQ7403", "AT-TQ6403 GEN2 / AT-TQm6403 GEN2", "AT-TQ6702 GEN2 / AT-TQm6702 GEN2 AT-TQ6602 GEN2 / AT-TQm6602 GEN2", "AT-TQ6702e GEN2", "AT-TQ5403 / AT-TQm5403", or "AT-TQ5403e" is selected as the Model. |
| Service Type | Whether to configure to inform the RADIUS server of the Service-Type attribute. When "Enable", Call-Check (10) is reported as the Service-Type attribute, indicating that MAC-based authentication is being performed. The default is "Disable". NoteThis setting is displayed when "AT-TQ7403-R" or "AT-TQ6702 GEN2-R" is selected as the Model, and "STOAT" in the Basic Configuration is enabled. |
| Vista Manager EX IP Address | When using the Intelligent Edge Security (IES) feature with the Vista Manager EX, specify the IP address of the Vista Manager EX server. When an Endpoint (wireless client) is denied communication on the Vista Manager EX, the Vista Manager EX sends a RADIUS Dynamic Authorization (Disconnect) message to the wireless AP that is the RADIUS client. The AP needs to set the IP address and shared secret of the Vista Manager EX so that the AP as a RADIUS client can verify that this message is valid. Leave blank if the IES feature is not used. NoteThis setting is displayed when "AT-TQ7403-R" or "AT-TQ6702 GEN2-R" is selected as the Model, and "STOAT" in the Basic Configuration is enabled. |
| Vista Manager EX Shared Secret | When using the Intelligent Edge Security (IES) feature with the Vista Manager EX, specify the shared secret used to authenticate the Vista Manager EX. Leave blank if the IES feature is not used. NoteThis setting is displayed when "AT-TQ7403-R" or "AT-TQ6702 GEN2-R" is selected as the Model, and "STOAT" in the Basic Configuration is enabled. |
- User-Name ab-cd-ef-12-34-56
- User-Password ab-cd-ef-12-34-56
◼ When "AMF Application Proxy" is selected:
Specify the information of AMF Application Proxy server which contains the device list to allow, deny, or quarantine.
| Item Name | Description |
|---|---|
| Redirect-URL | Specifies whether the wireless client detected as a "suspected node" by the AMF Application Proxy server is forwarded to the external page URL.
Normally, when a user of a suspected node tries to access a website, the loading session of the web page times out and the user cannot know the reason for the denial of access. By using Redirect-URL function, Web access from the user in question can be redirected to a pre-designated URL, and by preparing a page explaining the situation at the same URL, the reason for the block and contact information can be provided to the user. NoteWeb page used in Redirect-URL should not be placed on a server that handles sensitive information. NoteThis item is displayed when "AT-TQ6702 GEN2 / AT-TQm6702 GEN2 AT-TQ6602 GEN2 / AT-TQm6602 GEN2", "AT-TQ5403 / AT-TQm5403", or "AT-TQ5403e" is selected as the Model. NoteRedirect-URL cannot be used in conjunction with Captive Portal. NoteIf the suspected node uses HTTPS instead of HTTP for access, the user of the node may see screens such as "Your connection is not private", "Your connection is not secure", "Connect to Wi-Fi hotspot", "Connect to Wi-Fi", or "Log in to network". In that case, the user will be redirected to the Redirect-URL page by selecting Refresh, Reload or Connect button on her/his Web browser. |
| External Page URL | Enter the URL to be redirected to using 1 to 128 alphanumeric characters (including spaces). The default is empty. |
| AMF Application Proxy Server Primary IP Address | Enter the IP address of the primary AMF Application Proxy server. (required) |
| AMF Application Proxy Server Primary Secret | Enter the pre-shared key to connect to the primary AMF Application Proxy server using up to 128 alphanumeric characters (including spaces). |
| AMF Application Proxy Server Secondary IP Address | Enter the IP address of the secondary AMF Application Proxy server. Leave blank you are not using a secondary AMF Application Proxy server.NoteIn this version, the secondary AMF Application Server is not available. |
| AMF Application Proxy Server Secondary Secret | Enter the pre-shared key to connect to the secondary AMF Application Proxy server using up to 128 alphanumeric characters (including spaces). Leave blank you are not using a secondary AMF Application Proxy server.NoteIn this version, the secondary AMF Application Server is not available. |
| AMF Application Proxy Server Port Number | Enter a port number between 1 and 65535 on which the primary and secondary AMF Application Proxy server is listening. The default is 1812. |
| Verify RADIUS packets | Specify whether RADIUS packet verification is performed.
NoteThis item is displayed when "AT-TQ7613", "AT-TQ3403 / AT-TQm3403", "AT-TQ7403", "AT-TQ7403-R", "AT-TQ6403 GEN2 / AT-TQm6403 GEN2", "AT-TQ6702 GEN2 / AT-TQm6702 GEN2 AT-TQ6602 GEN2 / AT-TQm6602 GEN2", "AT-TQ6702e GEN2", "AT-TQ6702 GEN2-R", "AT-TQ5403 / AT-TQm5403", or "AT-TQ5403e" is selected as the Model. |
| Critical Mode | Specify whether to enable or disable Critical Mode. The default is "Disable".
|
| Two-step auth with Captive Portal | When any authentication method except "None" is selected for Captive Portal, the authentication will be performed in two steps: Captive Portal and MAC Access Control. Only the supplicants (wireless clients) which have been granted by both MAC Access Control, then Captive Portal, will be able to communicate via the relevant VAP. When AMF Application Proxy is selected, only "Enable" is displayed for the option of Two-step auth with Captive Portal. NoteThis item is displayed when "AT-TQ7613", "AT-TQ3403 / AT-TQm3403", "AT-TQ7403", "AT-TQ6403 GEN2 / AT-TQm6403 GEN2", "AT-TQ6702 GEN2 / AT-TQm6702 GEN2 AT-TQ6602 GEN2 / AT-TQm6602 GEN2", "AT-TQ6702e GEN2", "AT-TQ5403 / AT-TQm5403", or "AT-TQ5403e" is selected as the Model. |
NoteWhen using the dynamic VLAN feature of WPA Enterprise together, if a VLAN is assigned by the RADIUS server, the wireless device will be assigned to the VLAN ID of the dynamic VLAN.
If a VLAN is not assigned by the RADIUS server, the wireless device will be assigned to the VLAN ID specified by the AMF Application Server. If a VLAN is neither assigned by the RADIUS server nor assigned by the security policy on the AMF Application Proxy server, the wireless device will be assigned to the VLAN ID of VAP.
If the action on the AMF application proxy server side is quarantine, the VLAN ID of quarantine network will be applied regardless whether the dynamic VLAN has a VLAN ID or not
NoteWhen using the Dynamic VLAN feature of WPA Enterprise together, the VLAN IDs of wireless clients already connected to the network will not be changed even if the VLAN ID of the network specified in the security policy of the AMF application proxy server is changed.
NoteIf a wireless client already connected to a quarantine VLAN is allowed by the AMF application proxy server to connect to the VLAN ID of the network specified in the security policy, the VLAN ID of the wireless client will be changed to the VLAN ID of the network specified in the security policy.
However, if a high-priority action results in an assignment from one quarantine VLAN to another quarantine VLAN, the VLAN ID to which the wireless client belongs will not change.
NoteMAC Access Control with AMF Application Proxy cannot be used with channel blanket. If you want to use the AP as part of a channel blanket, do not assign the AP profile which the MAC Access Control with AMF Application Proxy is enabled.
Additional Options for Fast Roaming
| Item Name | Description |
|---|---|
| 802.11r FT | Specify whether to use IEEE 802.11r (Fast Basic Service Set Transition). When enabled, wireless clients can do IEEE 802.11r fast transition when roaming from one AP to another. The default is "Disable". An AP profile that contains VAPs using both WPA Enterprise and Fast Transition behaves as follows:
|
| FT over DS | Specify whether to request authentication via distributed system (DS).
NoteFast roaming with FT over DS enabled is not supported on TQ7403 Radio 3. When "AT-TQ7403" is selected for the Model, set this item to "Disable" to use the Fast Roaming function on Radio 3. |
| Mobility Domain | Specify a mobility domain with 4 hexadecimal digits (0 to 9, A to F, a to f). This is not case-sensitive. A wireless client can perform IEEE 802.11r fast transition between the APs in the same mobility domain. The default is "a1b2". |
| R0 key Lifetime | Specify a PMK-R0 lifetime, between 1 and 65535 minutes. Once the lifetime expires, IEEE 802.11r fast transition is not performed. The default is 10000. |
| AES Key | Specify an AES key that is used to exchange PMK-R1 between APs with 32 hexadecimal digits (0 to 9, A to F, a to f). This is not case-sensitive. The default is empty.NoteThis is mandatory for every function in the "Fast Roaming" section. Configure this item even if you only use IEEE 802.11k or IEEE 802.11v and you are not going to use IEEE 802.11r fast transition. |
| 802.11k RRM | Specify whether to use IEEE 802.11k RRM (Radio Resource Management). The default is "Disable". When "AT-TQ6702 GEN2 / AT-TQm6702 GEN2 AT-TQ6602 GEN2 / AT-TQm6602 GEN2", "AT-TQ6702e GEN2", or "AT-TQ6602" is selected for the Model, the 802.11k RRM setting for VAP 1 is also applied to VAP 2 through VAP 16. When you want to use "IEEE 802.11k RRM" enabled on any of VAP 2 to 16, enable it on VAP 1. |
| 802.11v WNM | Specify whether to use IEEE 802.11v WNM (Wireless Network Management). The default is "Disable". |
Additional Options for Proxy ARP
| Item Name | Description |
|---|---|
| Transmit Unlearned ARP Packet | Specify whether to transmit unlearned ARP Packet. The default is "Disable", which discards ARP requests addressed to wireless clients not connected to the AP and does not flood the wireless output. For the Proxy ARP to work, an AP must learn IP information of connected wireless clients, and learning is performed by one of the following frames. Wireless clients that do not send the these frames will not be learned in the AP's ARP table and will not be able to communicate.
*2 When the relevant frame from the wireless client is sent. When set to "Enable", an ARP request addressed to an IP address not learned in the AP's ARP table will be flooded to the wireless output to attempt address resolution. It can prevent some wireless clients from missing learning, but instead consumes wireless bandwidth as more queries for unlearned IP addresses are made. |
Additional Options for Passpoint
| Item Name | Description |
|---|---|
| Access Network Type | Specify a network type.
|
| Internet Access | Specify whether the access to the Internet is enabled or disabled. The default is "Enable". |
| Homogeneous ESS Identifier(HESSID) | Specify the same ESSID as the other APs in the Passpoint network. MAC address is in the format xx:xx:xx:xx:xx:xx (where x is a hexadecimal number). The default is "00:00:00:00:00:00", which is regarded as "value omitted" by the wireless AP. |
| Roaming Consortium List | Specify a list of Organization Indicators (OIs). A single OI can be specified in hexadecimal numbers from 3 to 15 octets, and not more than 100 octets in a whole list. The number of OIs that can be registered is limited to 15, separated by commas (,) (e.g. 021122,2233445566). Please specify the OI as an even number of digits. When specifying an odd-numbered OI, enter it as an even-numbered digit by adding a leading "0(zero)". For example, "1234567" becomes "01234567". When specifying a value of less than 3 octets, pad leading zeros so that the value is at least 6 digits long. For example, "123" becomes "000123". The default is empty. This item is an optional setting when "AT-TQ6702 GEN2 / AT-TQm6702 GEN2 AT-TQ6602 GEN2 / AT-TQm6602 GEN2" is specified as the Model. |
| Domain Name | Specify the domain name(s) used for the certificate with up to 100 characters in length. To specify more than one domain, separate them with a comma (,). The default is empty. |
| 3GPP Cellular Network Information | Specify the 3GPP Cellular Network Information. The default is empty. |
| NAI Realm Information 1 - 5 NAI Realm |
Specify the NAI Realm in FQDN format. To specify more than one, separate them with a semicolon (;). |
| NAI Realm Information 1 - 5 EAP Method |
Select the EAP Method to use for the NAI Realm with the same number from following list (multiple choices area allowed).
|
| Operator Friendly Name | The name of the operator providing the service, as a display language/string pair. You can register pairs in several languages. |
| Disable Downstream Group-Addressed Forwarding(DGAF) | Specify whether to disable sending multicast and broadcast frames. By selecting "Enable", these frames will not be sent. The default is "Disable". |
| L2 Traffic Inspection and Filtering | Specify whether to discard L2 traffic (ARP, ICMP, TDKS) between VAPs. By selecting "Enable", these traffic will be discarded. The default is "Disable". |
Network Configuration
For models "AT-TQ7403-R" and "AT-TQ6702 GEN2-R", configure the 802.1Q sub-interfaces and bridge groups on the bridge interface in "Network Configuration".Here you can make settings across all radio bands, regardless of whether you choose the "Radio 1", "Radio 2", or "Radio 3" at the top of the screen.
Overview
When communicating from a VAP to other VAPs or other wired-connected devices, the following two major methods are used to separate communications for each VAP.- Separate communication for each VAP by VLAN
- Attach each VAP's communication to separate bridge
◼ Separate communications for each VAP by VLAN
The network design will be the same as the existing TQ series APs.
To achieve this, the following configuration is required.
- In "Bridge Configuration, assign the VAP interface to the VLAN-enabled bridge br0.
At this time, specify the native VLAN ID for each VAP, so that untagged packets in the relevant VAP are treated as belonging to the specified VLAN.
- In "Interface Configuration", create an 802.1Q sub-interface in the VLAN-enabled bridge br0 that bridges the communication for each VLAN specified above.
If the communication from the VAP needs to be forwarded to the Ethernet interface, the Ethernet interface must be assigned to the VLAN-enabled bridge br0 separately.
◼ Attach each VAP's communication to separate bridge
This one is designed to communicate as all untagged packets without using VLANs.
In "Bridge Configuration", assign a VAP interface to a bridge with any bridge ID.
"Interface Settings" is not used in this case.
You can assign IP addresses to bridges separately in "Wireless AP Individual Configuration".
If communication from the VAP needs to be forwarded to the Ethernet interface, an 802.1Q sub-interface must be separately created on the Ethernet interface and assigned to each bridge group.
Interface Configuration
On VLAN-enabled bridge br0, create an 802.1Q sub-interface for bridging per-VLAN communication.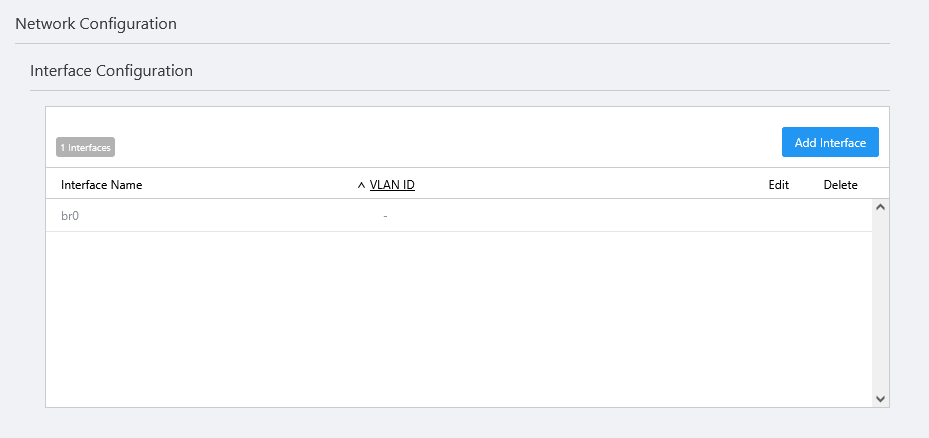
| Item Name | Description |
|---|---|
| X Interfaces | Displays the number of registered VLAN-enabled bridge interface and 802.1Q sub-interfaces. |
| Add Interface | Displays "Add 802.1Q Sub-interface" dialog box. Up to 10 additional 802.1Q sub-interfaces can be added. |
| Interface Name | Lists the VLAN-enabled bridge and registered 802.1Q sub-interfaces. By default, only "br0", the VLAN-enabled bridge, is displayed. |
| VLAN ID | Displays the VLAN ID corresponding to the 802.1Q sub-interface. |
| Edit | Change VLAN ID of the relevant 802.1Q sub-interface. |
| Delete | Delete the 802.1Q sub-interface. |
Add 802.1Q Sub-interface
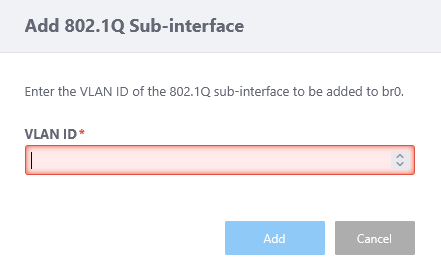
| Item Name | Description |
|---|---|
| VLAN ID | Enter the VLAN ID of the 802.1Q sub-interface to be added to br0 with a value from 1 to 4094. The 802.1Q sub-interface to be created will be assigned the interface name "br0.X" (X: the VLAN ID specified in this dialog). |
| Add | Create an 802.1Q sub-interface with the entered VLAN ID and add it to the list. |
| Delete | Discard your edits and close the dialog box. |
Edit 802.1Q Sub-interface
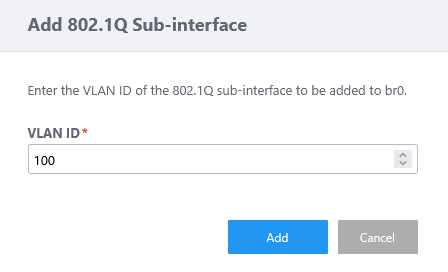
| Item Name | Description |
|---|---|
| VLAN ID | Enter the VLAN ID of the 802.1Q sub-interface to be added to br0 with a value from 1 to 4094. The 802.1Q sub-interface to be edited will be renamed to the interface name "br0.X" (X: the VLAN ID specified in this dialog). |
| Save | Change VLAN ID of the relevant 802.1Q sub-interface. |
| Cancel | Discard your edits and close the dialog box. |
Bridge Configuration
Assign a VAP interface for each radio band to the bridge group.On the AP's configuration, VAP interfaces are distinguished by a combination of radio band and VAP number. In this case, the VAP number on the configuration is "VAP number on AWC Plug-in - 1". For example, "VAP 1" in the radio band "Radio 1" will be assigned the interface name "vap1.0".
Assigning this VAP interface to the bridge allows L2 communication with other VAPs and Ethernet interface.
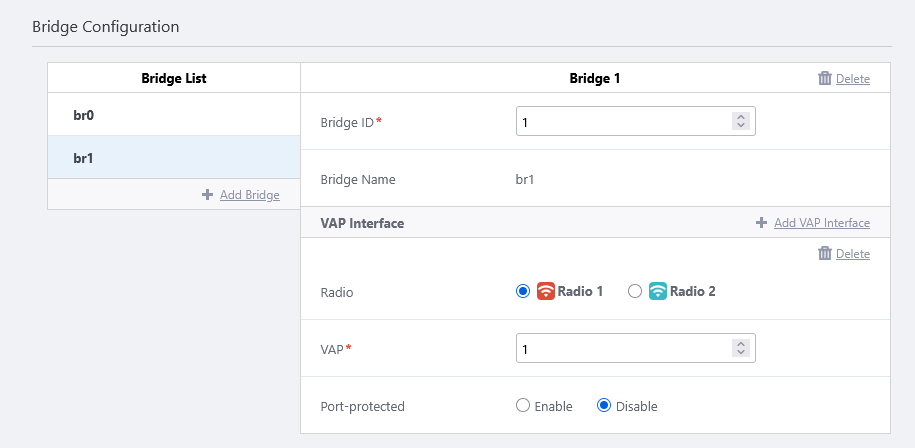
| Item Name | Description |
|---|---|
| Bridge List | The VLAN-enabled bridge and software bridges that have been created are listed. To assign a VAP interface, click on the bridge name from the list. |
| Add Bridge | Create the software bridge. |
| Delete | Deletes the selected bridge. |
| Bridge ID | Specify the ID of the bridge with a value from 1 to 255. |
| Bridge Name | The interface name based on the bridge ID, "brX" (X: the bridge ID) is displayed. |
| VAP interface | |
| Add VAP INterface | Add the VAP interface to be assigned to the bridge. Up to 10 VAP interfaces can be added per bridge. |
| Delete | Delete the VAP interface. |
| Radio | Select the VAP radio band to assign as the VAP interface to the bridge. |
| VAP | Specify the number of the VAP to be assigned as the VAP interface. VAP interfaces with the same radio band and VAP number cannot be assigned to more than one bridge. |
| VLAN ID | Only for VAP interfaces assigned to VLAN-enabled bridge br0, specify the native VLAN with a value from 1 to 4094. |
| Port-protected | Select whether to protect L2 communication on the VAP interface from Enable or Disable. The default is "Disable". When the protected port function of the VAP interface is enabled, L2 communication (bridging) is not performed with other protected ports belonging to the same bridge. L2 communication between protected ports and normal ports (interfaces that do not have Port-protected enabled) and between two normal ports interfaces will take place. NoteOnly L2 communication is covered by the protected port. L3 communication through the bridge interface must be controlled by a separate firewall or other means. |
Edit AP Profile
- Select "Wireless Configuration" > "AP Profile" from the AWC Plug-in menu.
- Click "Detail" (magnifying glass icon) of the AP Profile to edit from the List of AP Profiles.
- The selected AP Profile will be displayed. Click "Edit" at the top right corner.
- Change the information as needed.
- Click "Save" at the top right of the Content section.
Copy AP Profile
- Select "Wireless Configuration" > "AP Profile" from the AWC Plug-in menu.
- Select (Check) the AP Profile to be copied from the list of AP Profiles.
- Click "Copy" at the top right of the Content section.
The selected AP Profile is duplicated.
The duplicated AP Profile gets a temporary name, which is made by appending "_copy" to the original AP Profile name. Rename it on the Edit page as required.
NoteAn AP profile cannot be copied if its name plus a string "_copy" exceeds 101 characters in length.
In that case, a dialog box will appear and tell you that the profile was not copied.
Delete AP Profile
- Select "Wireless Configuration" > "AP Profile" from the AWC Plug-in menu.
- Click "Detail" (magnifying glass icon) of the AP Profile to delete from the List of AP Profiles.
- The selected AP Profile will be displayed. Click "Delete" at the top right of the Content section.
- The "Confirm" dialog box will appear.
- Click "Delete".
10 Nov 2025 11:46