Configure AP-Specific Configuration
This section explains how to configure AP-specific settings.
NoteFor TQ series, configuring APs, LLDP, Ethernet, and HTTP/HTTPS is only possible from the AP's own management web interface. Please follow the steps described in Configure AP through Its Own Web Interface to perform that configuration.
For detailed explanation on configuring APs, refer to the "TQ series Reference Manual" on our website.
NoteYou can access an AP-specific configuration page in one of the following ways.AP Profile and AP-specific settings created on the AWC Plug-in are not instantly applied to wireless APs. They will be applied to APs when:
- an AP is put under the AWC Plug-in's control
- a user manually applys configuration
- a scheduled task for applying configuration is run.
- Select "Wireless Monitoring" > "AP Status" > "Detail" (magnifying glass icon) (the rightmost column) > "Wireless AP Detail" (at the top of the page) > the "Edit" button (on the right of "Configuration").
- Select "Wireless Configuration" > "AP Settings" > "Detail" (magnifying glass icon) (the rightmost column) > the "Edit" button (on the right of "Configuration").
Edit AP-Specific Configuration
NoteThe Interface Configuration is only displayed for the AT-TQ6702 GEN2-R and AT-TQ7403-R.
| Item Name | Description |
|---|---|
| Top of the Content section | |
| Wireless AP Name | Shows the AP name. |
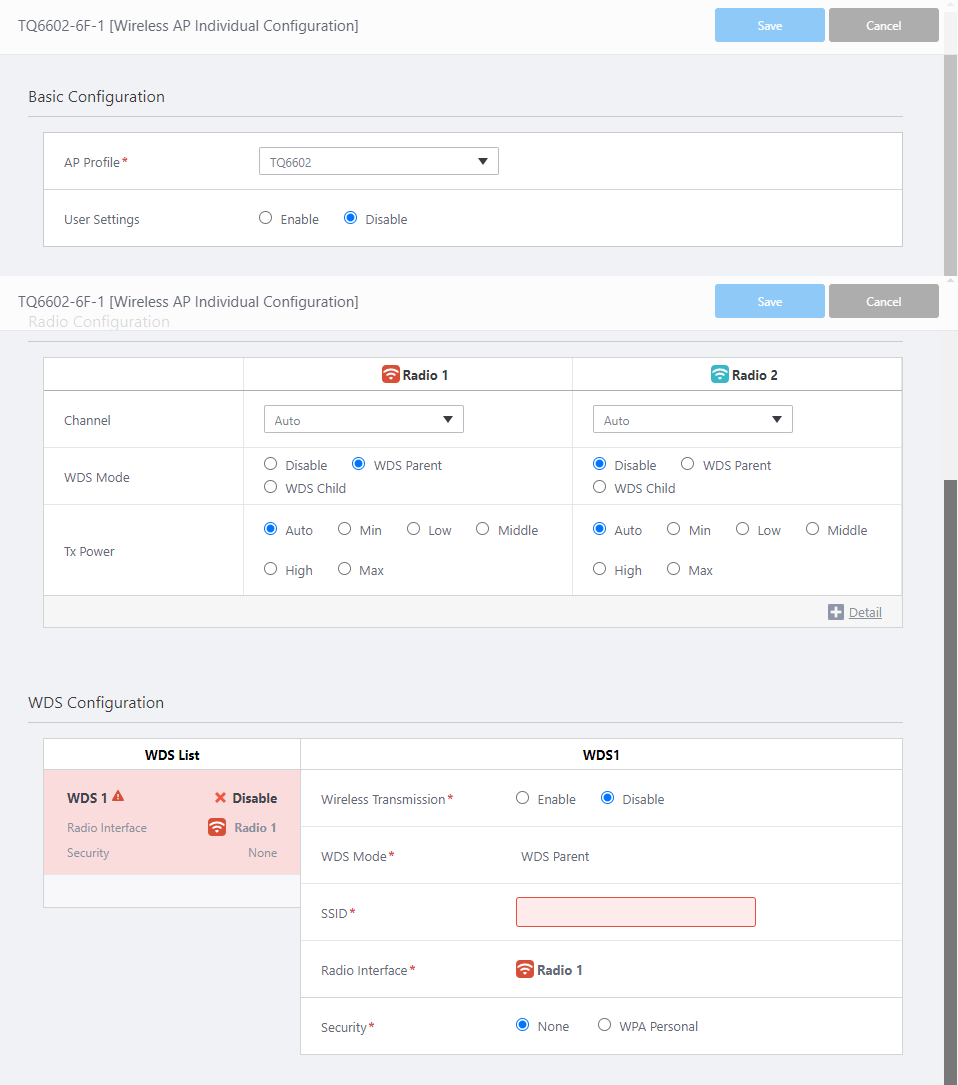
| Basic Configuration | |
| AP Profile | Lets you select an AP Profile for the AP. Clicking it displays the "Select AP Profile" dialog box. To change, select a new AP Profile to apply to the AP and click "Save". For more details, refer to Select AP Profile. |
| Do not use Emergency Status VAP | Check this if you don't want the AP to use emergency VAP even if it is configured in the AP Profile. |
| User Settings | Select whether to allow configuring username and password for AP's management web interface individually. When the "User Settings" is set as "Enable", the "Username", "Password" and "Password (Confirm)" fields will be shown.NoteThis is only available for TQ1402, TQm1402, TQ3403, TQm3403, TQ5403, TQ5403e, TQm5403, TQ6403 GEN2, TQm6403 GEN2, TQ6602, TQ6602 GEN2, TQm6602 GEN2, TQ6702 GEN2, TQm6702 GEN2, TQ7403, and TQ7613. |
| User Information | Specify whether to enter the user information for the AP individually, or to use the user information specified in the AP Profile.
NoteThis item is displayed only with TQ6702 GEN2-R and TQ7403-R. |
| Username | Specify the username used to log in to the AP's management web interface. 1 to 12 characters in length, with letters and digits. Must begin with a letter. NoteIf you set the username and password in both the AP Profile and the AP-specific configuration on the same AP, the username and password in the AP-specific configuration will take effect. |
| Password | Specify the password used to login to the AP's management web interface. The allowed characters vary depending on the AP model.
NoteIf you set the username and password in both the AP Profile and the AP-specific configuration on the same AP, the username and password in the AP-specific configuration will take effect. |
| Password (Confirm) | Enter the same login password for confirmation. Each character in the password is represented by a bullet. |
| Interface Configuration | |
| Only TQ6702 GEN2-R, TQ7403-R | |
| X Interfaces | Displays the total number of registered bridge interfaces, 802.1Q sub-interfaces, and VAP interfaces. |
| Interface Name | Displays the registered interface name. |
| IP Address | Shows the IP address configured for the interface. |
| Edit | Set or unset an IP address for the selected interface. The "Edit IP Address" dialog box will appear. |
| Wireless Configuration | |
| Channel | Lets you change the channel settings. Clicking it pops up the channel selection dialog box. |
| WDS Mode | Lets you select a WDS mode (Root or Satellite AP).
If you select "WDS Parent" or "WDS Child", the "WDS Configuration" section will be displayed. NoteThis is only available for TQ1402, TQm1402, TQ3403, TQm3403, TQ5403, TQ5403e, TQm5403, TQ6403 GEN2, TQm6403 GEN2, TQ6602, TQ6602 GEN2, TQm6602 GEN2, TQ6702 GEN2, TQm6702 GEN2, TQ7403, and TQ7613. |
| Tx Power | Lets you change the AP's transmit power. |
| AWC Tx Power Lower Limitation | Lets you change the minimum transmit power that can be configured by the AWC function. This is in effect only when "Tx Power" is set to "Auto". |
| Stop Radio Transmission | Lets you enable/disable the radio. Check this if you want to disable a radio. Uncheck it if you want to enable the radio again. |
| WDS Configuration | |
| TQ1402, TQm1402, TQ3403, TQm3403, TQ5403, TQm5403, TQ5403e, TQ6403 GEN2, TQm6403 GEN2, TQ6602, TQ6602 GEN2, TQm6602 GEN2, TQ6702 GEN2, TQm6702 GEN2, TQ6702e GEN2, TQ7403, TQ7613 | |
| WDS List | Shows a list of WDS settings in box style. Each configuration box contains WDS parameters such as status (Enable/Disable), WDS Radio Interface, and security. If you select "WDS Parent" or "WDS Child" for "WDS Mode" in the "Wireless Configuration" section, a WDS configuration will be created for the radio. |
| Radio Transmission | Lets you specify whether to enable the WDS. Select "Enable" to use the WDS configuration, otherwise select "Disable". |
| WDS Mode | Shows the selected "WDS Mode" (Root or Satellite AP) for the radio.
|
| SSID | Lets you specify an SSID used for the WDS connection. |
| Radio Interface | Select a radio band for use with the WDS configuration.NoteThe entry number of the WDS configuration (WDS 1, WDS 2, WDS 3) does not necessarily match the number of the radio (Radio1, Radio2, Radio3). Each WDS configuration will be assigned an entry number in the order of creation. |
| Security | Lets you select a security mechanism used for WDS connection.
|
NoteIf you add an AP that has been configured for WDS through its own management web interface, re-configure WDS on the "AP-specific configuration" page before applying an AP Profile to the AP.
If you applied an AP Profile to the AP before re-configuring WDS, the previous WDS configuration on the AP would become invalid and it would be impossible for you to manage the AP through the AWC Plug-in.
Refer to Configure WDS Bridge for more details.
NoteYou can not enable Captive Portal on the radio used for the WDS connection.
Select AP Profile
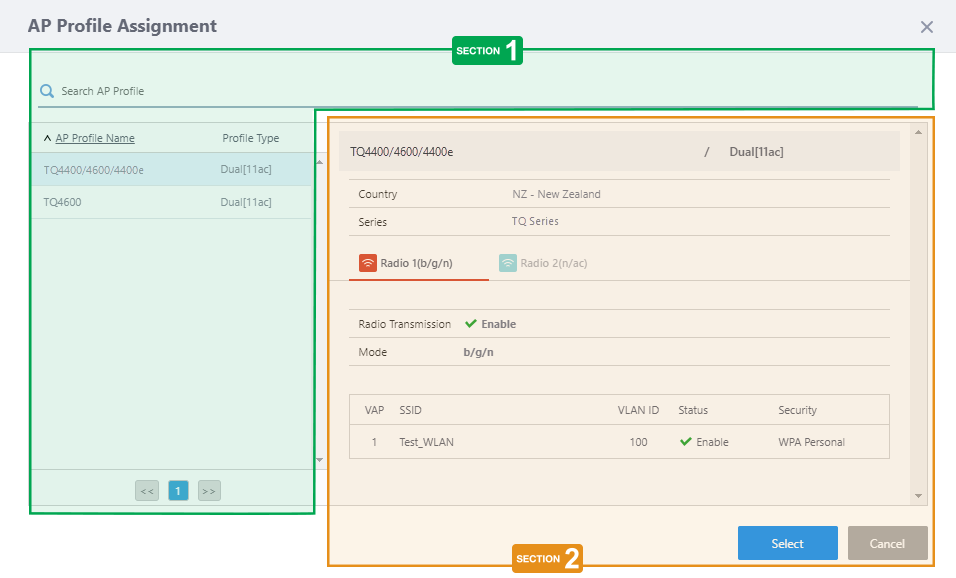
Section 1
| Item Name | Description |
|---|---|
| Search AP Profile | Filter entries in the list by entering a partial string in the search box. To remove the filter, delete the string from the Search field and press Enter. NoteThe search is case-sensitive. NoteDelimiters for a multi-value item (e.g. ":" in "Network:Area") is not searchable unless it is used in a single string. NoteThe search box here has the same functionality as the one on the AP Profile List page. |
| AP Profile Name | Shows the AP Profile name. |
| Models | Shows the AP Profile's target Model.
|
| << | Goes to the first page of the list. |
| (Page Number) | Shows the current page number in the list. |
| >> | Goes to the last page of the list. |
Section 2
| Item Name | Description |
|---|---|
| (Top of the section) | Shows an AP Profile name and its target Model. |
| Country | Shows the country code for the profile. |
| Series | Shows the AP series. |
| Radio 1 / Radio 2 / Radio 3 | Lets you select a radio to view its configuration in the section. A configured mode is shown in the parentheses after the radio name (Radio1/2/3). Clicking a radio name (Radio1/2/3) shows its configuration. A selected radio is indicated by the red line under its name. |
| Radio Transmission | Shows the status of the radio. |
| Mode | Shows the selected mode (protocol) for the radio. |
| VAP | Shows the VAP number. |
| SSID | Shows the SSID for the VAP. |
| VLAN ID | Shows the VLAN ID for the VAP. |
| Enabled/Disabled | Shows the status (Enable/Disable) of the VAP. |
| Security | The security mechanism selected for the VAP. It is one of "None", "Static WEP", "WPA Personal" or "WPA Enterprise". |
| "Select" button | Change the AP Profile for the AP to the selected one. |
| "Cancel" button | Cancel AP Profile selection. |
Edit IP Address
NoteEditing IP address is only available in the Wireless AP Individual Configuration for TQ6702 GEN2-R and TQ7403-R.
| Item Name | Description |
|---|---|
| Static IP Address | Specify an IP address to be assigned to the selected interface. |
| Undefined | No IP address is assigned to the selected interface. |
| Save | Save changes and close the dialog box. |
| Cancel | Discard changes and close the dialog box. |
Apply Changes
If you want to immediately apply the selected AP Profile to the AP, do it after saving the AP-specific configuration.To apply an AP Profile to APs, follow the steps below.
- Select "Wireless Configuration" > "AP Settings" from the AWC Plug-in menu.
- Select (Check) the APs to which you want to apply an AP Profile.
- Place the mouse cursor on the spanner icon at the top right of the screen and select "Apply Configuration" from the submenu.
- When the "Apply Configuration" dialog box appears, click "OK".
- When a completion message appears, click "Close".
NoteIf you want to apply an AP Profile to APs at a fixed date/time, you can create a schedule for the task.The maximum number of APs which can have an AP Profile applied in a single "Apply Configuration" action is 350.
Refer to Manage Task Scheduling for more details on scheduling a task to apply settings to APs.
10 Nov 2025 11:46