Preparation
Network Connection
The simplest network configuration for using AT-SESC is as follows.NoteRefer to Setting up OpenFlow Switch in Appendix for instructions on how to configure OpenFlow Switches.
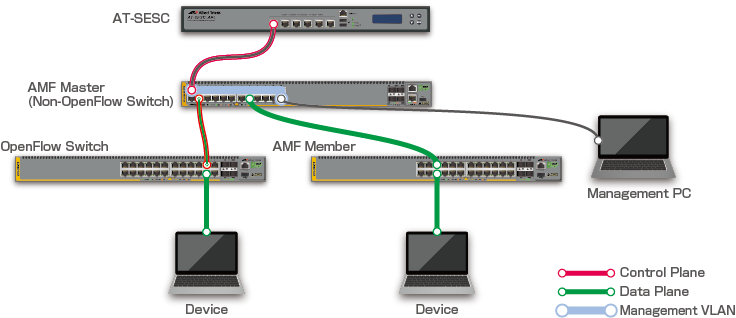
- Build the IPv4 network where AT-SESC and the OpenFlow Switch can communicate via IPv4 on their control plane.
Note
AT-SESC and the OpenFlow Switch can be in different segments.
- On the OpenFlow Switch, configure an IPv4 address and a port number (default 6653) of the AT-SESC.
Table 1: OpenFlow Switch configuration for connecting to the OpenFlow controller
IPv4 address AT-SESC's management IPv4 address (which you set up during installation process) Port number 6653 (default)
- Add required configurations such as enabling OpenFlow ports to the OpenFlow Switch.
You have to configure at least two OpenFlow ports on an OpenFlow Switch so that AT-SESC can assign one upstream and one or more client port(s) for the switch.
Note
For wireless access points, both wired and wireless interfaces are used for data plane ports too.
- On the AMF Master, configure AT-SESC's IPv4 address.
- On the AMF Master and Members, perform the required configuration such as enabling AMF Application Proxy.
Logging In to the Management Web Interface
You can configure AT-SESC through its web-based management interface.- Make sure that your PC and the AT-SESC are properly connected to the network and open a web browser on your PC.
- Enter the AT-SESC's URL in your web browser's address bar and press Enter.
Note
AT-SESC's URL is "https://AT-SESC_IP_ADDRESS/" where AT-SESC_IP_ADDRESS is the AT-SESC's management IP address.
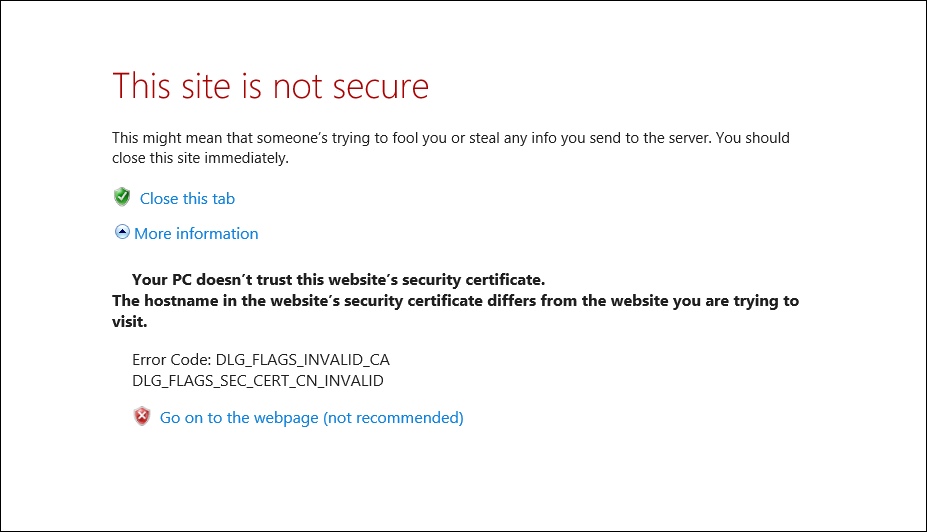
- The warning message "This site is not secure" is displayed. Click "Go on to the webpage (not recommended)" to continue.
If you have a SSL server certificate issued by a trusted certification authority (CA), you can install the certificate on the System Settings > System Information page's "SSL Certificate" section after logging in to the AT-SESC.
- Login screen is displayed. Enter the default account username and password then click "OK".
Entered password is masked with bullets on the screen.
Note
The default username is "manager" and the password is "friend".
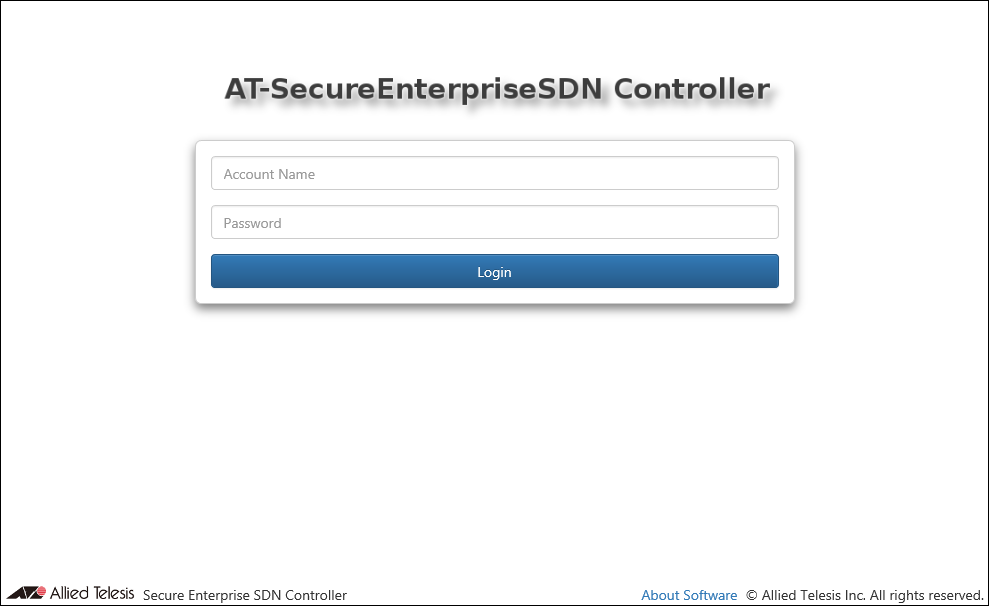
- Now you are logged in and you can see the AT-SESC's management web interface.
Note
A login session times out after 10 minutes of inactivity. The Login screen reappears when you perform any operation after the previous session has timed out.
14 Jun 2021 09:30