System Settings
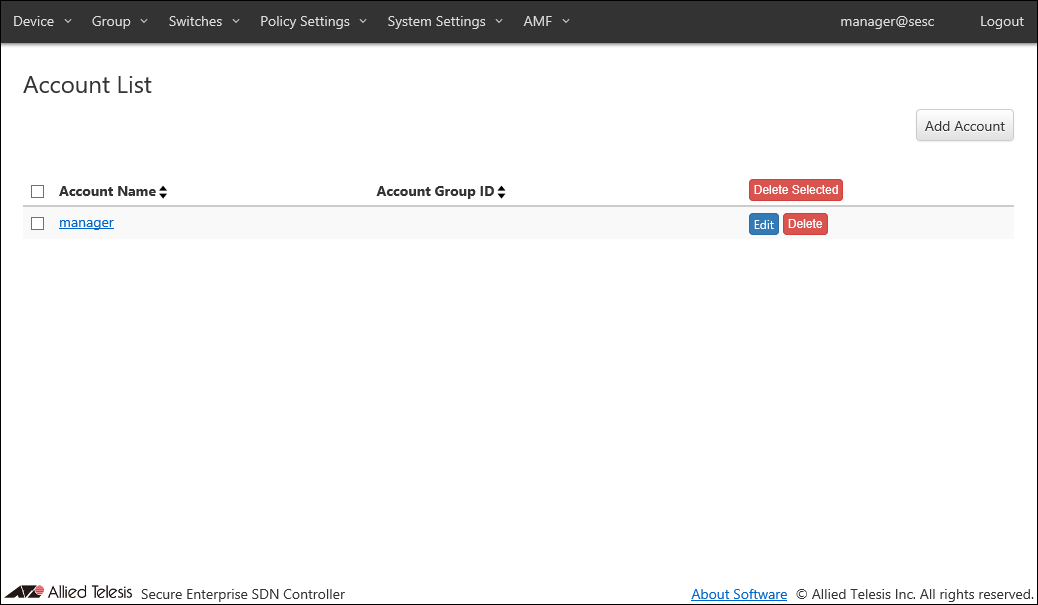
Account List
| Item Name | Sort |
|---|---|
| Account Name | × |
| Account Group ID | × |
| Item Name | Description |
|---|---|
| Account Name | Name of the login account. When clicked, the Update Account page for the account is displayed. |
| Account Group ID | Account group to which the Login Account belongs. |
| Item Name | Description |
|---|---|
| Page Top | |
| Add Account | Go to Add Account page. |
| Account List | |
| Delete Selected | Delete all the checked accounts. |
| Edit | Go to Update Account page for the account. |
| Delete | Delete the account. |
NoteDefault account "manager" cannot be deleted.
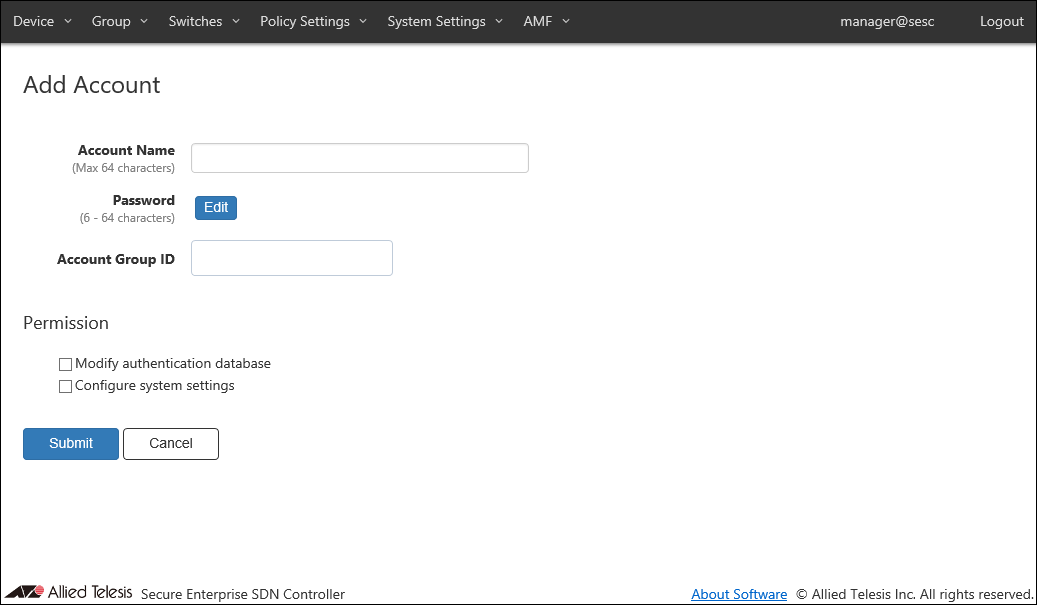
Add Account
| Item Name | Description |
|---|---|
| Account Name (Mandatory) | Name of the login account. Maximum length is 64 characters. Allowed characters are as follows. a-z, A-Z, 0-9, ' - _ . |
| Password | Login password for the account. Click "Edit" to configure password. |
| Account Group ID | Select the Account Group ID to which the Login Account belongs. |
| Permission | |
| Modify authentication database | Check this to grant permission to change authentication database to the account. |
| Configure system settings | Check this to grant permission to change system configurations to the account. |
| Item Name | Description |
|---|---|
| Password | |
| Edit | Open Password Configuration dialog to configure the account's password. |
| Page Bottom | |
| Submit | Add a new account with the input information. |
| Cancel | Cancel the operation for adding a new account. |
NoteWhen you forget all the passwords for user accounts with "Configure system settings The AT-SESC configurations must be initialized if you forget passwords for all accounts with the permission of "Configure system settings" including the "manager" account. Please make sure that you keep your passwords safely and never forget them.
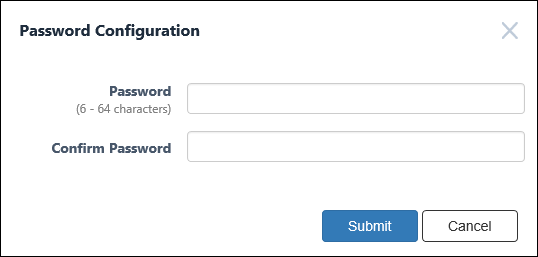
Password Configuration
| Item Name | Description |
|---|---|
| Password (Mandatory) | Login password for the account. Password must be 6 to 64 characters long. Allowed characters are as follows. a-z, A-Z, 0-9, ! # $ % & ' * + - / = ? ^ _ ` { | } ~ . |
| Confirm Password (Mandatory) | Enter the password again. |
| Item Name | Description |
|---|---|
| Bottom of the dialog | |
| Submit | Configure the input password. |
| Cancel | Cancel the operation for configuring a password. |
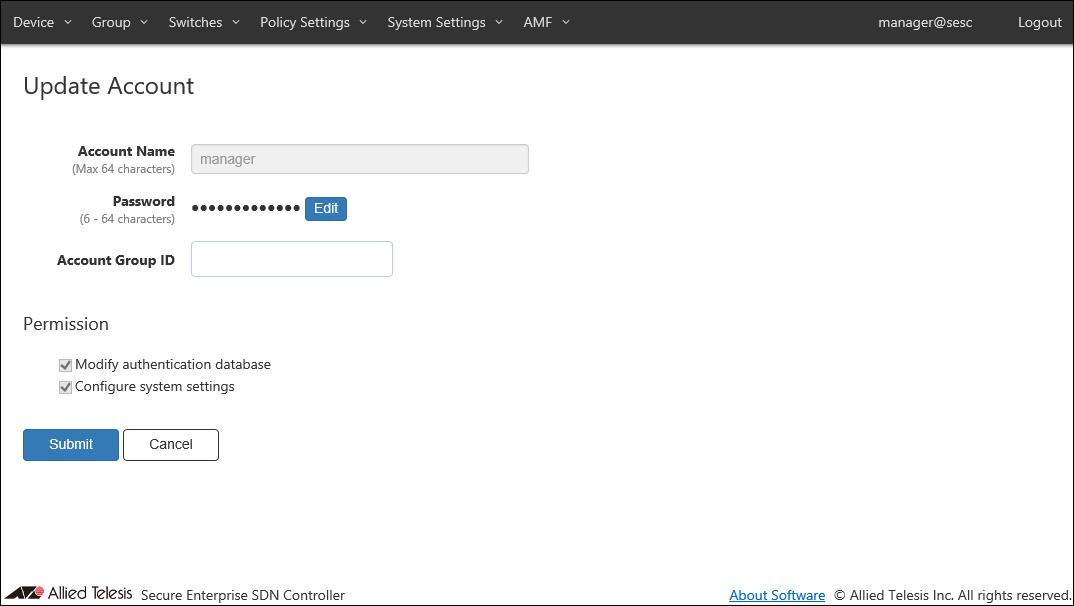
Update Account
| Item Name | Description |
|---|---|
| Account Name (Mandatory) | Name of the login account. Maximum length is 64 characters. Allowed characters are as follows. a-z, A-Z, 0-9, ' - _ . |
| Password | Login password for the account. Click "Edit" to configure password. |
| Account Group ID | Select the Account Group ID to which the Login Account belongs. |
| Permission | |
| Modify authentication database | Check this to grant permission to change authentication database to the account. |
| Configure system settings | Check this to grant permission to change system configurations to the account. |
| Item Name | Description |
|---|---|
| Password | |
| Edit | Open Password Configuration dialog to configure the account's password. |
| Page Bottom | |
| Submit | Update the account with the input information. |
| Cancel | Cancel the operation for updating the account. |
NoteAccount name and permissions of the default account "manager" cannot be changed.
NoteWhen you forget all the passwords for user accounts with "Configure system settings The AT-SESC configurations must be initialized if you forget passwords for all accounts with the permission of "Configure system settings" including the "manager" account. Please make sure that you keep your passwords safely and never forget them.
Password Configuration

| Item Name | Description |
|---|---|
| Password (Mandatory) | Login password for the account. Password must be 6 to 64 characters long. Allowed characters are as follows. a-z, A-Z, 0-9, ! # $ % & ' * + - / = ? ^ _ ` { | } ~ . |
| Confirm Password (Mandatory) | Enter the password again. |
| Item Name | Description |
|---|---|
| Bottom of the dialog | |
| Submit | Configure the input password. |
| Cancel | Cancel the operation for configuring a password. |
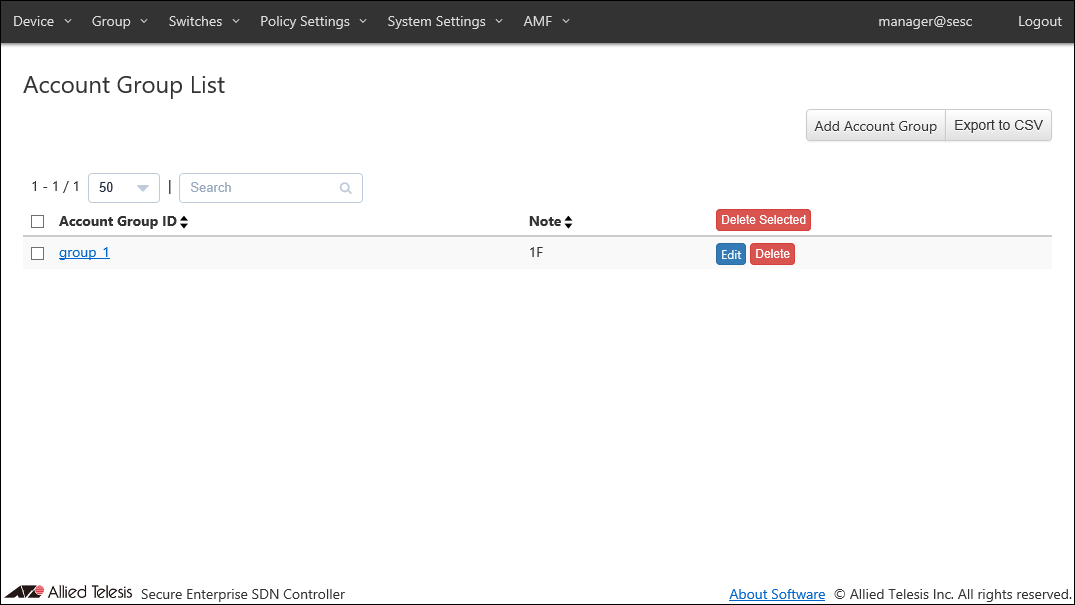
Account Group List
| Item Name | Search | Sort |
|---|---|---|
| Account Group ID | × | × |
| Note | × | × |
| Item Name | Description |
|---|---|
| Account Group ID | Account group name. |
| Note | Arbitrary string (comment) for the Account Group. |
| Item Name | Description |
|---|---|
| Page Top | |
| Add Account Group | Go to Add Account Group page. |
| Export to CSV | Start downloading of a list of account groups in CSV format. |
| Account Group List | |
| Delete Selected | Delete all the checked account groups. |
| Edit | Go to Update Account Group page for the account group. |
| Delete | Delete the account group. |
NoteRefer to CSV File in Appendix for CSV Files.
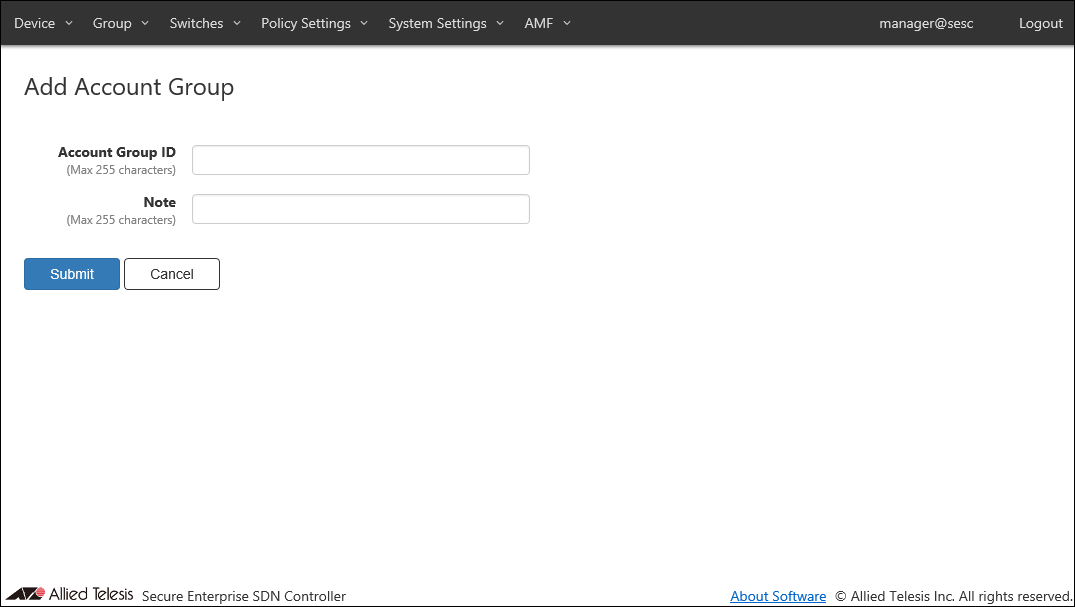
Add Account Group
| Item Name | Description |
|---|---|
| Account Group ID (Mandatory) | Account group to which the Login Account belongs. Account Group ID must be unique. Max 255 characters |
| Note | Arbitrary string (comment) for the Account Group. |
| Item Name | Description |
|---|---|
| Submit | Add a new account group with the input information. |
| Cancel | Cancel the operation for adding a new account group. |
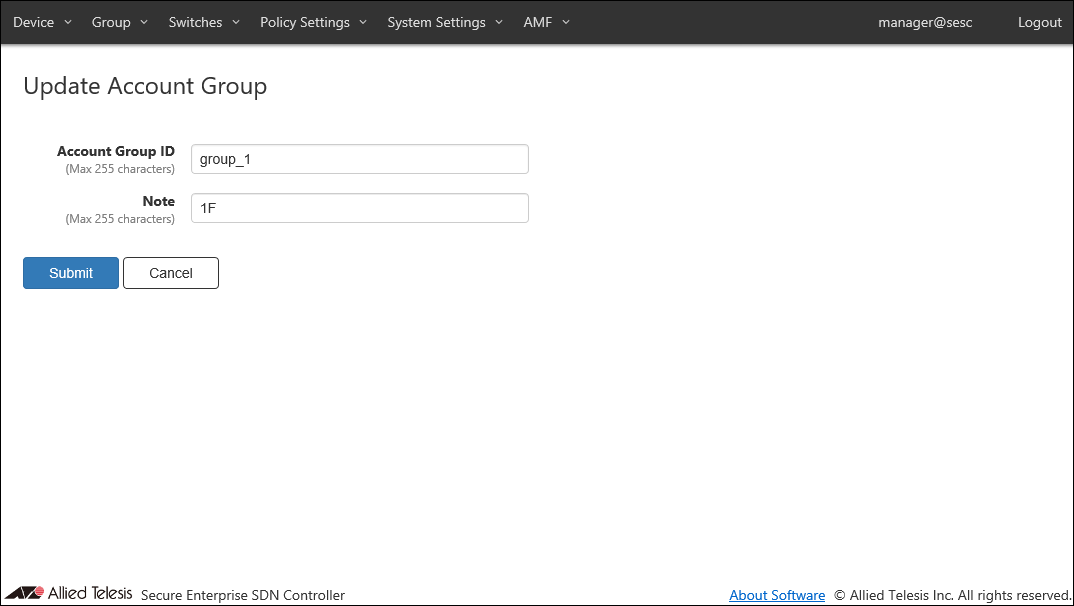
Update Account Group
| Item Name | Description |
|---|---|
| Account Group ID (Mandatory) | Account group to which the Login Account belongs. Account Group ID must be unique. Max 255 characters |
| Note | Arbitrary string (comment) for the Account Group. |
| Item Name | Description |
|---|---|
| Submit | Go to Update Account Group page for the account group. |
| Cancel | Cancel the operation for updating the account group. |
Network Settings
View and change network configurations for the AT-SESC system.
◼ Interfaces
| Item Name | Description |
|---|---|
| Name | Name of the interface. |
| MAC Address | MAC address of the interface. |
| IPv4 Address | IPv4 address and subnet mask of the interface. |
| Item Name | Description |
|---|---|
| Edit | Open the Interface Settings page for the interface. |
| Delete | Delete configurations for the interface. |
◼ Services
| Item Name | Description |
|---|---|
| Web Server Protocol | Protocol (HTTP or HTTPS) to use for the web interface. Default is HTTPS. |
| Web Server Port Number | TCP port number that AT-SESC's web interface is listening on. Valid range is 1 to 65535. Default is 443. |
| Item Name | Description |
|---|---|
| Submit | Update the network configurations with the input data. |
NoteOnly TLS 1.1 and TLS 1.2 are supported for HTTPS.
NoteAT-SESC is using several ports internally. Refer to Appendix's TCP or UDP port used by AT-SESC for the ports used by AT-SESC.
◼ Database Synchronization
| Item Name | Description |
|---|---|
| Enable authentication database synchronization. | Check this to synchronize authentication database between two AT-SESC systems for redundancy. |
| Local IPv4 Address | Local IPv4 address to use for synchronization. |
| Peer IPv4 Address | Remote IPv4 address to use for synchronization. |
NoteIf the system time is changed by a certain amount after synchronization started, there may be a case where the authentication data cannot be changed any further. If it happens, please disable synchronization on both systems, adjust system clocks correctly, then enable synchronization again.
| Item Name | Description |
|---|---|
| Submit | Update the network configurations with the input data. |
◼ Secondary host
| Item Name | Description |
|---|---|
| Do not send error response against authentication database modification request by API via the Secondary host. | Suppress error logs generated by the secondary AT-SESC system. |
| Suppress duplicated syslog messages and mail from secondary host. | Suppress duplicated log messages by disabling log transmission on the secondary AT-SESC system. |
| Item Name | Description |
|---|---|
| Submit | Update the network configurations with the input data. |
Interface Settings
This page lets you configure the network interface of the AT-SESC system.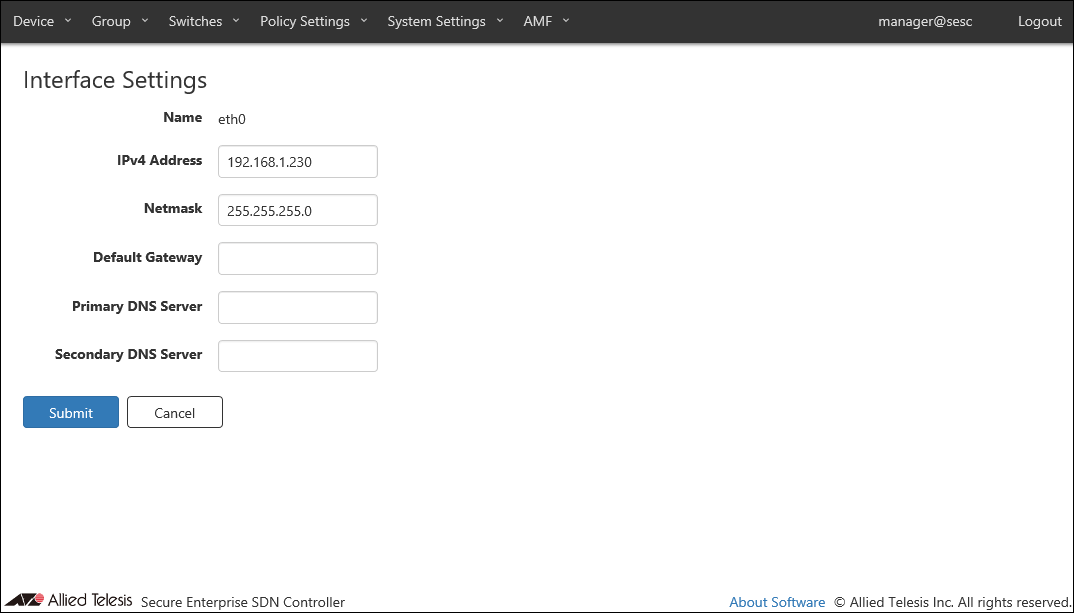
| Item Name | Description |
|---|---|
| Name | Name of the interface. |
| IPv4 Address | IPv4 address of the interface. |
| Netmask | IPv4 netmask for the interface. |
| Default Gateway | IPv4 default gateway address. |
| Primary DNS Server or Secondary DNS Server | IPv4 DNS server addresses. |
| Item Name | Description |
|---|---|
| Page Bottom | |
| Submit | Save the input interface configurations. |
| Cancel | Cancel the operation for updating the interface configurations. |
Logging Settings
NoteWhen changing the Logging Settings, the connection with the connected OpenFlow switch is temporarily disconnected.
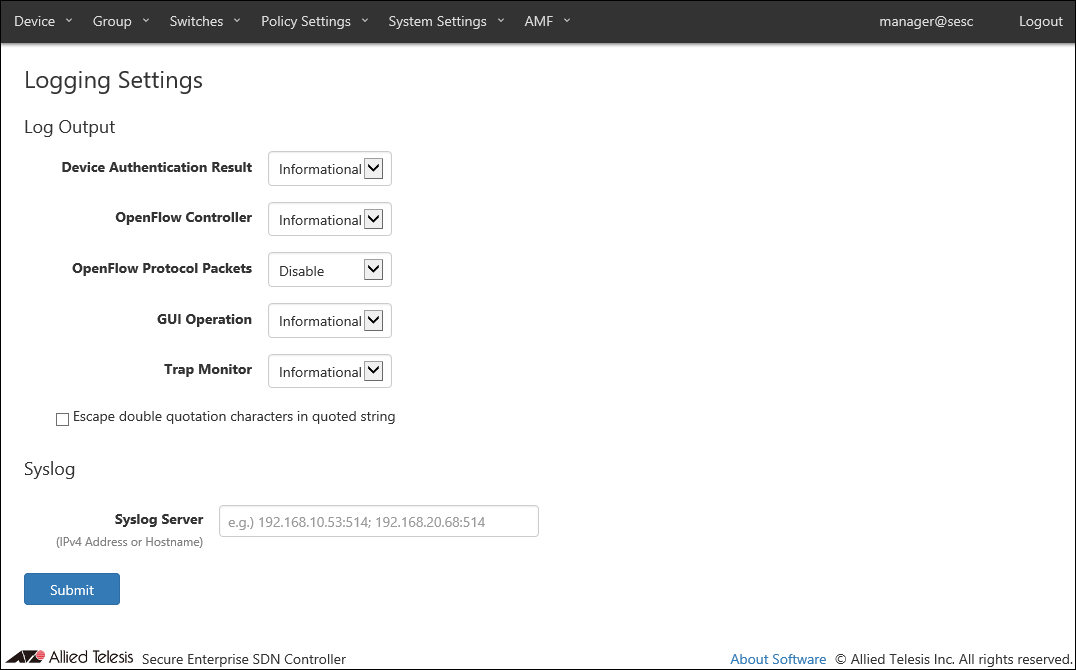
◼ Log Output
You can view and configure levels for various types of logs.
| Item Name | Description |
|---|---|
| Device Authentication Result | Minimum level for device authentication logs to be output. Default is Informational. |
| OpenFlow Controller | Minimum level for the OpenFlow protocol logs to be output. Default is Informational. |
| OpenFlow Protocol Packets | Minimum level for the OpenFlow packet logs to be output. Default is Disable (do not output any log of this type). |
| GUI Operation | Minimum level for the web interface logs to be output. Default is Informational. |
| Trap Monitor | Minimum level for the trap monitor logs to be output. Default is Informational. |
| Escape double quotation characters in quoted string | Escape double quotes in the log message. Default is disabled. |
◼ Syslog
| Item Name | Description |
|---|---|
| Syslog Server | Set the IPv4 address or hostname and UDP port number of the external Syslog server that sends the log. The forwarding destination should be in the form of "A.B.C.D:P" where the A.B.C.D is an IPv4 address and P is a port number. Multiple Syslog servers can be specified by separating each address by a semicolon (;). A colon (:) and a port number can be omitted if the host is listening on the default syslog port (514). |
NoteAT-SESC is using several ports internally. Refer to Appendix's TCP or UDP port used by AT-SESC for the ports used by AT-SESC.
| Item Name | Description |
|---|---|
| Page Bottom | |
| Submit | Save the input logging configurations. |
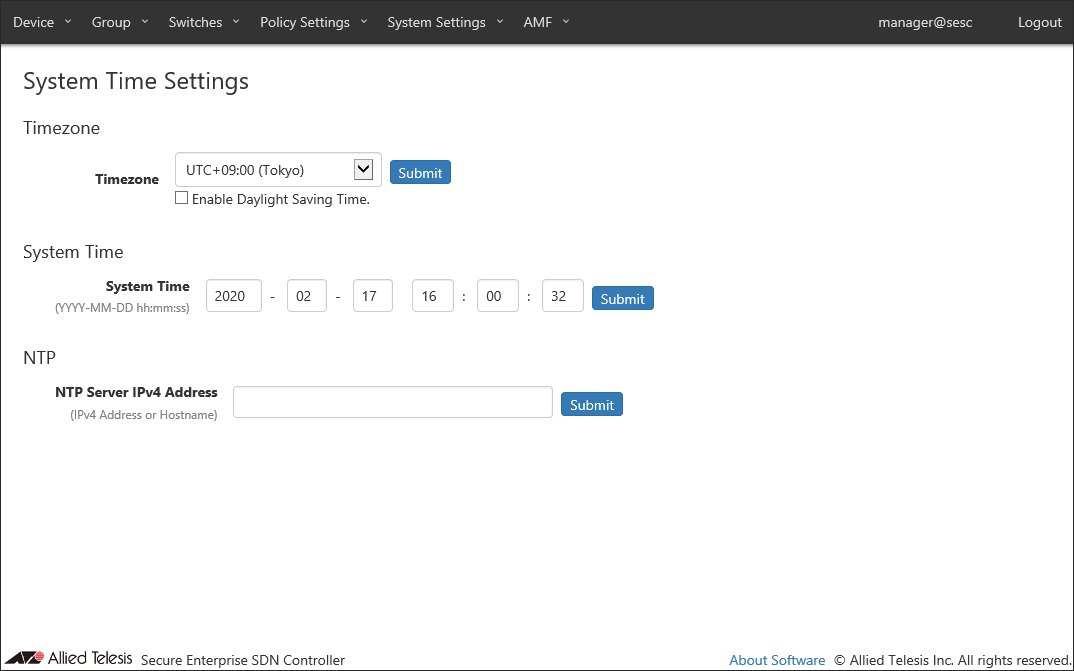
System Time Settings
| Item Name | Description |
|---|---|
| Timezone | Timezone for the system. |
| Enable Daylight Saving Time. | Check this to enable daylight saving time processing on the selected timezone. |
| Item Name | Description |
|---|---|
| Submit | Save the settings in the section. |
◼ System Time
| Item Name | Description |
|---|---|
| System Time | System date (year, month, day) and time (hour, minute, second). |
| Item Name | Description |
|---|---|
| Submit | Save the settings in the section. |
◼ NTP
| Item Name | Description |
|---|---|
| NTP Server IPv4 Address | Set the IPv4 address or hostname of the external NTP server that synchronizes the time. |
NoteIf the external NTP server does not synchronize to any other NTP server, AT-SESC may not be able to synchronize the clock.
| Item Name | Description |
|---|---|
| Submit | Save the NTP server setting. |
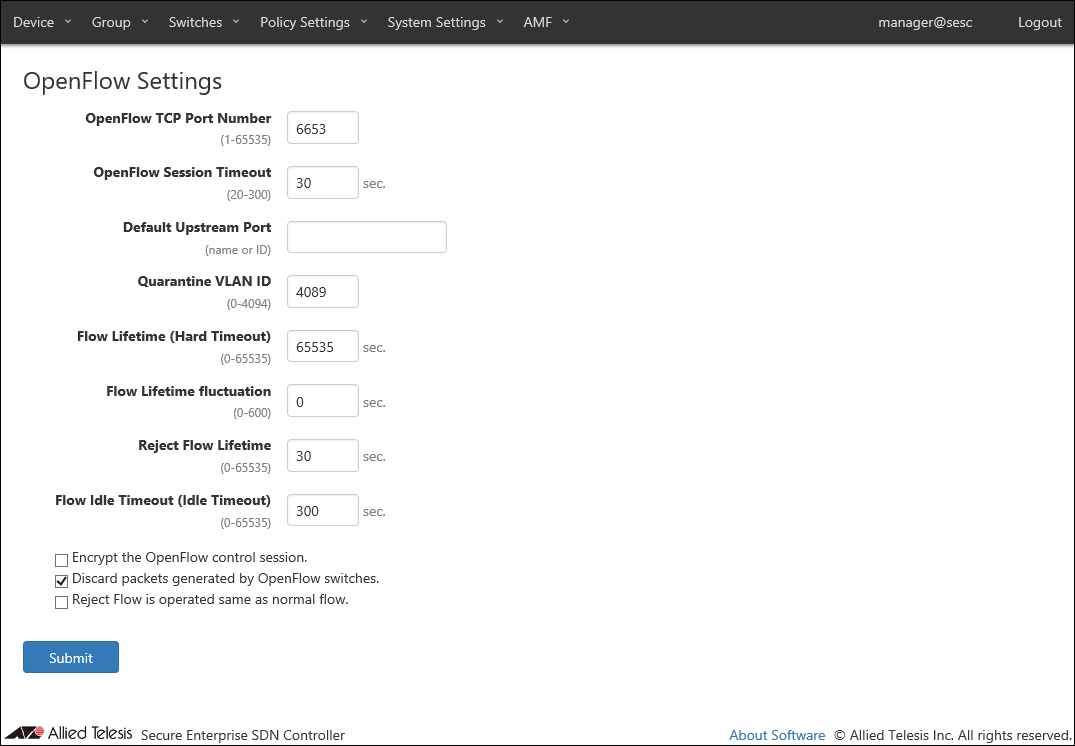
OpenFlow Settings
NoteWhen changing the OpenFlow Settings, the connection with the connected OpenFlow switch is temporarily disconnected.
| Item Name | Description |
|---|---|
| OpenFlow TCP Port Number | TCP port number on which AT-SESC's OpenFlow controller is waiting for control plane connections. Valid range is 1 to 65535. Default is 6653. |
| OpenFlow Session Timeout | Configure a timeout (in seconds) to disconnect an OpenFlow session with an irresponsive switch. When AT-SESC does not receive any message from an OpenFlow Switch for half of this timeout value, AT-SESC sends Echo request message to the switch. If the switch does not respond to the Echo request within the timeout period, AT-SESC automatically closes the session with the switch. Valid range is 20 to 300. Default is 30. |
| Default Upstream Port | Default setting for OpenFlow Switch's upstream port. If no upstream port is specified in a configuration for an OpenFlow Switch, the default upstream port is used as upstream port on the OpenFlow Switch. Specify it with a port name or an OpenFlow port number. Default is unspecified (empty) which means that the OpenFlow port with the smallest OpenFlow port number on a switch is used as upstream port. |
| Quarantine VLAN ID | VLAN ID of the quarantine network where quarantined devices are placed. Valid range is 0 to 4094. Default is 4089. |
| Flow Lifetime (Hard Timeout) |
Configure the default flow lifetime (in seconds) on the switch. When this amount of time has passed since a flow is created for a device, the flow is automatically deleted from OpenFlow Switches even though the device is still sending traffic. Valid range is 0 to 65535. Default is 65535. Specifying 0 means that flows are never timed out. This value is used when a security policy for a device does not have Schedule. This value may be preceded by a Schedule's End Date / Time. This value is used as it is when the interval between the successful authentication and a scheduled End Date / Time is less than 65535 seconds. If the interval between the successful authentication and a scheduled End Date / Time is larger than or equals to 65535 seconds, actual timeout is set to 65535 seconds. |
| Flow Lifetime fluctuation | Configure a maximum fluctuation value for Flow Lifetime (in seconds). When set to non-zero value (X), actual flow lifetime value is calculated by subtracting a random fluctuation value between 0 and X from the Default Flow Lifetime. This value must be less than the Flow Lifetime value and in the range between 0 and 600 (Only 0 is valid when the Default Flow Lifetime is 0). Default is 0. (The Default Flow Lifetime is used as is). For example, when the Flow Lifetime fluctuation is set to 600 seconds, actual flow lifetime set to flow entries is determined by subtracting a random value between 0 and 600 from the Default Flow Lifetime (If the Default Flow Lifetime is 65535 (default), actual flow lifetime can be any value in the range between 64935 and 65535). |
| Reject Flow Lifetime | Flow lifetime in seconds for devices which failed to authenticate. Valid range is 0 to 65535. Default is 30. Specifying 0 means that reject flows are never created. |
| Flow Idle Timeout (Idle Timeout) |
An amount of time that should have passed without any traffic from a device before the flow for the device is deleted automatically. Valid range is 0 to 65535. Default is 300. Specifying 0 means that flows are never deleted even though no traffic is seen from devices. |
| Encrypt the OpenFlow control session. | Check this to encrypt control plane traffic between AT-SESC and OpenFlow Switches. TLS is used for encryption. To use encrypted control plane, you also have to configure OpenFlow Switches to use encryption. |
| Discard packets generated by OpenFlow Switches. | Check this to install flows on the OpenFlow Switches that discard packets originated from the OpenFlow Switch themselves. |
| Reject Flow is operated same as normal flow. | Configure the timer and deletion behavior of Reject flows. Default is disabled.
|
NoteAT-SESC is using several ports internally. Refer to Appendix's TCP or UDP port used by AT-SESC for the ports used by AT-SESC.
NoteDefault Upstream Port is applied to unregistered OpenFlow Switches When you are using both AlliedWare plus switches and AT-TQ wireless access points as OpenFlow Switches, configuring the Default Upstream Port disturbs flow entry registration due to the difference in the port number structure between AlliedWare Plus and AT-TQ series.
When you use non-minimum number OpenFlow port as upstream port on AlliedWare Plus Devices, individually configure the upstream port on each OpenFlow Switch.
Refer to Switches > Add OpenFlow Switch for instructions on how to register OpenFlow Switches.
| Item Name | Description |
|---|---|
| Page Bottom | |
| Submit | Save the input OpenFlow configurations. |
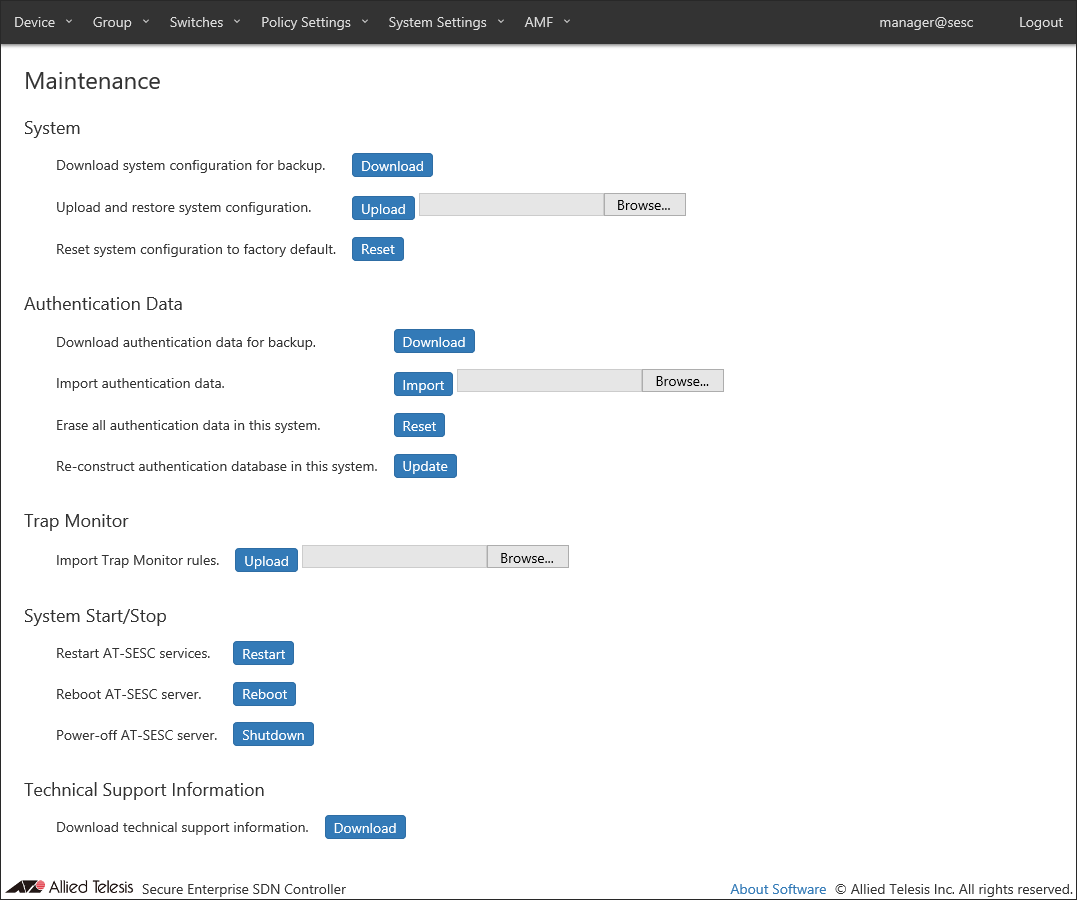
Maintenance
This page lets you perform maintenance operations such as backup, restore and system restart.NoteSystem settings download and upload features are intended for pure backup and restore. Do not modify a downloaded backup file nor upload a modified file using the feature. When uploading system configuration, a file to upload can have any file extension.
| Item Name | Description |
|---|---|
| Download system configuration for backup. | Download system configuration by clicking "Download". |
| Upload and restore system configuration. | Restore system configurations from the previously downloaded backup file by selecting a file with the "Browse" button and uploading it by the "Upload" button. |
| Reset system configuration to factory default. | Factory-reset the system by clicking "Reset". |
Manually backup, configure or delete those elements.
- Configurations to be backed up, restored and reset.
- Account List
- Network Settings - Services
- Logging Settings
- System Time Settings
- OpenFlow Settings
- Trap Monitor Settings
- Email Notification Settings
- AMF Settings
- Account List
- Configurations not to be backed up, restored and reset.
- Network Settings - Interfaces (AT-SESC only)
Note
If you made a mistake in interface configuration, re-configure management address in "Recovery Mode". It cannot be restored by uploading downloaded system backup.
- Maintenance - Trap Monitor
- System Information - SSL Certificate
- System Information - Licenses
- SESC Log
- Action Log
- Network Settings - Interfaces (AT-SESC only)
NoteLicenses include the Base and Addon licenses.
◼ Authentication Data
| Item Name | Description |
|---|---|
| Download authentication data for backup. | Download authentication data by clicking "Download". |
| Import authentication data. | Import authentication data from a CSV file by selecting a file with the "Browse" button and uploading it by the "Upload" button. |
| Erase all authentication data in this system. | Delete all authentication data on this system by clicking "Reset". |
| Re-construct authentication database in this system. | Rebuild the authentication database by clicking "Update". |
NoteAuthentication data file to import should be in CSV format. Refer to CSV File in Appendix for CSV Files.
NoteWhen you import and update authentication data, AT-SESC resets packet control flows for the devices which are contained in the authentication data.
◼ Trap Monitor
| Item Name | Description |
|---|---|
| Import Trap Monitor rules. | Import a trap monitor rules from a file by selecting a file with the "Browse" button and uploading it by the "Upload" button. |
NoteTrap monitor rule files are provided by our "AMF-SEC Technology Partner Program". Contact our sales engineer for the Technology Partner Program.
◼ System Start/Stop
| Item Name | Description |
|---|---|
| Restart AT-SESC services. | Restart only application processes by clicking "Restart". |
| Reboot AT-SESC server. | Reboot the whole system by clicking "Reboot". |
| Power-off AT-SESC server. | Power off the system by clicking "Shutdown". |
◼ Technical Support Information
| Item Name | Description |
|---|---|
| Download technical support information. | Download technical support information for trouble shooting by clicking "Download". |
System Information
NoteAfter a version upgrade, management pages or operational messages may not be displayed correctly. In those cases, reload or restart your Web browser.
NoteWhen changing the hostname, the connection with connected OpenFlow Switch or AMF Master is temporarily disconnected.
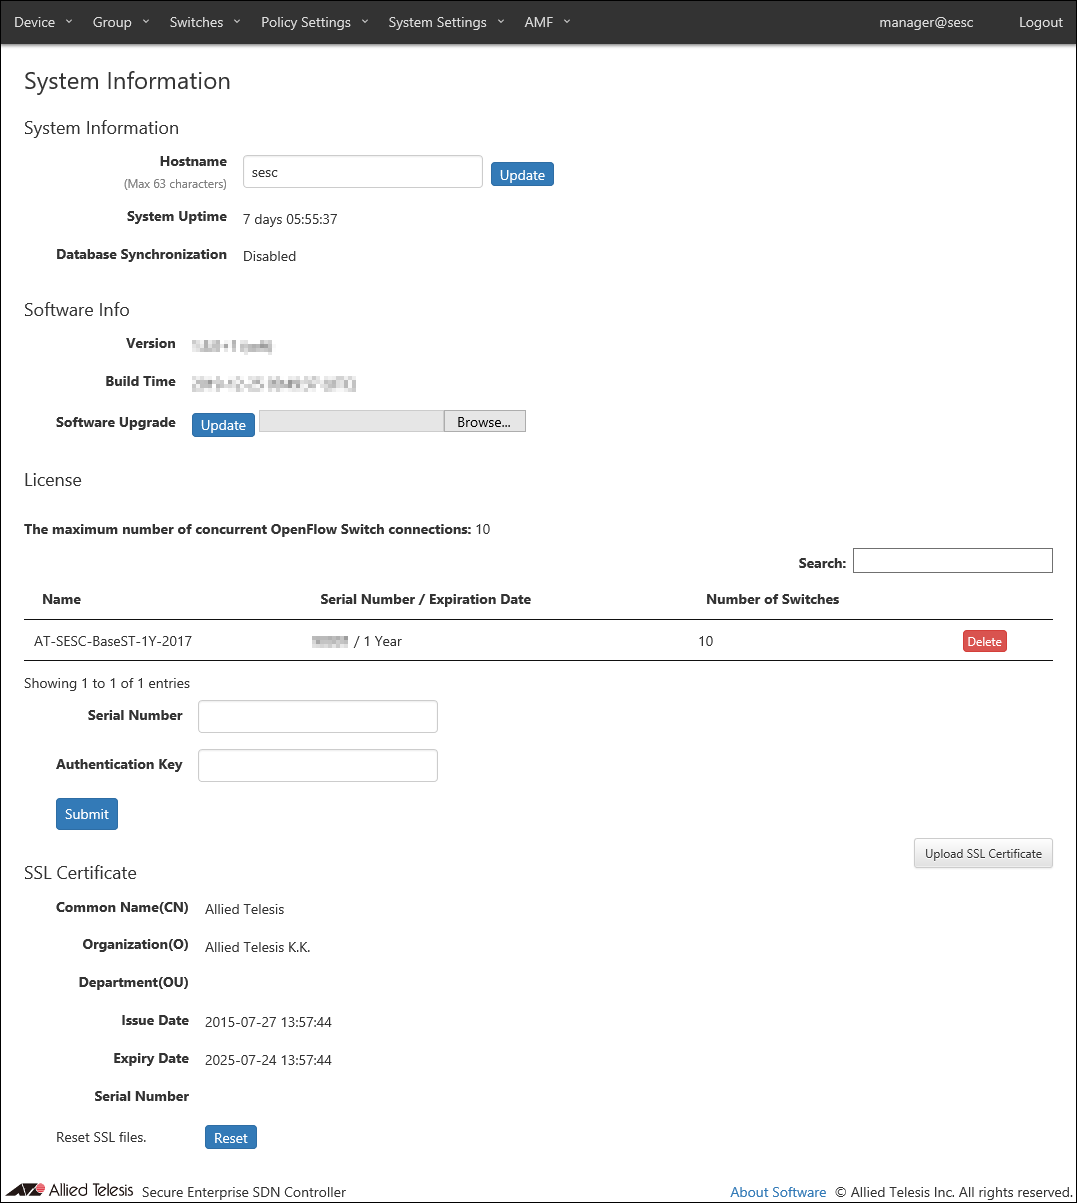
| Item Name | Description |
|---|---|
| Hostname | Hostname of the system Default is "sesc". To change the hostname, enter a new hostname and click "Update". Max 63 characters. Allowed characters are as follows. a-z, A-Z, 0-9, - Hyphen (-) cannot be used for the first letter. |
| System Uptime | Time since the system started. |
| Database Synchronization | Status of database synchronization. One of Disabled, Syncing or Disconnected. |
| Item Name | Description |
|---|---|
| Refresh | Update the hostname. |
◼ Software Info
| Item Name | Description |
|---|---|
| Version | Version and build number (internal version) of the installed AT-SESC software. After the version, "(soft)" is appended for AT-SESC. |
| Build Time | Build date and time of the installed AT-SESC software. |
| Software Upgrade | You can upgrade AT-SESC software from this section. Upgrade process begins by selecting a file with the "Browse" button and clicking "Update". The system automatically reboots after the upgrade is complete. |
| Software Downgrade | Only displayed after performing software upgrade. You can rollback to the previous version by clicking "Revert". |
NoteSince version 1.8.0, Authentication Data contains the items not compatible with the earlier versions (1.7.x or earlier).
Therefore, if you want to downgrade, download (back up) the Authentication Data (CSV format) on the System settings > Maintenance page, then delete the Authentication Data.
After downgrading, use the Authentication Data that was backed up before upgrading.
| Item Name | Description |
|---|---|
| Refresh | Upgrade AT-SESC software by uploading the specified software image file. |
◼ License
This section lets you manage licenses for AT-SESC.
There are two types of licenses: "Base" and "Addon".
- You always need the Base license to run AT-SESC.
- You can optionally install Addon licenses to increase the maximum number of OpenFlow Switches AT-SESC can manage.
Although you can install Addon licenses before installing the Base license, AT-SESC does not work until the Base license is installed.
NoteYou have to manually install the Base license on the AT-SESC running on your server.
| Item Name | Search | Sort | Note |
|---|---|---|---|
| Name | × | △* | |
| Serial Number / Expiration Date | × | △* | |
| Number of Switches | × | △* |
| Item Name | Description |
|---|---|
| The maximum number of concurrent OpenFlow Switch connections | The maximum number of OpenFlow Switches which can be supported by the installed licenses. |
| Name | Name of the license. |
| Serial Number / Expiration Date | Internal serial number of the license. |
| Number of Switches | Number of OpenFlow Switches supported by the license. |
| Item Name | Description |
|---|---|
| Serial Number | Enter a serial number on your license certificate. |
| Authentication Key | Enter the license key on your license certificate. |
| Item Name | Description |
|---|---|
| Delete | Delete the license. |
| Submit | Install the license. |
◼ SSL Certificate
View and configure SSL server certificate of the system.
If you want external applications to interact with AT-SESC via HTTPS, you may have to install an SSL server certificate issued by a trusted certificate authority (CA).
"SSL Certificate" section shows a summary of the installed SSL server certificate.
| Item Name | Description |
|---|---|
| Common Name(CN) | Common name of the web server (AT-SESC). |
| Organization(O) | Organization of the web server. |
| Department(OU) | Organization unit (i.e. department) of the web server. |
| Issue Date | Issue date of the certificate. |
| Expiration Date | Expiration date of the certificate. |
| Serial Number | Serial number of the certificate. |
| Item Name | Description |
|---|---|
| Upload SSL Certificate | Open the SSL Certificate Settings page. |
| Reset | Delete the installed SSL server certificate and restore the default certificate which is self-signed by AT-SESC. |
SSL Certificate Settings
This page lets you install a custom SSL server certificate and a private key.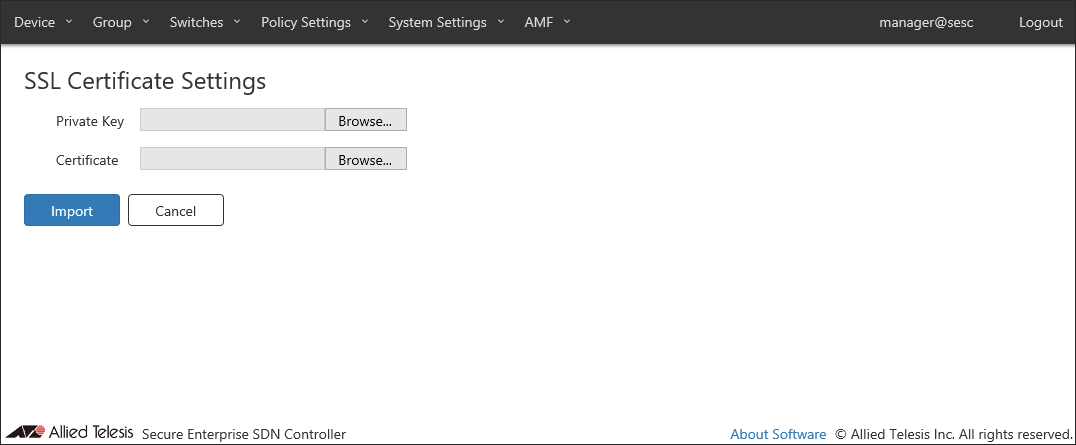
- If your CA provides you with intermediate CA certificates or cross root CA certificates in addition to your server certificate, concatenate those certificates into a single file then upload the file to AT-SESC. Contact the CA for detailed information on how to concatenate certificate files.
- To install a certificate file, it must meet the following requirements.
Table 55: SSL Certificate Requirements
Type X.509, RFC6818 Encryption PEM (Privacy Enhanced Mail) Extension .crt
| Item Name | Description |
|---|---|
| Private Key | Specify a private key file to upload. |
| Certificate | Specify a certificate file to upload. |
| Item Name | Description |
|---|---|
| Import | Import the specified private key and certificate. |
| Cancel | Cancel the operation for importing SSL certificate. |
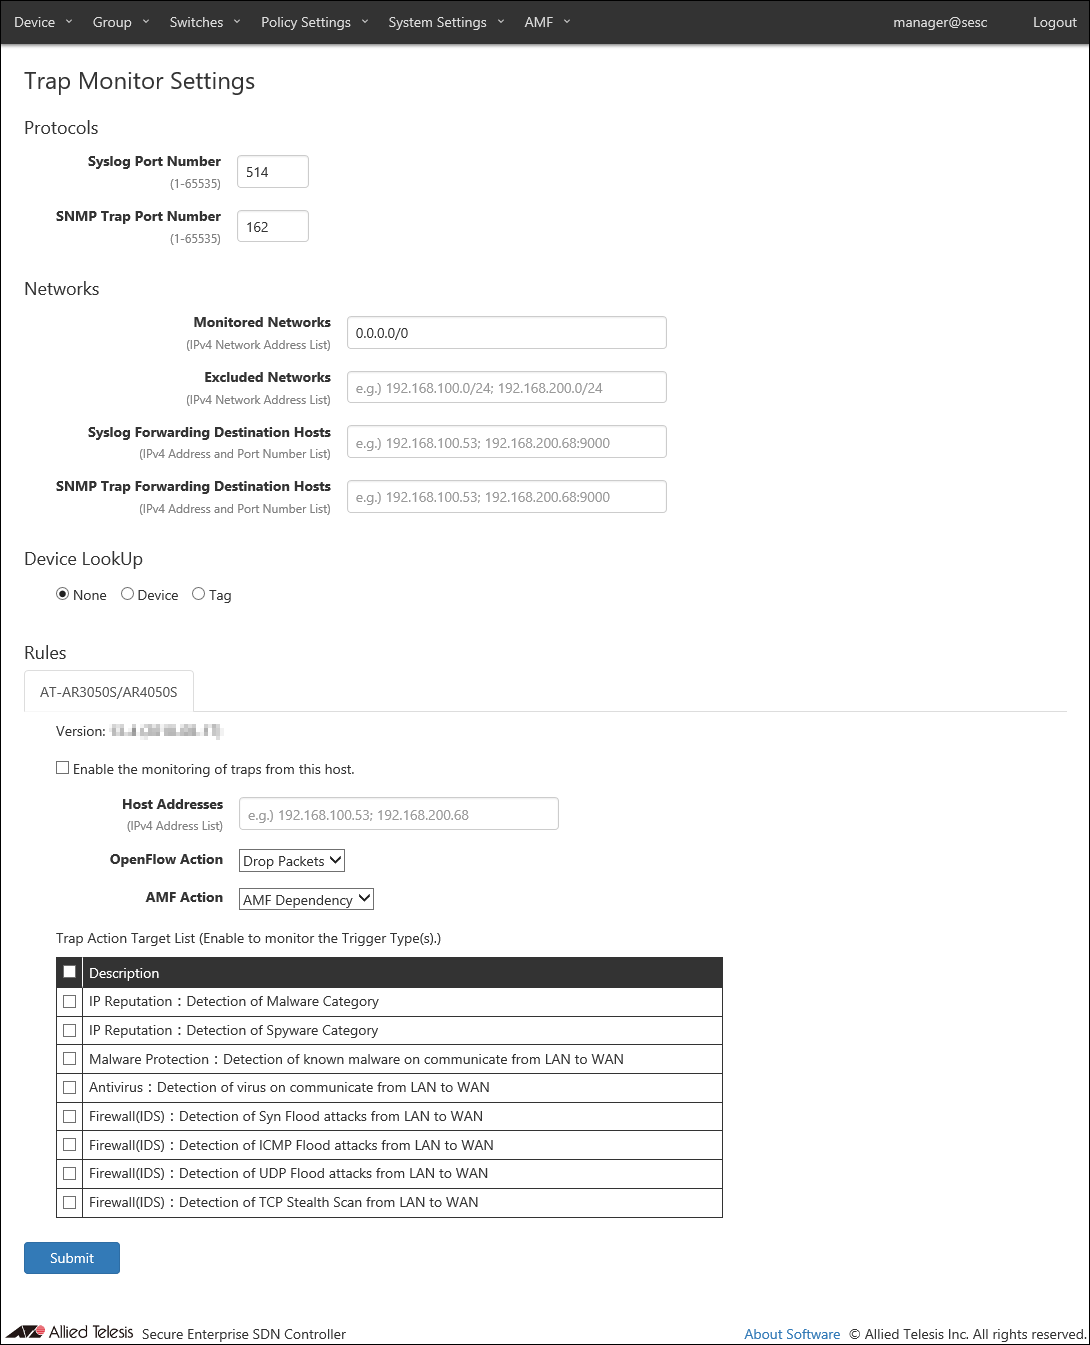
Trap Monitor Settings
This page lets you configure various parameters required for interaction with external applications.You can also setup AT-SESC to forward SNMP traps and syslog messages to other systems.
NoteTrap monitor only responds to specific set of log messages and SNMP traps. You cannot define actions for arbitrary messages and traps.
| Item Name | Description |
|---|---|
| Syslog Port Number | Listening port number to receive syslog messages. Valid range is 1 to 65535. Default is 514. |
| SNMP Trap Port Number | Listening port number to receive SNMP traps. Valid range is 1 to 65535. Default is 162. |
NoteAT-SESC is using several ports internally. Refer to Appendix's TCP or UDP port used by AT-SESC for the ports used by AT-SESC.
◼ Networks
Specify the monitored or unmonitored network, Syslog message, and SNMP Trap transfer destination host.
If Monitored Networks and Excluded Networks overlap, Exclude Networks have precedence.
NoteSome external applications do not respect settings of Monitored Networks and Excluded Networks.
| Item Name | Description |
|---|---|
| Monitored Networks | IPv4 networks to monitor using syslog and trap messages. Multiple networks can be specified by separating each network by a semicolon (;). If this field is empty or 0.0.0.0/0 is specified, all networks are monitored. Default is 0.0.0.0/0. |
| Excluded Networks | IPv4 networks not to monitor. Multiple networks can be specified by separating each network by a semicolon (;). |
| Syslog Forwarding Destination Hosts | Specify a host to which AT-SESC forwards the received syslog messages. The forwarding destination should be in the form of "A.B.C.D:P" where the A.B.C.D is an IPv4 address and P is a port number. Multiple hosts can be specified by separating each address by a semicolon (;). A colon (:) and a port number can be omitted if the host is listening on the default syslog port (514). Source IPv4 address of the forwarded messages are the address of AT-SESC. |
| SNMP Trap Forwarding Destination Hosts | Specify a host to which AT-SESC forwards the received trap messages. The forwarding destination should be in the form of "A.B.C.D:P" where the A.B.C.D is an IPv4 address and P is a port number. A colon (:) and a port number can be omitted if the host is listening on the default trap port (162). Multiple hosts can be specified by separating each address by a semicolon (;). Source IPv4 address of the forwarded messages are the address of AT-SESC. |
◼ Device Lookup
Specify a target range of the action to notify.
| Item Name | Description |
|---|---|
| None | Notify actions on MAC address. |
| Device | Notify actions on Device. |
| Tag | Notify actions on Device Tag. |
NoteDevice Lookup is not supported for AMF Application Proxy's IP-Filter action.
◼ Rules
Trap monitor rules can be updated and added through trap monitor rule files.
By default, trap monitor rules for the UTM functions of AT-AR3050S/AT-AR4050S routers are installed.
NoteTrap monitor rule files are provided by our "AMF-SEC Technology Partner Program". Contact our sales engineer for the Technology Partner Program.
- AT-AR3050S/AR4050S
This tab lets you configure trap monitor rules for the UTM functions of AT-AR3050S/AT-AR4050S routers.
To receive and monitor syslog messages from AT-AR3050S/AT-AR4050S routers, check "Enable the monitoring of traps from this host.".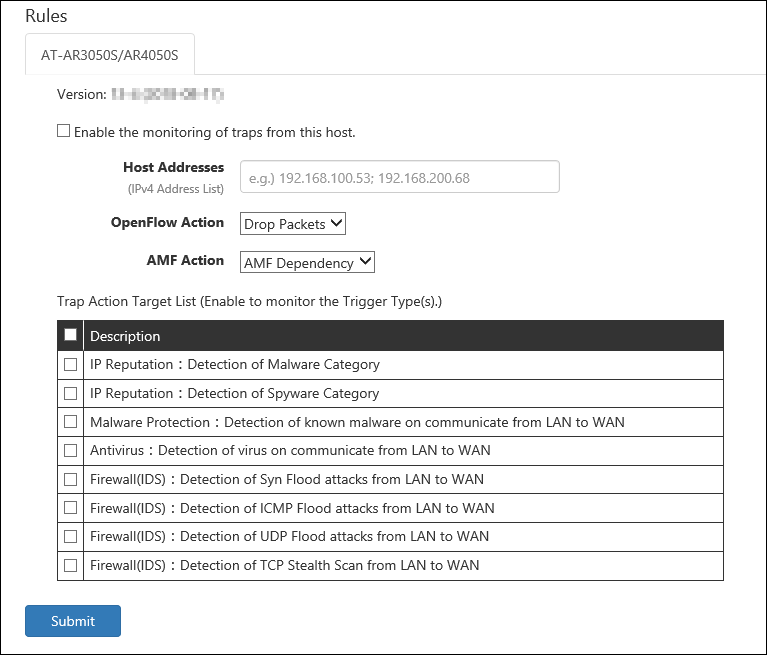
Then, check events which you want to monitor in the "Trap Action Target Trigger" table.
- IP Reputation:Detection of Malware Category
Block traffic from a device when AT-SESC receives a syslog message indicating that the IP reputation feature on the router detects the device tries to communicate with a destination classified as Malware category (Malware C&C server (CnC), Malware-infected host (Bot) or Mobile C&C Server (Mobile_CnC)).
- IP Reputation:Detection of Spyware Category
Block traffic from a device when AT-SESC receives a syslog message indicating that the IP reputation feature on the router detects the device tries to communicate a destination classified as Spyware category (drop site (Drop), Spyware C&C server (SpywareCnC) or Mobile Spyware C&C server (Mobile_Spyware_CnC)).
- Malware Protection:Detection of known malware on communicate from LAN to WAN
Block traffic from a device when AT-SESC receives a syslog message indicating that the malware protection feature on the router detects the known malware on the device.
- Antivirus:Detection of virus on communicate from LAN to WAN
Block traffic from a device when AT-SESC receives a syslog message indicating that the anti-virus feature on the router detects the known virus on the device.
- Firewall(IDS):Detection of Syn Flood attacks from LAN to WAN
Block traffic from a device when AT-SESC receives a syslog message indicating that the firewall's IDS feature on the router detects the SYN Flood attack from the device.
- Firewall(IDS):Detection of ICMP Flood attacks from LAN to WAN
Block traffic from a device when AT-SESC receives a syslog message indicating that the firewall's IDS feature on the router detects the ICMP Flood attack from the device.
- Firewall(IDS):Detection of UDP Flood attacks from LAN to WAN
Block traffic from a device when AT-SESC receives a syslog message indicating that the firewall's IDS feature on the router detects the UDP Flood attack from the device.
- Firewall(IDS):Detection of TCP Stealth Scan from LAN to WAN
Block traffic from a device when AT-SESC receives a syslog message indicating that the firewall's IDS feature on the router detects the TCP Stealth Scan attack from the device.
Note
To use those rules, you also have to configure AT-AR3050S/AT-AR4050S. Refer to the AT-AR3050S/AT-AR4050S's documentation for more details.
Table 61: Displayed columns
Item Name Description Version Version of the Trap Monitor Rules
Table 62: Configurable fields
Item Name Description Host Addresses IPv4 address of AT-AR3050S/AT-AR4050S routers. Multiple hosts can be specified by separating each address by a semicolon (;). Default is unspecified (empty) which means that AT-SESC accepts syslog messages from any IPv4 address. OpenFlow Action Specify an OpenFlow action to run when the event occurs. - Drop Packets: Block traffic from the device.
- Quarantine: Move the device to the quarantine network.
- Log-Only: Record the device information.
AMF Action An action to be taken on the AMF network deploying AMF Application Proxy feature. - Drop Packets: Block traffic from the device at the layer two (MAC) level.
- Link-Down: Shutdown the port where the device is connected.
- Quarantine: Move the port where the device is connected to the quarantine VLAN.
- AMF Dependency: AT-SESC does not specify an action and lets AMF devices determine its action.
- IP-Filter: Block traffic from the device at the layer 3 (IP) level.
- Log-Only: AT-SESC does not specify an action and records the device information.
Note
To use the AMF Action "Log-Only", your Proxy Node and Edge Nodes must have AlliedWare Plus firmware version 5.4.9-0.x or later installed.
Table 63: Buttons
Item Name Description Page Bottom Submit Save the settings. - IP Reputation:Detection of Malware Category
Email Notification Settings
This page lets you configure Email Notifications.You can configure AT-SESC to notify an administrator with an email when an event such as device authentication or block happens.
AT-SESC also sends emails to forward the contents of syslog messages and SNMP traps it receives.
NoteEmail notification of syslog and trap messages are always enabled and cannot be disabled.
NoteWhen changing the Email Notification Settings, the connections with the connected OpenFlow Switch is temporarily disconnected.
AT-SESC queues the Notification Emails by the following rules and tries to resend them upon failure.
- When an event occurs, AT-SESC queues up to 100 emails for the event in the first 10 seconds after the event.
- Queued emails are sent out as a single email after 10 seconds.
- If 100 or more events occur in 10 seconds after the first event, AT-SESC queues them too.
- A Queue is created for each event types of Email Notification Settings.
- AT-SESC attempts up to four retries, i.e. AT-SESC tries to send an email up to 5 times.
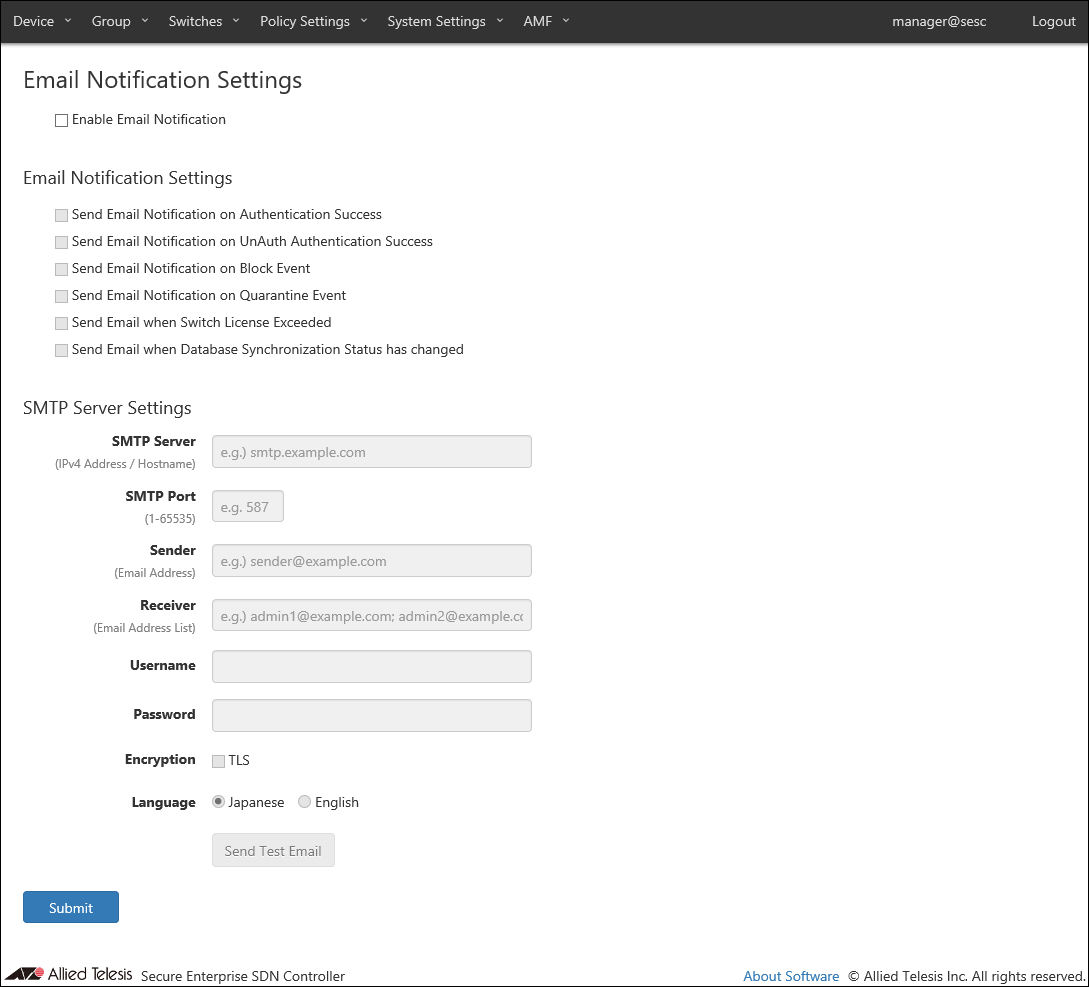
You can enable or disable email notification for each event with checkboxes.
- Send Email Notification on Authentication Success
- Send Email Notification on UnAuth Authentication Success
- Send Email Notification on Block Event
- Send Email Notification on Quarantine Event
- Send Email when Switch License Exceeded
- Send Email when Database Synchronization Status has changed
Note"Send Email Notification on Block Event" or "Send Email Notification on Quarantine Event" is checked, AT-SESC also sends notification email when a device is blocked or quarantined by AMF Application Proxy.
◼ SMTP Server Settings
| Item Name | Description |
|---|---|
| SMTP Server | IPv4 address of a SMTP server which AT-SESC uses to send out emails. |
| SMTP Port | Listening port of the SMTP server. |
| Sender | Mail address of the sender. |
| Receiver | Mail address of the recipient. Multiple addresses can be specified by separating them with a semicolon (;). |
| Username | Username for SMTP authentication. |
| Password | Password for SMTP authentication. |
| Encryption | Check this to use TLS connection to the SMTP server. |
| Language | Select a language used in emails. |
NoteAT-SESC is using several ports internally. Refer to Appendix's TCP or UDP port used by AT-SESC for the ports used by AT-SESC.
NoteIf your browser is configured to use Japanese, some part of emails is written in Japanese even if Language setting for Email Notification is English. If both browser and Email Notification are configured to use English, mail body is written in English. Note that strings contained in authentication data or messages received from an external application are left unchanged.
NoteWhen you want AT-SESC to send notification emails when a device is blocked by the AMF Application Proxy with "Drop Packets", "Link-Down" or "IP-Filter" action, check "Send Email Notification on Block Event" .
| Item Name | Description |
|---|---|
| SMTP Server Settings | |
| Send Test Email | Send a test email. |
| Page Bottom | |
| Submit | Save the SMTP server settings. |
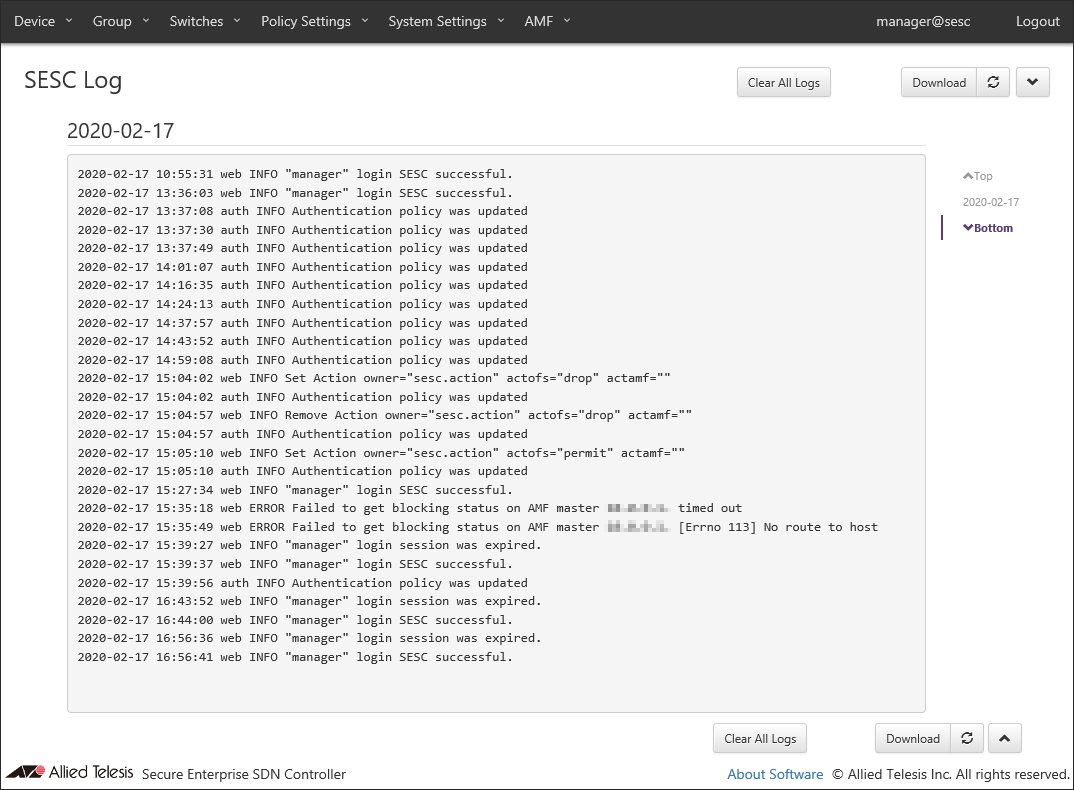
SESC Log
This page shows log messages generated by AT-SESC service. The latest 1000 messages are displayed in this page.You can view messages for a specific date by selecting a date at the right side of the page.
| Item Name | Description |
|---|---|
| Clear All Logs | Clear all log messages. |
| Download | Download the latest log messages (max 300000 messages). |
| Refresh | Refresh SESC Log page. |
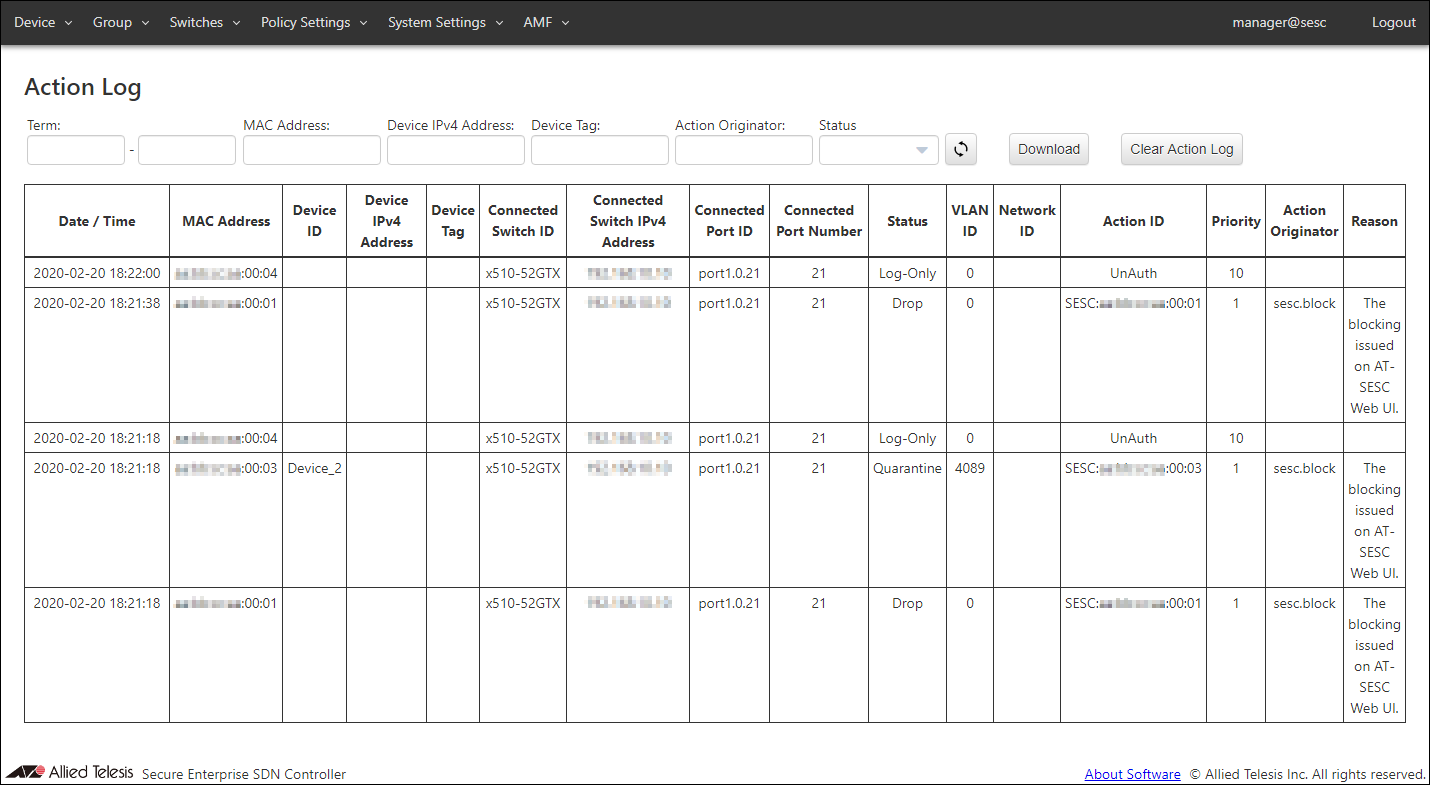
Action Log
This page shows AT-SESC services' log messages related to actions.This page can display up to 320000 log messages. It is possible to filter messages by each field's content.
| Item Name | Description |
|---|---|
| Date / Time | Date / Time the action was applied to a device. |
| MAC Address | MAC address of the device. |
| Device ID | Device ID |
| Device IPv4 Address | IPv4 address of the device. |
| Device Tag | Device Tag |
| Connected Switch ID | ID of the switch to which the device is connected. |
| Connected Switch IPv4 Address | IPv4 address of the connected switch |
| Connected Port ID | ID of the port to which the device is connected. |
| Connected Port Number | Port number of the port to which the device is connected. |
| Status | Type of action applied to the device. |
| VLAN ID | VLAN ID to which the device belongs |
| Network ID | Network ID to which the device belongs |
| Action ID | ID of the action applied to the device |
| Priority | Priority of the action applied to the device |
| Action Originator | Originator of the action applied to the device |
| Reason | Reason of the action applied to the device. |
| Item Name | Description |
|---|---|
| Refresh | Refresh the Action Log page. |
| Download | Download the latest log messages (max 320000 messages). |
| Clear Action Log | Deletes action logs. |
| Item Name | Search | Filter | Sort |
|---|---|---|---|
| Duration | × | − | − |
| MAC Address | × | − | − |
| Device IPv4 Address | × | − | − |
| Device Tag | × | − | − |
| Action Originator | × | − | − |
| Status | − | × | − |
14 Jun 2021 09:30